TG8200_20E.book Page 1 Monday, June 18, 2007 9:03 AM Operating Instructions Digital Cordless Phone Model No. KX-TG8200E KX-TG8202E Digital Cordless Answering System Model No. KX-TG8220E KX-TG8222E KX-TG8200 This unit is compatible with Caller ID and SMS. To use these features, you must subscribe to the appropriate service of your service provider/telephone company. Charge the batteries for about 7 hours before initial use.
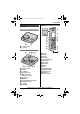
TG8200_20E.book Page 2 Monday, June 18, 2007 9:03 AM Table of Contents Preparation Introduction . . . . . . . . . . . . . . . . . . . . . 3 Accessory information . . . . . . . . . . . . . 4 Important information . . . . . . . . . . . . . 5 Controls . . . . . . . . . . . . . . . . . . . . . . . . 7 Displays. . . . . . . . . . . . . . . . . . . . . . . . 8 Connections . . . . . . . . . . . . . . . . . . . 10 Battery installation and replacement . 11 Battery charge . . . . . . . . . . . . . . . . . .
TG8200_20E.book Page 3 Monday, June 18, 2007 9:03 AM Preparation Introduction Thank you for purchasing a new Panasonic digital cordless phone. For your future reference Attach or keep original receipt to assist with any repair under warranty. Serial No. (found on the bottom of the base unit) Date of purchase Name and address of dealer Note: L This equipment is designed for use on the UK and Republic of Ireland analogue telephone network.
TG8200_20E.book Page 4 Monday, June 18, 2007 9:03 AM Preparation Accessory information Supplied accessories No. Accessory items Quantity KX-TG8200 KX-TG8220 KX-TG8202 KX-TG8222 1 AC adaptor for base unit Part No. PQLV207EZ or PQLV207EY (PQLV207E) 1 1 2 Telephone line cord Part No. PQJA87S (for UK) 1 1 3 Rechargeable batteries AAA (R03) size Part No. HHR-55AAAB 2 4 4 Handset cover*1 Part No. PQYNTG8200E 1 2 5 Charger Part No. PQLV30056Z — 1 6 AC adaptor for charger Part No.
TG8200_20E.book Page 5 Monday, June 18, 2007 9:03 AM Preparation Important information L General L Use only the AC adaptor supplied with this product, noted on page 4. L Do not connect the AC adaptor to any AC outlet other than a standard 220– 240 V AC outlet. L This product is unable to make calls when: – the portable handset battery(ies) need recharging or have failed. – there is a power failure. – the key lock feature is turned on.
TG8200_20E.book Page 6 Monday, June 18, 2007 9:03 AM Preparation or skin. The electrolyte may be toxic if swallowed. L Exercise care when handling the battery(ies). Do not allow conductive materials such as rings, bracelets or keys to touch the battery(ies), otherwise a short circuit may cause the battery(ies) and/or the conductive material to overheat and cause burns.
TG8200_20E.
TG8200_20E.book Page 8 Monday, June 18, 2007 9:03 AM Preparation Using the joystick Push the joystick up, down, left, or right to navigate through menus and to select. Displays Display icons Note: L When selecting menu or the desired item, these operating instructions use the following indication. Example: {^}/{V}: “Off” Push the joystick up or down to select the words in quotations. Adjusting the receiver or speaker volume Push the joystick up or down while on a call.
TG8200_20E.book Page 9 Monday, June 18, 2007 9:03 AM Preparation Icon Meaning Icon f Night mode is on. (page 22) Answer System*2 [1] Handset number (standby display setting, page 20) Handset Setup -1- Base unit number (standby display setting, page 20) h New SMS message received*3 (page 31) j Your written SMS message is over 160 characters.*3 (page 30) m Base Unit Setup Display Setup *1 KX-TG8200/KX-TG8202 *2 KX-TG8220/KX-TG8222 Soft key icons SMS memory is full.
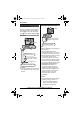
TG8200_20E.book Page 10 Monday, June 18, 2007 9:03 AM Preparation Charger (KX-TG8202/KX-TG8222) Connections C Connect the telephone line cord until it clicks into the base unit and telephone line jack (A). Connect the AC adaptor cord (B) by pressing the plug firmly (C). Hooks Base unit B C To AC mains outlet (220–240 V, 50 Hz) Hooks USE ONLY the supplied AC adaptor (Smaller). A B USE ONLY the supplied AC adaptor. To AC mains outlet (220–240 V, 50 Hz) To telephone line USE ONLY the supplied cord.
TG8200_20E.book Page 11 Monday, June 18, 2007 9:03 AM Preparation – in a convenient, high, and central location. 2 Insert the batteries negative (T) end first. Close the handset cover. Rechargeable Ni-MH ONLY Battery installation and replacement Important: L Use only the supplied rechargeable batteries noted on page 4, 5. L USE ONLY rechargeable Ni-MH batteries AAA (R03) size. L Do NOT use Alkaline/Manganese/NiCd batteries. L Ensure correct polarities (S, T) when installing the batteries.
TG8200_20E.book Page 12 Monday, June 18, 2007 9:03 AM Preparation Base unit*1 Charger*2 *1 The pictured model is KX-TG8200. *2 KX-TG8202/KX-TG8222 Note: L It is normal for the handset to feel warm during charging. L If you want to use the unit immediately, charge the batteries for at least 15 minutes. L Clean the charge contacts of the handset, base unit, and charger with a soft, dry cloth once a month. Clean more often if the unit is subject to the exposure of grease, dust, or high humidity.
TG8200_20E.book Page 13 Monday, June 18, 2007 9:03 AM Preparation 3 Turning the power on/off Push the joystick up or down to select “Time Settings”. i # 4 Push the joystick up or down to select “Set Date & Time”. i # Power on 5 Enter the current date, month, and year. Example: 17 May, 2007 {1}{7} {0}{5} {0}{7} 6 Enter the current hour and minute. Example: 3:30 PM {0}{3} {3}{0} i Press {*} until “03:30 PM” is displayed. 7 # i {ih} Press {ih} for about 1 second.
TG8200_20E.book Page 14 Monday, June 18, 2007 9:03 AM C Making/Answering Calls Making calls 1 Lift the handset and dial the phone number. L To correct a digit, press {C/T}. 2 3 {C} When finished talking, press {ih} or place the handset on the base unit or charger. Speakerphone 1 During a conversation, press {s} to turn on the speakerphone. L Speak alternately with the caller. 2 When finished talking, press {ih}. Note: L For best performance, use the speakerphone in a quiet environment.
TG8200_20E.book Page 15 Monday, June 18, 2007 9:03 AM C Making/Answering Calls will probably need to pause after dialling {0} until you hear a dial tone. 1 2 {0} i l Dial the phone number. i {C} Note: L A 3 second pause is inserted each time l is pressed. Repeat as needed to create longer pauses. Answering calls 1 2 Lift the handset and press {C} or {s} when the unit rings. L You can also answer the call by pressing any dial key from {0} to {9}, {*}, or {#}.
TG8200_20E.book Page 16 Monday, June 18, 2007 9:03 AM C Making/Answering Calls 3 {^}/{V}: “High Tone” or “Low Tone” i # L d is displayed. To join the conversation, press {C} or {s} when the other handset is on an outside call. Key lock Call privacy The handset can be locked so that no calls or settings can be made. Incoming calls can be answered, but all other functions are disabled while key lock is on. To turn key lock on, press " (centre of joystick) for about 3 seconds. L ! is displayed.
TG8200_20E.book Page 17 Monday, June 18, 2007 9:03 AM k Phonebook Handset phonebook The handset phonebook allows you to make calls without having to dial manually. You can add 200 names and phone numbers, assign each handset phonebook entry to the desired category. Adding entries 1 n (left soft key) i " 2 {^}/{V}: “New Entry” i # 3 Enter the party’s name (16 characters max.; page 44). i # 4 Enter the party’s phone number (24 digits max.). i # 5 {^}/{V}: Select the desired category.
TG8200_20E.book Page 18 Monday, June 18, 2007 9:03 AM k Phonebook 3 {^}/{V}: Select the category you want to search. i # L If you select “All”, the unit will end the category search. 4 {^}/{V}: Scroll through the phonebook if necessary. 5 {C} Editing entries 1 Find the desired entry (page 17). i" 2 3 {^}/{V}: “Edit” i # 4 Edit the phone number if necessary (24 digits max.). i # 5 {^}/{V}: Select the desired category.
TG8200_20E.book Page 19 Monday, June 18, 2007 9:03 AM k Phonebook Chain dial This feature allows you to dial phone numbers in the handset phonebook while you are on a call. This feature can be used, for example, to dial a calling card access number or bank account PIN that you have stored in the handset phonebook, without having to dial manually. 1 2 3 While on a call, press n. {^}/{V}: Select the desired entry. Press # to dial the number. Helpline Tel. No.: U.K. 0844 844 3898 R.O.I.
TG8200_20E.book Page 20 Monday, June 18, 2007 9:03 AM N Handset Settings Handset settings To customise the handset: 1 2 3 " (centre of joystick) 4 Push the joystick up or down to select the desired item in the sub-menu. i # L In some cases, you may need to select from a second sub-menu. i # 5 Push the joystick up or down to select the desired setting then press #. L This step may vary depending on the feature being programmed. L To exit the operation, press {ih}.
TG8200_20E.book Page 21 Monday, June 18, 2007 9:03 AM N Handset Settings Menu Sub-menu Sub-menu 2 Details (default setting) Other Options Keytones (“On”) Auto Talk (“Off”): page 15 *1 When the ringer volume is turned off, ~ is displayed and the handset does not ring for outside calls.
TG8200_20E.book Page 22 Monday, June 18, 2007 9:03 AM N Handset Settings Special instructions for time settings Special instructions for ringer setup Alarm Night mode An alarm will sound for 3 minutes at the set time once or daily. Set the date and time beforehand (page 13). Off Turns alarm off. Press # again, then press {ih} to finish. Once The alarm sounds once at the set time. Enter the desired date and month.
TG8200_20E.book Page 23 Monday, June 18, 2007 9:03 AM N Handset Settings 4 5 {^}/{V}: “On/Off” i # {^}/{V}: “On” or “Off” i # i {ih} L When the night mode is set, f is displayed. Setting the ring delay This setting allows the handset to ring during night mode if the caller waits long enough. After the selected amount of time passes, the handset will ring. If you select “No Ringing”, the handset will not ring during night mode.
TG8200_20E.book Page 24 Monday, June 18, 2007 9:03 AM | Base Unit Settings Base unit settings To customise the base unit using the handset: 1 2 3 " (centre of joystick) 4 5 Push the joystick up or down to select the desired item in the sub-menu. i # Select | by pushing the joystick in any direction. i # Push the joystick up or down to select the desired item in the base unit settings menu. i # Push the joystick up or down to select the desired setting then press #.
TG8200_20E.book Page 25 Monday, June 18, 2007 9:03 AM | Base Unit Settings Special instructions for call options Setting call restriction You can restrict selected handsets from dialling certain numbers. You can assign up to 6 phone numbers to be restricted, and select which handsets will be restricted. Storing area codes here will prevent the restricted handsets from dialling any phone number in that area code.
TG8200_20E.book Page 26 Monday, June 18, 2007 9:03 AM j Caller ID Service Using Caller ID service Important: L This unit is Caller ID compatible. To use Caller ID features (such as displaying caller phone numbers), you must subscribe to Caller ID service. Consult your service provider/telephone company for details. Caller ID features When an outside call is received, the caller’s phone number will be displayed. L Phone numbers of the last 50 callers will be logged in the caller list.
TG8200_20E.book Page 27 Monday, June 18, 2007 9:03 AM j Caller ID Service 4 {^}/{V}: Select the current setting of the category ringtone. i # 5 {^}/{V}: Select the desired ringtone. i # i {ih} Changing category display colours If you select “Display Colour”, the unit will use the display colour you set on page 20 when calls from this category are received. The default setting is “Display Colour”. 1 2 3 4 n (left soft key) i " 5 {^}/{V}: Select the desired colour.
TG8200_20E.book Page 28 Monday, June 18, 2007 9:03 AM j Caller ID Service Voice mail service Voice mail is an automatic answering service offered by your service provider/telephone company. If you subscribe to this service, your service provider/telephone company’s voice mail system will answer calls for you when you are unavailable to answer the phone or when your line is busy. Messages are recorded by your service provider/telephone company, not your telephone.
TG8200_20E.book Page 29 Monday, June 18, 2007 9:03 AM X SMS (Short Message Service) Using SMS SMS allows you to send and receive text messages between other fixed-line and mobile phones that support compatible SMS networks and features. Important: L To use SMS features, you must: – subscribe to Caller ID and/or appropriate service – confirm SMS is turned on – confirm the correct message centre numbers are stored Consult your service provider/telephone company for details and availability.
TG8200_20E.book Page 30 Monday, June 18, 2007 9:03 AM X SMS (Short Message Service) Note: L For PBX users: – You need to add the PBX line access number and a dialling pause to the beginning of the Message Centre 1 phone number. – If you only use the Message Centre 1 phone number for SMS, store the Message Centre 1 phone number as is (without adding a line access number or dialling pause) to Message Centre 2. created by pushing the joystick up. 4 Enter the message (page 44).
TG8200_20E.book Page 31 Monday, June 18, 2007 9:03 AM may treat long messages differently from other messages. Consult your service provider/telephone company for details. L If your phone is connected to a PBX, store the PBX line access number (page 33). Sending a saved message 1 " (centre of joystick) i X i # 2 Proceed with the desired operation. ■ To access the public mailbox {^}/{V}: “Public” i # ■ To access a private mailbox {^}/{V}: Select the desired mailbox. i # i Enter its password.
TG8200_20E.book Page 32 Monday, June 18, 2007 9:03 AM X SMS (Short Message Service) ■ To access a private mailbox {^}/{V}: Select the desired mailbox. i # i Enter its password. L If a mailbox contains new (unread) SMS messages, “@” is displayed next to the total number of messages for that mailbox. 3 4 5 {^}/{V}: “Receive List” i # {^}/{V}: Select a message. L Messages which have already been read are indicated by a “Q”, even if they were read using another handset. L To erase a message, press W.
TG8200_20E.book Page 33 Monday, June 18, 2007 9:03 AM 5 {^}/{V}: Select the desired new mailbox number (“Mailbox1” to “Mailbox6”). i # X SMS (Short Message Service) 9 {^}/{V}: “Save” i # i {ih} 6 Enter a name for the mailbox (5 characters max.; page 44). i # 7 Storing the PBX line access number (for PBX users only) Enter a 4-digit password for the mailbox. i # 8 {^}/{V}: “Save” i # i {ih} Store your PBX line access number (4 digits max.) so that SMS messages are sent properly.
TG8200_20E.book Page 34 Monday, June 18, 2007 9:03 AM I Answering System Features Answering system Available for: KX-TG8220/KX-TG8222 The answering system can answer and record calls for you when you are unavailable to answer the phone. You can also record phone conversations (page 16). Important: L Only 1 person can access the answering system (listen to messages, record a greeting message, etc.) at a time. L When callers leave messages, the unit records the date and time of each message.
TG8200_20E.book Page 35 Monday, June 18, 2007 9:03 AM I Answering System Features a different pre-recorded greeting message asking callers to call again. L If there are no new messages, the base unit plays back all messages. Playing back the greeting message 1 " (centre of joystick) i I i Using the handset # 2 {^}/{V}: “Play Greeting” i # i {ih} Erasing the greeting message If you erase your own greeting message, the unit will play a pre-recorded greeting message for callers.
TG8200_20E.book Page 36 Monday, June 18, 2007 9:03 AM I Answering System Features 2 {^}/{V}: “Erase Message” i # 3 4 Operation {6} Play greeting message {^}/{V}: “Erase All” i # {7}{6} {^}/{V}: “Yes” i # i {ih} Record greeting message {8} Turn answering system on Calling back (Caller ID subscribers only) If caller information was received for the call, you can call the caller back while listening to a message. 1 2 Key Press " during playback.
TG8200_20E.book Page 37 Monday, June 18, 2007 9:03 AM I Answering System Features 3 4 5 {^}/{V}: “Remote Code” i # Key Operation To turn on remote operation, enter a 3-digit remote access code. L To turn off remote operation, press {*}.
TG8200_20E.book Page 38 Monday, June 18, 2007 9:03 AM I Answering System Features Answering system settings Setting (default setting) Page Answering system on/off (Answer On) 34 Remote access code (–) 36 Number of rings (4 Rings) 38 Caller’s recording time (3 Minutes) 38 Call screening (On) 39 Number of rings You can change the number of times the phone rings before the unit answers calls. You can select 2 to 7 rings, or “Auto”.
TG8200_20E.book Page 39 Monday, June 18, 2007 9:03 AM I Answering System Features Call screening While a caller is leaving a message, you can screen the call through the handset speaker. 1 " (centre of joystick) i I i # 2 3 {^}/{V}: “Settings” i # 4 {^}/{V}: “On” or “Off” i # i {ih} {^}/{V}: “Call Screening” i # Helpline Tel. No.: U.K. 0844 844 3898 R.O.I.
TG8200_20E.book Page 40 Monday, June 18, 2007 9:03 AM Multi-unit Operation Operating additional units Additional handsets Up to 6 handsets can be registered to a single base unit. Important: L The additional handset model recommended for use with this unit is noted on page 4. If other model handset is used, certain operations (handset settings, base unit settings, etc.) may not be available.
TG8200_20E.book Page 41 Monday, June 18, 2007 9:03 AM Multi-unit Operation L When the handset has been registered successfully, w will stop flashing. If the key tone is turned on (page 21), a confirmation tone will be heard. L To cancel a selected handset number, press the number again. The number will stop flashing. 5 {^}/{V}: “Yes” i # L A long beep will sound as each handset number disappears. L The handset does not beep when cancelling its own registration.
TG8200_20E.book Page 42 Monday, June 18, 2007 9:03 AM Multi-unit Operation Important: L Before registering the repeater to this base unit, you must turn the repeater mode on. L Do not use more than one repeater at a time. Setting the repeater mode 1 " (centre of joystick) i | i # 2 {^}/{V}: “Other Options” i # 3 {^}/{V}: “Repeater Mode” i # 4 {^}/{V}: “On” or “Off” i # i {ih} Note: L After turning repeater mode on or off, w will flash on the handset momentarily. This is normal.
TG8200_20E.book Page 43 Monday, June 18, 2007 9:03 AM Multi-unit Operation Note: L If the other handset user does not answer the call within 1 minute, the call will ring at your handset again. 4 {ih} Copying phonebook entries You can copy handset phonebook entries to the handset phonebook of another compatible Panasonic handset. Note: L Category settings for phonebook entries are not copied. Copying one entry 1 Find the desired handset phonebook entry (page 17).
TG8200_20E.book Page 44 Monday, June 18, 2007 9:03 AM Useful Information Character entry The dial keys are used to enter characters and numbers. Each dial key has multiple characters assigned to it. The available character entry modes are Alphabet (ABC), Numeric (0-9), Greek (F), Extended 1 (G), Extended 2 (H), and Cyrillic (I). For SMS messages, Alphabet (ABC), Numeric (0-9), Greek (F), and Extended (G) modes are available.
TG8200_20E.book Page 45 Monday, June 18, 2007 9:03 AM Useful Information Greek character table (M) Extended 1 character table (N) L The following are used for both uppercase and lowercase: Extended 2 character table (O) L The following are used for both uppercase and lowercase: Cyrillic character table (P) Helpline Tel. No.: U.K. 0844 844 3898 R.O.I.
TG8200_20E.book Page 46 Monday, June 18, 2007 9:03 AM Useful Information When writing SMS messages Alphabet character table (ABC) Numeric entry table (0-9) Greek character table (M) Extended character table (N) L The following are used for both uppercase and lowercase: 46 Helpline Tel. No.: U.K. 0844 844 3898 R.O.I.
TG8200_20E.book Page 47 Monday, June 18, 2007 9:03 AM Useful Information Error messages Error message Cause & solution Answer Sys. Full*1 L Erase unnecessary messages (page 35). Error*1 L Recording was too short. Try again. Failed L Phonebook copy failed. Confirm the other handset (the receiver) is in standby mode and try again. Incomplete L The receiver’s phonebook memory is full. Erase the unnecessary phonebook entries from the other handset (the receiver) and try again.
TG8200_20E.book Page 48 Monday, June 18, 2007 9:03 AM Useful Information Troubleshooting If you still have difficulties after following the instructions in this section, disconnect the base unit AC adaptor and turn off the handset, then reconnect the base unit AC adaptor and turn on the handset. Telephone Problem Cause & solution w is flashing. L The handset is not registered to the base unit. Register it (page 40). L The handset is too far from the base unit. Move closer.
TG8200_20E.book Page 49 Monday, June 18, 2007 9:03 AM Useful Information Problem Cause & solution I cannot make or receive calls. L The base unit AC adaptor or telephone line cord is not connected. Check the connections. L If you are using a splitter to connect the unit, remove the splitter and connect the unit to the wall socket directly. If the unit operates properly, check the splitter. L Disconnect the base unit from the telephone line and connect the line to a known working telephone.
TG8200_20E.book Page 50 Monday, June 18, 2007 9:03 AM Useful Information Problem Cause & solution I fully charged the batteries, but ) still flashes. L Clean the charge contacts and charge again (page 11). L It is time to replace the batteries (page 11). I fully charged the batteries, but the operating time seems to be short. L Wipe the battery ends (S, T) and the unit contacts with a dry cloth. Caller information is not displayed. L You need to subscribe to Caller ID service.
TG8200_20E.book Page 51 Monday, June 18, 2007 9:03 AM Useful Information SMS (Short Message Service) Problem Cause & solution I cannot send or receive SMS messages. L You have not subscribed to the appropriate service. Consult your service provider/telephone company. L The SMS message centre number(s) are not stored or are incorrect. Store the correct numbers (page 29). L Message transmission was interrupted. Wait until the message has been sent before using other telephone functions.
TG8200_20E.book Page 52 Monday, June 18, 2007 9:03 AM Useful Information Problem Cause & solution I cannot operate the answering system with the handset. L The base unit or another handset is being used. Wait for the other user to finish. L A caller is leaving a message. Wait for the caller to finish. L The handset is too far from the base unit. Move closer.
TG8200_20E.book Page 53 Monday, June 18, 2007 9:03 AM Useful Information Specifications ■ Standard: DECT (Digital Enhanced Cordless Telecommunications), GAP (Generic Access Profile) ■ Number of channels: 120 Duplex Channels ■ Frequency range: 1.88 GHz to 1.90 GHz ■ Duplex procedure: TDMA (Time Division Multiple Access) ■ Channel spacing: 1,728 kHz ■ Bit rate: 1,152 kbit/s ■ Modulation: GFSK (Gaussian Frequency Shift Keying) ■ RF transmission power: Approx.
TG8200_20E.book Page 54 Monday, June 18, 2007 9:03 AM Useful Information Conditions of guarantee This guarantee is in addition to and does not in any way affect any statutory or other rights of consumer purchasers. If within the applicable guarantee period, the appliance proves to be defective by reason of faulty design, workmanship or materials, we undertake subject to the following conditions to have the defective appliance (or any part or parts there of) repaired or replaced free of charge. 1.
TG8200_20E.
TG8200_20E.book Page 59 Monday, June 18, 2007 9:03 AM Sales and support information Customer Care Centre L For customers within the UK: 0844 844 3898 L For customers within the Republic of Ireland: 01289 8333 L Visit our website for product information: www.panasonic.co.uk L E-mail: customer.care@panasonic.co.