TG93XX_OI.book Page 1 Monday, August 18, 2008 2:42 PM Operating Instructions Expandable Digital Cordless Answering System Model No. KX-TG9331 KX-TG9341 with 2 Handsets Model No. KX-TG9332 KX-TG9342 with 3 Handsets Model No. KX-TG9333 KX-TG9343 with 4 Handsets Model No. KX-TG9334 KX-TG9344 Model shown is KX-TG9331. This unit is compatible with Caller ID. You must subscribe to the appropriate service offered by your service provider/telephone company.
TG93XX_OI.book Page 2 Monday, August 18, 2008 2:42 PM Table of Contents Introduction Voice Mail Service Product information . . . . . . . . . . . . . . . 3 Accessory information . . . . . . . . . . . . . 5 For your safety . . . . . . . . . . . . . . . . . . 7 Important safety instructions . . . . . . . . 8 For best performance . . . . . . . . . . . . . 8 Voice mail service. . . . . . . . . . . . . . . 40 Preparation Controls . . . . . . . . . . . . . . . . . . . . . . . 10 Display. . . . . . . . . . .
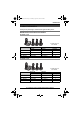
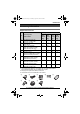
TG93XX_OI.book Page 3 Monday, August 18, 2008 2:42 PM Introduction Product information Thank you for purchasing a new Panasonic digital cordless phone. Notable differences between the models KX-TG9331 series L Model shown is KX-TG9334. Base unit Model No. Handset Part No. Part No. KX-TG9331 KX-TG9331 KX-TGA931 Quantity 1 KX-TG9332 KX-TG9331 KX-TGA931 2 KX-TG9333 KX-TG9331 KX-TGA931 3 KX-TG9334 KX-TG9331 KX-TGA931 4 KX-TG9341 series L Model shown is KX-TG9344.
TG93XX_OI.book Page 4 Monday, August 18, 2008 2:42 PM Introduction Feature differences Intercom Model No. Making/answering calls with base unit N ⇔ N*1 KX-TG9331 r*2 KX-TG9332 r – KX-TG9333 r – KX-TG9334 r – KX-TG9341 r *2 – r KX-TG9342 r r KX-TG9343 r r KX-TG9344 r r *1 Intercom calls can be made between the handsets. *2 Intercom calls can be made between the handsets by purchasing and registering one or more optional handsets (page 6).
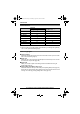
TG93XX_OI.book Page 5 Monday, August 18, 2008 2:42 PM Introduction Accessory information Supplied accessories Quantity No.
TG93XX_OI.book Page 6 Monday, August 18, 2008 2:42 PM Introduction Additional/replacement accessories Please contact your nearest Panasonic dealer for sales information. No. Accessory item Order number 1 Headset KX-TCA60, KX-TCA86, KX-TCA92, KX-TCA93, KX-TCA94, KX-TCA95 2 T-adaptor KX-J66 3 Battery back-up power supply KX-TCA230 4 Wall mounting adaptor for base unit PNKL1001Z1 (Black metallic) PNKL1001Z2 (Pearl silver) 1 2 3 L Headset shown is KX-TCA86.
TG93XX_OI.book Page 7 Monday, August 18, 2008 2:42 PM Introduction For your safety To prevent severe injury and loss of life/property, read this section carefully before using the product to ensure proper and safe operation of your product. WARNING Power connection L Use only the power source marked on the product. L Do not overload power outlets and extension cords. This can result in the risk of fire or electric shock. L Completely insert the AC adaptor/power plug into the power outlet.
TG93XX_OI.book Page 8 Monday, August 18, 2008 2:42 PM Introduction L Never touch uninsulated telephone wires or terminals unless the telephone line has been disconnected at the network interface. L Use caution when installing or modifying telephone lines. L The AC adaptor is used as the main disconnect device. Ensure that the AC outlet is installed near the product and is easily accessible. L This product is unable to make calls when: – the handset batteries need recharging or have failed.
TG93XX_OI.book Page 9 Monday, August 18, 2008 2:42 PM Introduction computers, wireless devices or other phones. – avoid facing radio frequency transmitters, such as external antennas of mobile phone cell stations (avoid putting the base unit on a bay window or near a window). L Coverage and voice quality depends on the local environmental conditions. L If the reception for a base unit location is not satisfactory, move the base unit to another location for better reception.
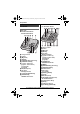
TG93XX_OI.book Page 10 Monday, August 18, 2008 2:42 PM Preparation ■ KX-TG9341/KX-TG9342/ KX-TG9343/KX-TG9344 Controls A B C D E F G HIJ Base unit ■ KX-TG9331/KX-TG9332/ KX-TG9333/KX-TG9334 A B C D E F K GH I J A B C D E F G H I J K K Charge contacts Speaker {■} (STOP) {ERASE} {GREETING REC} (Recording) {GREETING CHECK} {^} (VOL.: Volume up) {V} (VOL.
TG93XX_OI.book Page 11 Monday, August 18, 2008 2:42 PM Preparation Handset I J A B C D E F K Using the navigator key The handset navigator key can be used to navigate through menus and to select items shown on the display by pressing {^}, {V}, {<}, or {>}. To adjust the receiver or speaker volume, press {^} to increase the volume, or press {V} to decrease the volume repeatedly while talking.
TG93XX_OI.book Page 12 Monday, August 18, 2008 2:42 PM Preparation Charger Connections Connect the AC adaptor cord (A) by pressing the plug firmly (B). Connect the telephone line cord until it clicks into the base unit and telephone line jack (C). Available for: KX-TG9332/KX-TG9333/ KX-TG9334/KX-TG9342/ KX-TG9343/KX-TG9344 L Use only the supplied Panasonic AC adaptor PQLV209 or PQLV219. Base unit L Use only the supplied Panasonic AC adaptor PQLV207 or PQLV219.
TG93XX_OI.book Page 13 Monday, August 18, 2008 2:42 PM Preparation If you subscribe to a DSL/ADSL service Please attach a DSL/ADSL filter (contact your DSL/ADSL provider) to the telephone line between the base unit and the telephone line jack in the event of the following: – noise is heard during conversations. – Caller ID features do not function properly. To single-line telephone jack (RJ11C) – We recommend using the Panasonic rechargeable batteries noted on page 6, 8.
TG93XX_OI.book Page 14 Monday, August 18, 2008 2:42 PM Preparation Attention: A nickel metal hydride battery that is recyclable powers the product you have purchased. Please call 1-800-8-BATTERY (1-800822-8837) for information on how to recycle this battery. Battery charge Place the handset on the base unit or charger for about 7 hours before initial use. L While charging, “Charging” is displayed and the charge indicator on the handset lights up.
TG93XX_OI.book Page 15 Monday, August 18, 2008 2:42 PM Preparation Operation Operating time Symbol Meaning While using the clarity booster feature (page 20) 3 hours max. {V}/{^}: “” Press {V} or {^} to select the words in quotations. Example: {V}/{^}: “Off” Note: L Actual battery performance depends on a combination of how often the handset is in use and how often it is not in use (standby).
TG93XX_OI.book Page 16 Monday, August 18, 2008 2:42 PM Preparation 3 {Save} i {OFF} Date and time 1 {MENU} i {#}{1}{0}{1} 2 Enter the current month, date, and year by selecting 2 digits for each. Example: July 15, 2008 {0}{7} {1}{5} {0}{8} 3 Enter the current hour and minute (12-hour clock format) by selecting 2 digits for each. Example: 9:30 {0}{9} {3}{0} 4 5 {AM/PM}: Select “AM” or “PM”. Belt clip You can hang the handset on your belt or pocket using the supplied belt clip.
TG93XX_OI.book Page 17 Monday, August 18, 2008 2:42 PM Making/Answering Calls Making calls Using the handset 1 Lift the handset and dial the phone number. L To correct a digit, press {Clear}. 2 3 Press {C} or {Call}. When you finish talking, press {OFF} or place the handset on the base unit or charger. Using the speakerphone 1 2 Dial the phone number, and press {s}. L Speak alternately with the other party. When you finish talking, press {OFF}.
TG93XX_OI.book Page 18 Monday, August 18, 2008 2:42 PM Making/Answering Calls – Press {C} on the handset, then press {SP-PHONE} on the base unit. – If the handset is on the base unit, simply lift it. Adjusting the speaker volume Press {^} or {V} repeatedly while talking. Redialing the last number dialed {SP-PHONE} i {REDIAL} Temporary handset ringer off While the handset is ringing for a call, you can turn the ringer off temporarily by pressing {OFF}.
TG93XX_OI.book Page 19 Monday, August 18, 2008 2:42 PM Making/Answering Calls Useful features during a call Hold This feature allows you to put an outside call on hold. Handset 1 Press {HOLD} 2 times during an outside call. 2 To release hold, press {C}. L Another handset user can take the call by pressing {C}. L The base unit user can take the call by pressing {SP-PHONE}.
TG93XX_OI.book Page 20 Monday, August 18, 2008 2:42 PM Making/Answering Calls For call waiting or Call Waiting Caller ID service users To use call waiting, you must first subscribe to the call waiting service of your service provider/telephone company. This feature allows you to receive calls while you are already talking on the phone. If you receive a call while on the phone, you will hear a call waiting tone.
TG93XX_OI.book Page 21 Monday, August 18, 2008 2:42 PM Shared Phonebook Key Shared phonebook The shared phonebook allows you to make calls without having to dial manually. Any handset registered to the base unit can use the shared phonebook. You can add 50 names and phone numbers to the shared phonebook. Important: L Only 1 person can access the shared phonebook at a time. Adding entries 1 {Phonebook} 2 {Add} 3 Enter the party’s name (16 5 Enter the party’s phone number (32 digits max.).
TG93XX_OI.book Page 22 Monday, August 18, 2008 2:42 PM Shared Phonebook Editing entries 1 Find the desired entry (page 21). i {Option} 2 3 {V}/{^}: “Edit” i {Select} 4 Edit the phone number if necessary (32 digits max.). i {Next} i {Save} i {OFF} Edit the name if necessary (16 characters max.; page 21). i {Next} Erasing entries 1 Find the desired entry (page 21). 2 {Erase} i {Yes} i {OFF} Chain dial This feature allows you to dial phone numbers in the phonebook while you are on a call.
TG93XX_OI.book Page 23 Monday, August 18, 2008 2:42 PM Programming Programmable settings You can customize the unit by programming the following features using the handset. To access the features, there are 2 methods: – scrolling through the display menus (page 23) – using the direct commands (page 25) L Mainly the direct command method is used in these operating instructions. Programming by scrolling through the display menus 1 {MENU} 2 Press {V} or {^} to select the desired main menu.
TG93XX_OI.
TG93XX_OI.book Page 25 Monday, August 18, 2008 2:42 PM Programming Programming using the direct commands 1 {MENU} i {#} 2 Enter the desired feature code. 3 Enter the desired setting code. i {Save} L This step may vary depending on the feature being programmed. L To exit the operation, press {OFF}. Note: L In the following table, < > indicates the default settings.
TG93XX_OI.
TG93XX_OI.book Page 27 Monday, August 18, 2008 2:42 PM Programming *5 If you select one of the melody ringer tones, the ringer tone will continue to play for several seconds even if the caller has already hung up. You may either hear a dial tone or no one on the line when you answer the call. *6 The flash time depends on your telephone exchange or host PBX. Contact your PBX supplier if necessary. The setting should stay at “700ms” unless pressing {FLASH} fails to pick up the waiting call.
TG93XX_OI.book Page 28 Monday, August 18, 2008 2:42 PM Programming Special instructions for programmable settings Block calls (Caller ID subscribers only) This feature allows the unit to reject calls from specified phone numbers that you do not want to answer such as junk calls. You can store up to 20 phone numbers in the block call list by using the caller list or by entering the numbers directly. When a call is received, the unit rings for a short time while identifying the caller.
TG93XX_OI.book Page 29 Monday, August 18, 2008 2:42 PM Programming off (page 34) in addition to turning the night mode on. L If you have set the alarm, the alarm sounds even if the night mode is turned on. – “It’s time for dinner” – “It’s time for lunch” – “It’s time for the game” – “It’s time for your meeting” – “It’s time to pick up the children” – “Happy birthday” The unit makes the selected announcement at the set time (talking alarm clock).
TG93XX_OI.book Page 30 Monday, August 18, 2008 2:42 PM Programming the first handset makes the announcement, while the other handsets only sound the tone. L If the other unit is in use at the set time, the handsets sound the tone instead of the selected announcement. L If you select “Once”, the setting changes to “Off” after the alarm sounds. L When the ringer volume for outside calls is set to off (page 26), the alarm sound is heard at a low level.
TG93XX_OI.book Page 31 Monday, August 18, 2008 2:42 PM Caller ID Service Using Caller ID service Important: L This unit is Caller ID compatible. To use Caller ID features, you must subscribe to Caller ID service. Contact your service provider/telephone company for details. Caller ID features When an outside call is being received, the name and phone number are displayed. Caller information for the last 50 callers is logged in the caller list from the most recent call to the oldest.
TG93XX_OI.book Page 32 Monday, August 18, 2008 2:42 PM Caller ID Service Ringer ID This feature can help you identify who is calling by using different ringers for different callers stored in the phonebook. You can assign a different ringer to each phonebook entry. When a call is received from a caller stored in the phonebook, the assigned ringer rings after the caller information is displayed.
TG93XX_OI.book Page 33 Monday, August 18, 2008 2:42 PM Caller ID Service – After the call is ended, the phone number of the caller, when reviewed from the Caller list, is displayed in the same Format as the Edited Number. For example, you can use this feature to set the unit to ignore the area code of callers in your area code, so that you can call these local numbers using caller information without dialing the area code.
TG93XX_OI.book Page 34 Monday, August 18, 2008 2:42 PM Answering System Answering system The answering system can answer and record calls for you when you are unavailable to answer the phone. You can also set the unit to play a greeting message but not to record caller messages. Select “Greeting only” as the recording time setting (page 39). Important: L Only 1 person can access the answering system (listen to messages, record a greeting message, etc.) at a time.
TG93XX_OI.book Page 35 Monday, August 18, 2008 2:42 PM Answering System Greeting message When the unit answers a call, callers are greeted by a greeting message. You can record your own greeting message or use a pre-recorded greeting message. Recording your greeting message You can record your own greeting message (2 minutes max.). 1 2 {GREETING REC} 3 After the base unit beeps, speak clearly about 20 cm (8 inches) away from the MIC. 4 Press {■} (STOP) to stop recording.
TG93XX_OI.book Page 36 Monday, August 18, 2008 2:42 PM Answering System Key Erasing all messages Operation {4} Play new messages {5} Play all messages {8} Turn answering system on Listening to messages using the handset {9} Stop playback*2 {0} Turn answering system off When new messages have been recorded: – “New message” is displayed. – The message indicator on the handset flashes slowly if the message alert feature is turned on (page 39).
TG93XX_OI.book Page 37 Monday, August 18, 2008 2:42 PM Answering System 2 Voice memo Available for: KX-TG9341/KX-TG9342/ KX-TG9343/KX-TG9344 Recording a voice memo You can use the base unit to leave a voice memo (voice message) for yourself or someone else (max. 3 minutes). Voice memos can be played back later with the same operation used to play back answering system messages. Enter the desired 3-digit remote access code.
TG93XX_OI.book Page 38 Monday, August 18, 2008 2:42 PM Answering System When the Spanish voice guidance is selected To start the voice guidance, press {9}. The voice guidance announces the available remote commands (page 38). See the Spanish quick guide for details. Note: L If you do not press any dial keys within 15 seconds after a voice guidance prompt, the unit disconnects your call.
TG93XX_OI.book Page 39 Monday, August 18, 2008 2:42 PM Answering System the phone rings for the 3rd time. You can then hang up without being charged for the call. 1 2 {MENU} i {#}{2}{1}{1} {V}/{^}: Select the desired setting.
TG93XX_OI.book Page 40 Monday, August 18, 2008 2:42 PM Voice Mail Service Example: Voice mail service Voice mail is an automatic answering service offered by your service provider/telephone company. After you subscribe to this service, your service provider/telephone company’s voice mail system answers calls for you when you are unavailable to answer the phone or when your line is busy. Messages are recorded by your service provider/telephone company, not your telephone.
TG93XX_OI.book Page 41 Monday, August 18, 2008 2:42 PM Voice Mail Service Listening to voice mail messages The unit lets you know that you have new voice mail messages in the following ways: – “New Voice Mail” is displayed on the handset. – The message indicator on the handset flashes slowly if message alert feature is turned on (“Message alert”; page 39). 1 Press {C}, then press {VM} within 15 seconds. OR {MENU} i {#}{3}{3}{0} L The speakerphone turns on. 2 Follow the pre-recorded instructions.
TG93XX_OI.book Page 42 Monday, August 18, 2008 2:42 PM Intercom/Locator 2 To page a specific handset, enter the handset number. To page all handsets, press {0} or wait for a few seconds. L To stop paging, press {INTERCOM}. 3 When you finish talking, press {INTERCOM}. Intercom Intercom calls can be made: – between handsets. – between the handset and base unit. Note: L If you receive an outside call while talking on the intercom, you hear 2 tones.
TG93XX_OI.book Page 43 Monday, August 18, 2008 2:42 PM Intercom/Locator 3 4 Wait for the paged party to answer. L If the paged party does not answer, press {C} to return to the outside call. To complete the transfer: Press {OFF}. L The outside call is being routed to the destination unit. To establish a conference call: Press {Conf}. L To leave the conference, press {OFF}. The other parties can continue the conversation. L To put the outside call on hold, press {HOLD}.
TG93XX_OI.book Page 44 Monday, August 18, 2008 2:42 PM Useful Information 3 Wall mounting Important: L The wall mounting adaptor is not supplied with KX-TG9341/ KX-TG9342/KX-TG9343/ KX-TG9344, but it is available as an option. 1 Base unit 1 Lead the telephone line cord through 2 2 the hole in the wall mounting adaptor in the direction of the arrow. 1 4 2 Insert the hooks on the wall mounting adaptor into the holes 1 and 2 on the base unit.
TG93XX_OI.book Page 45 Monday, August 18, 2008 2:42 PM Useful Information 5 Connect the telephone line cord. Mount the unit by inserting the mounting pins into the round openings on the adaptor (for pin 2, use the round cut out at the bottom of the adaptor if you are using the 4 inch phone plate), then slide the unit down to secure it. Connect the AC adaptor to power outlet (page 12). L There are 2 common types of wall phone plates.
TG93XX_OI.book Page 46 Monday, August 18, 2008 2:42 PM Useful Information Error messages If the unit detects a problem, one of the following messages is shown on the display. Display message Cause/solution Busy L The called handset or base unit is in use. L Other units are in use and the system is busy. Try again later. L The handset you are using is too far from the base unit. Move closer and try again. L The handset’s registration may have been canceled. Re-register the handset (page 30).
TG93XX_OI.book Page 47 Monday, August 18, 2008 2:42 PM Useful Information Troubleshooting If you still have difficulties after following the instructions in this section, disconnect the base unit’s AC adaptor, then reconnect the base unit’s AC adaptor. Remove the batteries from the handset, and then insert the batteries into the handset again. General use Problem Cause/solution The unit does not work. L Make sure the batteries are installed correctly (page 13). L Fully charge the batteries (page 14).
TG93XX_OI.book Page 48 Monday, August 18, 2008 2:42 PM Useful Information Problem Cause/solution While programming, the handset starts to ring. L A call is being received. Answer the call and start again after hanging up. I cannot register a handset to a base unit. L The maximum number of handsets (6) is already registered to the base unit. Cancel unused handset registrations from the base unit (page 30). L Place the handset and the base unit away from other electrical appliances.
TG93XX_OI.book Page 49 Monday, August 18, 2008 2:42 PM Useful Information Caller ID/Talking Caller ID Problem Cause/solution Caller information is not displayed. L You need to subscribe to Caller ID service. Contact your service provider/telephone company for details. L If your unit is connected to any additional telephone equipment such as a Caller ID box or cordless telephone line jack, plug the unit directly into the wall jack.
TG93XX_OI.book Page 50 Monday, August 18, 2008 2:42 PM Useful Information Problem Cause/solution I cannot dial the phone number edited in the caller list. L The phone number you dialed might have been edited incorrectly (for example, the long distance “1” or the area code is missing). Edit the phone number with another pattern (page 32). Time on the unit is shifted. L Incorrect time information from incoming Caller ID changes the time. Set the time adjustment to off (page 26).
TG93XX_OI.book Page 51 Monday, August 18, 2008 2:42 PM Useful Information Problem Cause/solution I cannot operate the answering system remotely. L You are entering the wrong remote access code. If you forgot the remote access code, store a new remote access code (page 37). L Press each key firmly. L The answering system is turned off. Turn it on (page 38). L You are using a rotary/pulse telephone. Try again using a touch-tone phone.
TG93XX_OI.book Page 52 Monday, August 18, 2008 2:42 PM Useful Information FCC and other information This equipment complies with Part 68 of the FCC rules and the requirements adopted by the ACTA. On the bottom of this equipment is a label that contains, among other information, a product identifier in the format US:ACJ----------. If requested, this number must be provided to the telephone company. L Registration No.............(found on the bottom of the unit) L Ringer Equivalence No. (REN)....... 0.
TG93XX_OI.book Page 53 Monday, August 18, 2008 2:42 PM Useful Information about what will disable alarm equipment, consult your telephone company or a qualified installer. This equipment is hearing aid compatible as defined by the FCC in 47 CFR Section 68.316. When you hold the phone to your ear, noise might be heard in your Hearing Aid. Some Hearing Aids are not adequately shielded from external RF (radio frequency) energy.
TG93XX_OI.book Page 54 Monday, August 18, 2008 2:42 PM Useful Information interference is experienced, move the cordless telephone further away from the TV or VCR. This will often reduce, or eliminate, interference. Notice FCC RF Exposure Warning: L This product complies with FCC radiation exposure limits set forth for an uncontrolled environment.
TG93XX_OI.book Page 55 Monday, August 18, 2008 2:42 PM Useful Information Specifications ■ Standard: DECT 6.0 (Digital Enhanced Cordless Telecommunications 6.0) ■ Number of channels: 60 Duplex Channels ■ Frequency range: 1.92 GHz to 1.93 GHz ■ Duplex procedure: TDMA (Time Division Multiple Access) ■ Channel spacing: 1,728 kHz ■ Bit rate: 1,152 kbit/s ■ Modulation: GFSK (Gaussian Frequency Shift Keying) ■ RF transmission power: 115 mW (max.
TG93XX_OI.book Page 56 Monday, August 18, 2008 2:42 PM Useful Information Customer services Customer Services Directory Obtain Product Information and Operating Assistance; locate your nearest Dealer or Service Center; purchase Parts and Accessories; or make Customer Service and Literature requests by visiting our Web Site at: http://www.panasonic.com/help or, contact us via the web at: http://www.panasonic.
TG93XX_OI.book Page 57 Monday, August 18, 2008 2:42 PM Useful Information Warranty PANASONIC CONSUMER ELECTRONICS COMPANY, DIVISION OF PANASONIC CORPORATION OF NORTH AMERICA One Panasonic Way, Secaucus, New Jersey 07094 PANASONIC PUERTO RICO, INC. San Gabriel Industrial Park, Ave. 65 de Infantería, Km. 9.
TG93XX_OI.book Page 58 Monday, August 18, 2008 2:42 PM Useful Information IF REPAIR IS NEEDED DURING THE LIMITED WARRANTY PERIOD THE PURCHASER WILL BE REQUIRED TO FURNISH A SALES RECEIPT/PROOF OF PURCHASE INDICATING DATE OF PURCHASE, AMOUNT PAID AND PLACE OF PURCHASE. CUSTOMER WILL BE CHARGED FOR THE REPAIR OF ANY UNIT RECEIVED WITHOUT SUCH PROOF OF PURCHASE.
TG93XX_OI.
TG93XX_OI.book Page 60 Monday, August 18, 2008 2:42 PM If you need assistance with setup or operation 1 Visit our website: http://www.panasonic.com/help 2 Contact us via the web at: http://www.panasonic.com/contactinfo 3 Call us at: 1-800-211-PANA (1-800-211-7262) TTY users (hearing or speech impaired users) can call 1-877-833-8855. When you ship the product L Carefully pack your unit, preferably in the original carton. L Attach a letter, detailing the symptom.