TGB21xFX(en).book Page 1 Friday, October 7, 2016 4:20 PM Operating Instructions Digital Cordless Phone Model No. KX-TGB210FX KX-TGB212FX Model shown is KX-TGB210. Before initial use, see “Getting Started” on page 9. Thank you for purchasing a Panasonic product. Please read these operating instructions before using the unit and save them for future reference. This unit is compatible with Caller ID. You must subscribe to the appropriate service offered by your service provider/telephone company.
TGB21xFX(en).book Page 2 Monday, February 9, 2015 5:36 PM Table of Contents Introduction Model composition. . . . . . . . . . . . . . . . . . . . 3 Accessory information . . . . . . . . . . . . . . . . . 3 General information . . . . . . . . . . . . . . . . . . . 4 Important Information For your safety. . . . . . . . . . . . . . . . . . . . . . . Important safety instructions . . . . . . . . . . . . For best performance . . . . . . . . . . . . . . . . . Other information . . . . . . . . . . . . . . . . .
TGB21xFX(en).book Page 3 Monday, February 9, 2015 5:36 PM Introduction Model composition Base unit Handset Part No. Part No. KX-TGB210 KX-TGB210 KX-TGBA20 1 KX-TGB212 KX-TGB210 KX-TGBA20 2 Series Model No. KX-TGB210 series Quantity L The Intercom feature is only available for KX-TGB212. L The suffix (FX) in the following model numbers will be omitted in these instructions: KX-TGB210FX/KX-TGB212FX Accessory information Supplied accessories No.
TGB21xFX(en).book Page 4 Wednesday, January 11, 2017 6:31 PM Introduction General information L This equipment is designed for use on the Czech, Slovakia, Estonia, Latvia, Lithuania, Croatia, Slovenia, Romania and Bulgaria analogue telephone network. L In the event of problems, you should contact your equipment supplier in the first instance. L For use in other countries, please contact your equipment supplier.
TGB21xFX(en).book Page 5 Monday, February 9, 2015 5:36 PM Important Information For your safety To prevent severe injury and loss of life/ property, read this section carefully before using the product to ensure proper and safe operation of your product. k WARNING Power connection L Use only the power source marked on the product. L Do not overload power outlets and extension cords. This can result in the risk of fire or electric shock. L Completely insert the AC adaptor/power plug into the power outlet.
TGB21xFX(en).book Page 6 Monday, February 9, 2015 5:36 PM Important Information L This product is unable to make calls when: – the handset batteries need recharging or have failed. – there is a power failure. 4. Use only the power cord and batteries indicated in this manual. Do not dispose of batteries in a fire. They may explode. Check with local codes for possible special disposal instructions. Battery SAVE THESE INSTRUCTIONS L We recommend using the batteries noted on page 3.
TGB21xFX(en).book Page 7 Monday, February 9, 2015 5:36 PM Important Information L The product should be kept away from heat sources such as radiators, cookers, etc. It should not be placed in rooms where the temperature is less than 0 °C or greater than 40 °C. Damp basements should also be avoided. L The maximum calling distance may be shortened when the product is used in the following places: Near obstacles such as hills, tunnels, underground, near metal objects such as wire fences, etc.
TGB21xFX(en).book Page 8 Friday, October 7, 2016 Important Information dealer and ask for the correct method of disposal. Note for the battery symbol This symbol (2) might be used in combination with a chemical symbol (3). In this case it complies with the requirement set by the Directive for the chemical involved. Note for the battery removal procedure Refer to “Battery installation”, page 9. Specifications n Standard: DECT (Digital Enhanced Cordless Telecommunications) n Frequency range: 1.
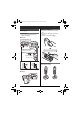
TGB21xFX(en).book Page 9 Monday, February 9, 2015 5:36 PM Getting Started Battery installation Setting up Connections L Use only the supplied Panasonic AC adaptor PNLV226CE. L USE ONLY Ni-MH batteries AAA (R03) size. L Do NOT use Alkaline/Manganese/Ni-Cd batteries. L Confirm correct polarities (S, T). ■ Base unit Press plug firmly. “Click” Hook Use only the supplied telephone line cord.
TGB21xFX(en).book Page 10 Monday, February 9, 2015 5:36 PM Getting Started Note when setting up Note for connections L The AC adaptor must remain connected at all times. (It is normal for the adaptor to feel warm during use.) L The AC adaptor should be connected to a vertically oriented or floor-mounted AC outlet. Do not connect the AC adaptor to a ceiling-mounted AC outlet, as the weight of the adaptor may cause it to become disconnected.
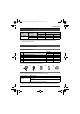
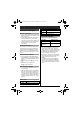
TGB21xFX(en).book Page 11 Monday, February 9, 2015 5:36 PM Getting Started Handset Controls Base unit G A H I A B C D J K L B A Charge contacts B {x} (Locator) E F M A A B C D E F G H I J K L M Ringer {k} (Phonebook) {C} (Clear) {C} (Talk) Dial keypad Microphone Receiver Display {j/OK} (Menu/OK) {P} (Pause) {R} (Recall/Flash) {m} (Off/Power) Charge contacts ■ Control type A Navigator key Navigator keys functions as follows.
TGB21xFX(en).book Page 12 Monday, February 9, 2015 5:36 PM Getting Started Symbol Meaning {v} {^} Up {y} {3} Left {R} {4} Right – {^}, {V}, {3}, or {4}: Scroll through various lists and items. – {^} or {V} (v): Adjust the receiver volume while talking. – {y} (Caller list): View the caller list. – {R} (Redial): View the redial list. Turning the power on/off Power on Press {m}. Power off Press {m} for about 2 seconds.
TGB21xFX(en).book Page 13 Monday, February 9, 2015 5:36 PM Getting Started 4 Enter the current date, month, and year. s {j/OK} Example: 15 July, 2014 15 z7 14 5 Enter the current hour and minute. s {j/OK} Example: 15:30 15 3z L If you enter the wrong date and/or time, press {C} and perform again from step 3. 6 {m} Note: L The date and time may be incorrect after a power failure. In this case, set the date and time again.
TGB21xFX(en).book Page 14 Monday, February 9, 2015 5:36 PM Making/Answering Calls Making calls 1 2 3 Lift the handset and dial the phone number. L To correct a digit, press {C}. {C} When you finish talking, press {m} or place the handset on the base unit or charger. Adjusting the receiver volume Press {^} or {V} repeatedly while talking. Making a call using the redial list The last 10 phone numbers dialled are stored in the redial list (each 24 digits max.).
TGB21xFX(en).book Page 15 Monday, February 9, 2015 5:36 PM Making/Answering Calls Adjusting the handset ringer volume ■ While the handset is ringing for an incoming call: Press {^} or {V} repeatedly to select the desired volume. ■ Programming the volume beforehand: 1 {j/OK} 2 {r}: “Ringer Setup” s {j/OK} 3 {r}: “Volume” s {j/OK} 4 {r}: Select the desired volume. 5 {j/OK} s {m} Useful features during a call Mute While mute is turned on, you can hear the other party, but the other party cannot hear you.
TGB21xFX(en).book Page 16 Monday, February 9, 2015 5:36 PM Phonebook Handset phonebook The phonebook allows you to make calls without having to dial manually. You can add 50 names and phone numbers, and confirm the number of entries (page 16). Adding entries 1 {k} 2 {r}: “New Entry” s {j/OK} 3 Enter the party’s name (12 characters max.). s {j/OK} L You can change the character entry mode by pressing {k} (page 25). 4 5 Enter the party’s phone number (24 digits max.).
TGB21xFX(en).book Page 17 Monday, February 9, 2015 5:36 PM Phonebook L If you have rotary/pulse service, you need to press * before pressing {k} in step 1 to change the dialling mode temporarily to tone. When adding entries to the phonebook, we recommend adding * to the beginning of phone numbers you wish to chain dial (page 16).
TGB21xFX(en).book Page 18 Monday, February 9, 2015 5:36 PM Programming Programmable settings You can customise the unit by programming the following features using the handset. Programming by scrolling through the display menus 1 {j/OK} 2 Press {V} or {^} to select the desired main menu. s {j/OK} 3 Press {V} or {^} to select the desired item in sub-menu 1. s {j/OK} L In some cases, you may need to select from sub-menu 2. s {j/OK} 4 Press {V} or {^} to select the desired setting.
TGB21xFX(en).book Page 19 Monday, February 9, 2015 5:36 PM Programming Main menu Sub-menu 1 Setup Language – 12 Contrast (Display contrast) – – Clock Disp.*5 – – Auto Talk*6 – 14 Register HS – 30 Keytones*7 – – Dial Mode*3 – 13 Recall/Flash*3, *8, *9 <600 msec.> – 15 Privacy Mode*3, *10, *11 – – Change PIN*3 Intercom*10 – Sub-menu 2 Page – 30 – 24 *1 Ringer volume cannot be turned off for paging.
TGB21xFX(en).book Page 20 Monday, February 9, 2015 5:36 PM Programming L We recommend selecting a different ringer tone from the one used for outside calls. Special programming Alarm An alarm sounds at the set time (once or daily) for 2 minutes. You can also customise the repeat times and the repeat cycle (snooze function). Alarm can be set for each handset.
TGB21xFX(en).book Page 21 Monday, February 9, 2015 5:36 PM Caller ID Service Using Caller ID service Important: L This unit is Caller ID compatible. To use Caller ID features, you must subscribe to a Caller ID service. Contact your service provider/telephone company for details. Caller ID features When an outside call is being received, the caller’s phone number is displayed. Caller information for the last 50 callers is logged in the caller list from the most recent call to the oldest.
TGB21xFX(en).book Page 22 Monday, February 9, 2015 5:36 PM Caller ID Service 2 {r}: Select the desired entry. s {j/OK} 3 {r}: “Save TEL No.” s {j/OK} 4 To store the name, continue from step 3, “Adding entries”, page 16.
TGB21xFX(en).book Page 23 Monday, February 9, 2015 5:36 PM Voice Mail Service Voice mail service Voice mail is an automatic answering service offered by your service provider/telephone company. After you subscribe to this service, your service provider/telephone company’s voice mail system answers calls for you when you are unavailable to answer the phone or when your line is busy. Messages are recorded by your service provider/telephone company, not your telephone.
TGB21xFX(en).book Page 24 Monday, February 9, 2015 5:36 PM Intercom/Locator Intercom Available for: KX-TGB212 Intercom calls can be made between handsets. Note: L If you receive an outside call while talking on the intercom, you hear interrupt tones. To answer the call, press {m}, then press {C}. L When paging the handset, the paged handset beeps for 1 minute.
TGB21xFX(en).book Page 25 Monday, February 9, 2015 5:36 PM Useful Information Character entry The dial keys are used to enter characters and numbers. Each dial key has multiple characters assigned to it. The characters that can be entered depend on the character entry mode (page 25). – Press {3} or {4} to move the cursor left or right. – Press dial keys to enter characters and numbers.
TGB21xFX(en).
TGB21xFX(en).book Page 27 Monday, February 9, 2015 5:36 PM Useful Information Error messages Display message Cause/solution Memory Full L The phonebook memory is full. Erase unwanted entries (page 16). Troubleshooting If you still have difficulties after following the instructions in this section, disconnect the base unit’s AC adaptor and turn off the handset, then reconnect the base unit’s AC adaptor and turn on the handset.
TGB21xFX(en).book Page 28 Monday, February 9, 2015 5:36 PM Useful Information Problem Cause/solution I cannot use the intercom feature. L This feature is available between the handsets. Although the handset displays “Intercom”, this feature is not available for single handset models. Programmable settings Problem Cause/solution The display is in a language I cannot read. L Change the display language (page 12). Battery recharge Problem Cause/solution The handset beeps and/or 8 displays.
TGB21xFX(en).book Page 29 Monday, February 9, 2015 5:36 PM Useful Information Problem Cause/solution I cannot make a call. L The dialling mode may be set incorrectly. Change the setting (page 13). L The handset is too far from the base unit. Move closer and try again. L Another unit is in use.*1 Wait and try again later. *1 KX-TGB212 Caller ID Problem Cause/solution Caller information is not displayed. L You must subscribe to a Caller ID service.
TGB21xFX(en).book Page 30 Monday, February 9, 2015 5:36 PM Useful Information Registering a handset to the base unit 1 Handset: {j/OK} 2 3 4 {r}: “Setup” s {j/OK} {r}: “Register HS” s {j/OK} Base unit: Press and hold {x} for about 5 seconds. (No registration tone) L If all registered handsets start ringing, press {x} again to stop, then repeat this step. (KX-TGB212) 5 Handset: Wait until “PIN:____” is displayed. s Enter the base unit PIN (default: “0000”).
TGB21xFX(en).
TGB21xFX(en).