Operating Instructions 2-in-1 Corded | Cordless Phone Model No. KX-TGF880 KX-TGF882 KX-TGF883 Model shown is KX-TGF880. Before initial use, see “Getting Started” on page 9. Thank you for purchasing a Panasonic product. Please read these operating instructions before using the unit and save them for future reference. Consulte “Guía Rápida Española”, página 88. For assistance, visit our Web site: http://shop.panasonic.com/support for customers in the U.S.A. Please register your product: http://shop.
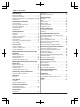
Table of Contents Introduction Model composition ..............................................3 Accessory information ........................................3 Graphical symbols for use on equipment and their descriptions .........................................................5 Important Information For your safety ....................................................6 Important safety instructions ...............................7 For best performance .........................................
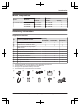
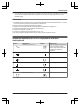
Introduction Model composition Series Model No. Base unit Handset Part No. Part No. KX-TGF880 series KX-TGF880 KX-TGF880 KX-TGFA88 Quantity 1 KX-TGF882 KX-TGF880 KX-TGFA88 2 KX-TGF883 KX-TGF880 KX-TGFA88 3 Accessory information Supplied accessories Quantity No.
Introduction Additional/replacement accessories Please contact your nearest Panasonic dealer for sales information (page 99). Accessory item Model number/Specifications Rechargeable batteries HHR-4DPA*1 R To order, please visit http://shop.panasonic.
Introduction *1 Your cellular phone and headset must be Bluetooth wireless technology compatible. For more details and the list of compatible cellular phones, please visit our Web site: http://shop.panasonic.com/ bluetooth-phone Trademarks R The Bluetooth® word mark and logos are registered trademarks owned by Bluetooth SIG, Inc. and any use of such marks by Panasonic Corporation is under license. R iPhone and Siri are registered trademarks of Apple Inc.
Important Information For your safety To prevent severe injury and loss of life/property, read this section carefully before using the product to ensure proper and safe operation of your product. WARNING Power connection R Use only the power source marked on the product. R Do not overload power outlets and extension cords. This can result in the risk of fire or electric shock. R Completely insert the AC adaptor/power plug into the power outlet.
Important Information Ni-MH rechargeable batteries R We recommend using the batteries noted on page 4. USE ONLY rechargeable Ni-MH batteries AAA (R03) size. R Do not mix old and new batteries. R Do not open or mutilate the batteries. Released electrolyte from the batteries is corrosive and may cause burns or injury to the eyes or skin. The electrolyte is toxic and may be harmful if swallowed. R Exercise care when handling the batteries.
Important Information R The product should be kept free from excessive smoke, dust, high temperature, and vibration. R The product should not be exposed to direct sunlight. R Do not place heavy objects on top of the product. R When you leave the product unused for a long period of time, unplug the product from the power outlet. R The product should be kept away from heat sources such as heating devices, cooking appliances, etc.
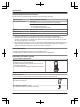
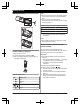
Getting Started R Follow the directions on the display to set up the unit. Setting up n Charger Connect the AC adaptor to the power outlet. Connections R If you do not connect the telephone line cord and use only cellular lines, set the cellular line only mode to use this unit more conveniently (page 19). n Base unit Connect the AC adaptor to the unit by pressing the plug firmly. Connect the telephone line cord to the unit until you hear a click.
Getting Started Note: R At the end of each call, the unit displays a large icon for a few moments to indicate the battery level. R You can set the unit to play a voice announcement when the battery is low or needs charging. (page 16) Removing the battery Ni-MH battery performance (supplied batteries) 1 Operation Operating time In continuous use 10 hours max.*1 Not in use (standby) 5 days max.*1 *1 If eco mode is on except when using link to cell function.
Getting Started 1 2 3 4 Disconnect the telephone line cord (A). Open the battery cover (B). Install the batteries in the battery compartment (C). Close the cover, then reconnect the telephone line cord (D). one-touch dial, answering system, speakerphone, Bluetooth functions, etc.) The base unit display is blank. – “Off” (default): You can use the full functions of the base unit, but battery life is not extended. The brightness level for the base unit display is lowered.
Getting Started Note for Ni-MH battery installation R Handset: Use the supplied rechargeable batteries. R Handset/Base unit: For replacement, we recommend using the Panasonic rechargeable batteries noted on page 4, 7. Controls Handset A Note for battery charging R It is normal for the handset to feel warm during charging. R Clean the charge contacts of the handset and charger with a soft and dry cloth once a month. Before cleaning the unit, disconnect from power outlets and any telephone line cords.
Getting Started n Control type Soft keys By pressing a soft key, you can select the feature shown directly above it on the display. After a cellular phone is paired, MCELLN is displayed. Navigator key – MDN, MCN, MFN, or MEN: Scroll through various lists and items. – VOL. (Volume: MDN or MCN): Adjust the receiver or speaker volume while talking. – MFN : View the phonebook entry. – MEN REDIAL: View the redial list. – MCN CID (Caller ID): View the caller list.
Getting Started Item Meaning Item – A cellular line is in use.*1 R When flashing slowly: The cellular call is on hold. R When flashing rapidly: A cellular call is being received. – The remote voice assist feature is in use.*1 Cell1 in Someone is using the use corresponding line. Eco mode is on.*2 (page 12) A cellular phone is connected.*1 Ready to make/receive cellular calls. R When turned off: A cellular phone is not connected to the base unit. (page 19) – A cellular call is in progress on that line.
Getting Started Item Meaning Blocked call (page 58) – Automated call block is set to “Block”. (page 35) – Blocked automated call (page 58) A Bluetooth headset is connected to the base unit. It is ready for use. A Bluetooth headset is in use. In use Answering system is being used by the handset. Cell1 in Someone is using the use corresponding line. Cell2 in use Language settings Display language Handset / Base unit 1 2 3 MMENUN#110 MbN: Select the desired setting.
Getting Started 4 Enter the current hour and minute (12-hour clock format) by selecting 2 digits for each. Example: 9:30 09 30 3 5 Proceed with the operation for your unit. Handset: *: Select “AM” or “PM”. Base unit: MAM/PMN: Select “AM” or “PM”. Low battery alert 6 7 MSAVEN Proceed with the operation for your unit. Handset: MOFFN Base unit: MEXITN Note: R When English is selected as the display language, 12-hour clock format is used. When Spanish is selected, 24-hour clock format is used.
Link to Cell Link to cell feature You can connect your base unit and cellular phone using Bluetooth wireless technology, so that you can make or answer cellular calls using your phone system. This allows you to: – use the unit to talk on cellular calls even if some areas of your home have poor cellular reception, simply by placing your cellular phone in an area with good reception. – talk on cellular calls even if your cellular phone is in your pocket or bag.
Link to Cell Link to cell settings Selecting which unit receives cellular calls You can select which unit rings and receives calls for a cellular line. When “All” is selected, all handsets and the base unit ring. Handset / Base unit 1 For CELL 1: MMENUN#6271 For CELL 2: MMENUN#6272 2 MbN: Select the desired handset or “All”. a MSAVEN 3 Proceed with the operation for your unit.
Link to Cell automatically resume the connection to Bluetooth devices, leave the auto connection on. R Some cellular phones lose connection after usage, please check the specifications of your cellular phone for more details. Handset / Base unit 1 2 3 MMENUN#632 MbN: Select the desired setting. a MSAVEN Proceed with the operation for your unit. Handset: MOFFN Base unit: MEXITN Note: R Some cellular phones may ask you if you accept the connection requirement from the base unit.
Link to Cell Cellular line selection This feature determines which cellular line is selected to make cellular calls when: – you press MCELLN on the handset. – you press M N or MZN on the handset while the cellular line only mode is turned on. – you lift the corded handset or press MZN on the base unit while the cellular line only mode is turned on. The following settings are available: – “Manual” (handset only: default): You can select the desired cellular line when making a call.
Making/Answering Calls Using the Handset Making cellular calls Important: R The unit cannot be used to talk on 2 cellular lines at the same time. R Only 1 Bluetooth device can be used with the unit at a time*1. R Before making calls, confirm that the corresponding on the handset is displayed (page 14). *1 You cannot use a Bluetooth headset to talk on a cellular line. 1 Lift the handset and then dial the phone number. R To correct a digit, press MCLEARN.
Making/Answering Calls Using the Handset Pause (for PBX/long distance service users) A pause is sometimes required when making calls using a PBX or long distance service. When storing a calling card access number and/or PIN in the phonebook, a pause is also needed (page 41). Example: If you need to dial the line access number “9” when making outside calls with a PBX: 1 2 9 a MDN (Pause) Dial the phone number. a M Useful features during a call Hold 1 2 3 N Note: R A 3.
Making/Answering Calls Using the Handset For call waiting or Call Waiting Caller ID service users To use call waiting or Call Waiting Caller ID, you must first subscribe with your phone service provider. This feature allows you to receive calls while you are already talking on the phone. If you receive a call while on the phone, you will hear a call waiting tone.
Making/Answering Calls Using the Handset R 2 way recording is not available during conference calls. R The recording will end in the following situations: – When MFLASHN is pressed. – When the hold or intercom feature is used. R When memory is/becomes full: – “Memory full” is shown on the display. – An error tone sounds. 5 Call share You can join an existing outside call. n While another unit is on a cellular call: 1 To join the conversation, press MCELLN.
Making/Answering Calls Using the Handset Answering a 2nd call If you receive a call while talking on the phone, the interrupt tone sounds (page 48) and the 2nd caller’s information is displayed if you subscribe to Caller ID service (page 57). Answering a cellular call during a landline call 1 2 3 4 Press MMENUN during a landline call. MbN: “Hold” a MSELECTN To answer the 2nd call: Press MCELLN while the 2nd call is being received.
Making/Answering Calls Using the Base Unit Making cellular calls Important: R The unit cannot be used to talk on 2 cellular lines at the same time. R Only 1 Bluetooth device can be used with the unit at a time*1. R Before making calls, confirm that the corresponding CELL indicator on the base unit lights up (page 15). *1 You cannot use a Bluetooth headset to talk on a cellular line. 1 Dial the phone number. R To correct a digit, press MCLEARN. 2 3 4 Press MCELL 1N or MCELL 2N. Lift the corded handset.
Making/Answering Calls Using the Base Unit 2 3 – Only 1 cellular phone is paired. – A specific line is set to make cellular calls (page 20). Dial the phone number. Lift the corded handset. Note: R A 3.5 second pause is inserted each time MPAUSEN is pressed. Answering calls When a landline call is being received, the SP-PHONE indicator flashes rapidly. When a cellular call is being received, the CELL indicator and SP-PHONE indicator flash rapidly.
Making/Answering Calls Using the Base Unit Temporary tone dialing for landline calls (for rotary/pulse service users) Press * before entering access numbers which require tone dialing. Recording a telephone conversation (2-way recording) This unit can record a telephone conversations during landline calls. 1 Press MRECORDN during a landline call. R The total recordable time is displayed. R The unit announces to both parties that the recording will start. R The unit starts recording.
Making/Answering Calls Using the Base Unit Answering a 2nd call If you receive a call while talking on the phone, the interrupt tone sounds (page 48) and the 2nd caller’s information is displayed if you subscribe to Caller ID service (page 57). Answering a cellular call during a landline call 1 2 3 Press MHOLDN during a landline call. To answer the 2nd call: Press MCELL 1N or MCELL 2N.
Answer by Voice Command Answer by voice command This feature allows you to answer incoming calls automatically with your voice. When your voice is detected, answered calls will automatically be directed to the speakerphone mode. The default setting is “Off”. Important: R Before using this feature, we recommend that you test it and adjust the voice command sensitivity as needed. R For best performance, answer the call within a range of 50 cm (20 inches) to 1 m (40 inches).
Intercom Intercom Intercom calls can be made: – between handsets – between a handset and the base unit Note: R When paging unit(s), the paged unit(s) beeps for 1 minute. R If you receive an outside call while talking on the intercom, the interrupt tone sounds (page 48). – Handset: To finish intercom, press MOFFN. To answer the call, press M N. – Base unit: To finish intercom, place the corded handset on the cradle. If the speakerphone is used, press MZN. To answer the call, lift the corded handset.
Call Block Call block You can press the MCALL BLOCKN button in the following situations to disconnect the current call and add a phone number to the call block list: – when an incoming call is being received – when an incoming call is being recorded by the answering system – when talking on an outside call Once a phone number has been added to the call block list, the unit will block calls from that phone number in the future. Handset / Base unit 1 Press MCALL BLOCKN under the situations shown above.
Call Block Base unit 1 2 3 4 5 Blocking incoming calls that have no phone number MCIDN MbN: Select the entry to be blocked. R To edit the number: Press MEDITN repeatedly until the phone number is shown in the 10-digit format. You can block calls when no phone number is provided, such as private callers or out of area calls. MCALL BLOCKN MbN: “Yes” a MSELECTN Edit the phone number if necessary (24 digits max.).
Call Block Viewing/editing/unblocking call block numbers Displaying and clearing the blocked call count Handset 1 2 Handset MCALL BLOCKN MbN: “Block a single number” or “Block range of numbers” a MSELECTN 3 MbN: Select the desired entry. R After viewing, press MOFFN to exit. 4 To edit a number: MEDITN a Edit the number. a MSAVEN a MOFFN To unblock a number: MUNBLOCKN a MbN: “Yes” a MSELECTN a MOFFN 1 2 MCALL BLOCKN 3 4 MCLEARN MbN: “Blocked calls count” a MSELECTN R To exit, press MOFFN.
Enhanced Call Block Automated call block With automated call block, the unit screens incoming calls before ringing for allowed calls, or ends the calls without ringing for calls identified as robocalls, telemarketing calls, or other undesirable calls (Caller ID subscribers only). The unit will play the greeting message for automated call block and prompt the caller to enter an access code in order for the unit to identify whether the call is automated. You can set the unit to block or unblock mode.
Enhanced Call Block Displaying and clearing the blocked call count Erasing all entries The total number of blocked calls (up to 65,000) will be displayed. 1 2 3 Handset 1 MMENUN#790 R To exit, press MOFFN. 2 3 MCLEARN Handset You can allow specific callers to pass through by adding the caller’s name to the allow name list. You can store up to 100 names (16 characters max.). If the name stored in the allow name list matches the incoming Caller ID, the unit rings.
Enhanced Call Block Playing back the greeting message for automated call block 1 2 MMENUN#792 To exit, press MOFFN. Telemarketing call block In addition to Automated call block (page 35), you can use Telemarketing call block to further screen calls to stop telemarketer calls from getting through. Using this feature, the unit will prompt callers to say their names, and after checking the names, you can decide whether to answer the calls or not.
Phonebook Entering characters Phonebook You can add 3,000 names (16 characters max.) and phone numbers (24 digits max.) to the phonebook, and assign each phonebook entry to the desired group (page 39). The following groups are available: – Group 1: “Home”*1 (default) – Group 2: “Cell 1”*1 – Group 3: “Cell 2”*1 – Group 4-9: You can change the group name for each group. *1 For groups 1-3, the group names cannot be changed. Important: R All entries can be shared by the base unit and any registered handset.
Phonebook Note for handset and base unit: R The name stored in the phonebook will be reflected in the redial list after you make a call using that phonebook entry. of callers, you can identify who is calling (ringer ID), if you have subscribed to Caller ID service. Changing group names/setting ringer ID Handset / Base unit Storing caller information to the phonebook Handset n When a cellular phone is paired: 1 MCN CID 2 MbN: Select the desired entry.
Phonebook Base unit 3 MbN: Select the group you want to search. a MSELECTN R If you select “All groups”, the unit ends the group search. 4 MbN: Select the desired entry. Lift the corded handset. Scrolling through all entries Handset / Base unit 1 Proceed with the operation for your unit. Handset: MFN Base unit: M N 2 MbN: Select the desired entry. Searching by first character Handset / Base unit 1 Proceed with the operation for your unit.
Phonebook 5 6 MbN: “Yes” a MSELECTN Proceed with the operation for your unit. Handset: MOFFN Base unit: MEXITN n By entering phone numbers: 1 Press and hold the desired speed dial key (1 to 9). 2 Proceed with the operation for your unit. Handset: MADDN a MbN: “Manual” a MSELECTN Base unit: MEDITN 3 Enter the party’s name (16 characters max.). a MOKN 4 Enter the party’s phone number (24 digits max.). a MOKN a MSELECTN 5 Proceed with the operation for your unit.
Phonebook Erasing an entry One-touch dial buttons Handset / Base unit 1 Press and hold the desired speed dial key (1 to 9). 2 Proceed with the operation for your unit. Handset: MMENUN a MbN: “Erase” a MSELECTN Base unit: MERASEN 3 4 MbN: “Yes” a MSELECTN Proceed with the operation for your unit. Handset: MOFFN Base unit: MEXITN Viewing an entry/Making a call Handset n Using a cellular line: 1 Press and hold the desired speed dial key (1 to 9).
Phonebook 3 MbN: Select the desired unit. a MSELECTN 2 times a MEXITN Viewing/editing/erasing an entry Base unit 1 Press and hold the desired one-touch dial button (1 or 2). R After viewing, press MEXITN to exit. 2 To edit an entry MEDITN a Edit the name if necessary. a MOKN a Edit the phone number if necessary. a MOKN a MSELECTN a MEXITN To erase an entry MERASEN a MbN: “Yes” a MSELECTN a MEXITN Making a call Base unit n Using a cellular line: 1 Press MCELL 1N or MCELL 2N.
Programming Menu list To access the features, there are 2 methods. Handset / Base unit n Scrolling through the display menus 1 MMENUN 2 3 4 Press MCN or MDN to select the desired main menu. a MSELECTN Press MCN or MDN to select the desired item from the next sub-menus. a MSELECTN Press MCN or MDN to select the desired setting. a MSAVEN n Using the direct command code 1 MMENUN a Enter the desired code. Example: Press MMENUN#101. 2 Select the desired setting.
Programming Sub-menu 1 Sub-menu 2 Greeting Record greeting*1 – #302 / 66 Check greeting – #303 / 67 Pre-recorded*1 (Reset to pre-recorded greeting) – #304 / 66 #338 / 68 New message alert*1 Outgoing call – On/Off Settings On Outgoing call – Notification to Settings Code Unit – Outgoing call – Remote code Activate Base unit beep On #339 / 68 Ring count*1 Toll saver 2-7 rings <4 rings> #211 / 71 Recording time*1 <3 min> 1 min Greeting only*2
Programming Main menu: “Bluetooth” Sub-menu 1 Sub-menu 2 Link to cell – 1:Add new device*4 (for CELL 1) – 2:Add new device*4 (for CELL 2) Connect*1/ Settings Code – Disconnect*1 Ringer volume Unit #6251*5 / 19 / 22, 27 #6252*6 Off-6 <6> #6281*5 #6282*6 Ringer tone*7 *5 *6 #6291*5 Select unit to ring*1 Handset 1-6 #6271*5 Ring as cell (limited)*1 – #6292*6 / 18 #6142*6 On (without Talking CID) Off / 18 Alert settings*1 – Aler
Programming Sub-menu 1 Sub-menu 2 Settings Code Settings Auto connect*1 Off <1 min> 3 min 5 min 10 min #632 / 18 #633 / 20 / 19 – Cell area code*1 Main menu: Cell line only mode*1 On #157 Cell line select (Handset) Cellphone 1*4 Cellphone 2*4 #634 Cell line select (Base unit) *4 Cellphone 2*4 #634 Set PIN*1 <0000> #619 / 20 60 20 International code*1 – #117 / Country code*1 – #118 / Trunk prefix*1 – #119 / – #101 15 Once Daily
Programming Main menu: “Settings” Sub-menu 1 Sub-menu 2 Settings Code Ring adjustments Ringer volume (Incoming)*3 Off-6 <6> #160 – Ringer volume*3 Off-6 <6> #160 – Intercom ringer volume 1–6 <6> #175 – Ringer tone (Incoming)*3, *7, *10 #161 – Intercom ringer tone*7, *10 #163 – Interrupt tone*11 Off #201 / 25, 29 Silent mode – On/Off On #238 / 53 Silent mode – Start/End <11:00 PM/06:00 AM> #237 / 53 Silent mode – Select group Home Cell 1
Programming Sub-menu 1 Sub-menu 2 Settings Code Key detector setting*12 – 1:Add new device (for Detector1)*13 – 2:Add new device (for Detector2) – 3:Add new device (for Detector3) – 4:Add new device (for Detector4) Change name*1 Detector1 #6561 Detector2*14 #6562*14 Detector3*14 #6563*14 Detector4*14 #6564*14 Automated call block*1 Block/Unblock Registration – Unit – #6571 – #6572*14 #6573*14 #6574*14 Deregistration – #6581 – #6582*14 #6583*14 #6584*14 Block #787 35 –
Programming Sub-menu 1 Sub-menu 2 Voicemail*3 Save VM access#*1, *15 (VM: Voicemail) Save voicemail access#*1, *16 VM tone detect*1 LCD contrast (Display contrast) – Handset name – Display name – Answer by voice command*1 On/Off Settings Code – Unit #331 / 73 Off #332 / 73 Handset: Level 1-4 <2> Base unit: Level 1-6 <3> #145 / – – #104 55 On #105 55 On #106 30 #107 30 Sensitivity level Low High Auto intercom – On #273 Key tone –
Programming Sub-menu 1 Sub-menu 2 Registration Register handset – #130 55 Deregistration*2 – #131 56 – #131 56 On #150 11 Display Español #110 / 15 Announcement*1 Español #112 / 15 Deregistration*2 – Battery saving mode – Change language Main menu: Settings Code “Customer support” Operation Code Displaying customer support Web address.
Programming *11 This tone lets you know when you receive an outside call while you are on another line or an intercom call. If you select “On”, the tone sounds 2 times. *12 This setting is available when you have the key detector (KX-TGA20). Read the installation manual for more information on the key detector. *13 For models with supplied key detectors, the display shows “1:Detector1”. *14 If you register 2 or more key detectors.
Programming Using the phonebook’s group feature (page 39), you can also select groups of callers whose calls override silent mode and ring the unit (Caller ID subscribers only). Important: R Make sure the unit’s date and time setting is correct (page 15). R If you have set the alarm, the alarm sounds even if the silent mode is turned on. 2 MbN: Select the desired groups. a MSELECTN R “ ” is displayed next to the selected group numbers. R To cancel the selected group: MbN: Select the group.
Programming – between handsets – between a handset and the base unit Handset 1 2 3 Turning off the baby monitor MMENUN#268 MbN: “On” a MSELECTN MbN: Select the desired unit’s number to monitor with. a MSAVEN R “Baby monitor” will be displayed. R The registered unit’s name/number is displayed. Note: R When this feature is on, another handset or the base unit can hear the monitored handset by making an intercom call.
Programming 2 3 MbN: “Sensitivity level” a MSELECTN MbN: Select the desired setting. a MSAVEN a MOFFN Handset 1 2 Answering the baby monitor Handset / Base unit n When monitoring with a unit: Handset: Press M N to answer a call. Base unit: Press M N to answer a call. If you want to respond from the monitoring unit, press MMUTEN. R The monitoring unit will answer calls automatically when the auto intercom feature is set to “On” (page 31).
Programming Deregistering a handset A handset can cancel its own registration to the base unit, or other handsets registered to the same base unit. This allows the handset to end its wireless connection with the system. Handset / Base unit 1 MMENUN#131 R All handsets registered to the base unit are displayed. 2 MbN: Select the handset you want to cancel. a MSELECTN 3 4 56 MbN: “Yes” a MSELECTN Proceed with the operation for your unit.
Caller ID Service Using Caller ID service Important: R This unit is Caller ID compatible. To use Caller ID features, you must subscribe to a Caller ID service. Contact your phone service provider for details. Caller ID features Handset / Base unit When an outside call is being received, the caller information is displayed. Caller information for the last 50 callers is logged in the caller list from the most recent call to the oldest.
Caller ID Service n When a cellular phone is not paired: 1 MCN CID Base unit 1 2 MCIDN 3 To call back, press MCELL 1N or MCELL 2N, then lift the corded handset. To exit, press MEXITN. 2 3 4 Press MCN to search from the most recent call, or MDN to search from the oldest call. 5 n Using a landline Proceed with the operation for your unit. Handset: MCN CID Base unit: MCIDN 2 Press MCN to search from the most recent call, or MDN to search from the oldest call.
Caller ID Service Erasing selected caller information Handset / Base unit 1 2 3 4 Proceed with the operation for your unit. Handset: MCN CID Base unit: MCIDN MbN: Select the desired entry. MERASEN a MbN: “Yes” a MSELECTN Proceed with the operation for your unit. Handset: MOFFN Base unit: MEXITN Erasing all caller information Handset / Base unit 1 2 3 Proceed with the operation for your unit. Handset: MCN CID Base unit: MCIDN MERASEN a MbN: “Yes” a MSELECTN Proceed with the operation for your unit.
Using Bluetooth® Devices Copying phonebook from a cellular phone (phonebook transfer) 4 You can copy phonebook entries from the paired cellular phones or other cellular phones (not paired) to the unit’s phonebook. A cellular phone must be compatible with Bluetooth wireless technology. Important: R Your cellular phone must support Phone Book Access Profile (PBAP) or Object Push Profile (OPP) specification. R If a copied entry has 2 or more phone numbers, each phone number (6 max.
Using Bluetooth® Devices To store “Trunk prefix”: #119 3 4 information is updated on the handset and base unit’s display, if time adjustment feature is activated on your Android phone. Enter the desired number. a MSAVEN Proceed with the operation for your unit. Handset: MOFFN Base unit: MEXITN Note: R After you copy the entries, confirm that the numbers were transferred correctly. Installing the Link to Cell app Download links are also available at the web page below.
Using Bluetooth® Devices Text message (SMS) alert 2 3 For iPhone® users This feature alerts you on your DECT phone when your paired cellular phone receives SMS messages. The Link to Cell app is not required for iPhone users. Important: R Your cellular phone must support Message Access Profile (MAP) specification. R For further information, refer to the instructions on web page listed below: www.panasonic.net/pcc/support/tel/sms/ R To use this feature, the following settings are required.
Using Bluetooth® Devices – Android: In order to use Google Now, make sure your cellular phone is registered to your Google account. R If you have multiple voice recognition features available for your cellular phone, you may need to set the desired voice recognition feature as the default. R For Android users: Depending on your cellular phone, you may need to set Google Now or S voice as your cellular phone’s default voice recognition feature.
Using Bluetooth® Devices 3 If your headset PIN is “0000”, go to step 4. If your headset PIN is not “0000”, press MCLEARN, then enter your headset’s PIN. R Typically, default PIN is “0000”. Refer to your headset’s operating instructions. Making landline calls with your headset 1 Press your headset’s button referring to your headset’s operating instructions. 4 Press MOKN, then wait until a long beep sounds. 2 Dial the phone number using the base unit after hearing the dial tone on your headset.
Using Bluetooth® Devices Adjusting your headset receiver volume Base unit Press MDN or MCN repeatedly while using your headset. Note: R Depending on your headset, the receiver volume may not be adjustable. For assistance, please visit http://shop.panasonic.
Answering System for Landline Answering system for landline The answering system can answer and record calls for you when you are unavailable to answer the phone. The unit can be set to play a greeting message but not to record caller messages by selecting “Greeting only” as the recording time setting (page 72). You can also record phone conversations (page 23, 28). Important: R Make sure the unit’s date and time setting is correct (page 15).
Answering System for Landline Handset / Base unit 1 2 3 MMENUN#304 Calling back (Caller ID subscribers only) MYESN Proceed with the operation for your unit. Handset: MOFFN Base unit: MEXITN Playing back the greeting message Handset / Base unit 1 2 *1 If pressed within the first 5 seconds of a message, the previous message is played. MMENUN#303 Proceed with the operation for your unit. Handset: To exit, press MOFFN. Base unit: To exit, press MEXITN.
Answering System for Landline Key Operation 76 Record greeting message 8 Turn answering system on MPAUSEN Pause message*2 9 or MSTOPN Stop recording Stop playback 0 Turn answering system off *4*3 Erase currently playing message *5 Erase all messages *6 Reset to a pre-recorded greeting message *1 If pressed within the first 5 seconds of a message, the previous message is played.
Answering System for Landline After you answer the new message alert call, you can listen to messages from that call (page 70). This feature is only available for landline. Important: R A new message alert is stopped 1 minute after the unit starts to call. The unit will not retry the call even if the call is not answered.
Answering System for Landline Activating/inactivating the remote access code to play messages If you activate this feature, you must enter the remote access code (page 70) to play the new message from the new message alert call. This is so that unauthorized parties cannot listen to your messages. The default setting is “Inactivate”. – “Inactivate”: You can listen to the message by pressing 4 to play new messages (without entering the remote access code).
Answering System for Landline 3 Voice guidance n When the English voice guidance is selected During remote operation, the unit’s voice guidance starts and prompts you to press 1 to perform a specific operation, or press 2 to listen to more available operations. n When the Spanish voice guidance is selected To start the voice guidance, press 9. The voice guidance announces the available remote commands (page 71).
Answering System for Landline 3 Proceed with the operation for your unit. Handset: MOFFN Base unit: MEXITN Caller’s recording time You can change the maximum message recording time allowed for each caller. The default setting is “3 min”. Handset / Base unit 1 2 3 MMENUN#305 MbN: Select the desired setting. a MSAVEN Proceed with the operation for your unit.
Useful Information Example: Voicemail service for landline In addition to your unit’s answering system you may also have voicemail service from your phone service provider. Voicemail is an answering service that may be offered by your phone service provider. This service can also record calls when you are unavailable to answer the phone or when your line is busy. Messages are recorded on the phone company system and not on the unit’s answering system.
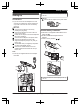
Useful Information Listening to voicemail messages 2 When new messages have been recorded, “Voicemail msg. via phone co.” is displayed if message indication service is available. A Turn the adaptor so that the words “UP WALL” are facing up. B Tuck the telephone line cord inside the wall mounting adaptor. C Connect the AC adaptor cord and telephone line cord. Handset / Base unit 1 MMENUN#330 R The speakerphone turns on. R Lift the corded handset if needed. 2 3 Follow the pre-recorded instructions.
Useful Information 4 Mount the unit on a wall then slide down to secure in place. R This product is compliant with the following wall phone plate sizes (2 types). 1 83 mm (3 1/4 inches) 2 102 mm (4 inches) Fit the slots of the unit onto the corresponding wall phone plate tabs for (3) and (4) respectively. Charger Drive the screws (1) (not supplied) into the wall. 2 27.
Useful Information Display message Cause/solution Busy R No cellular phone is paired to the base unit. Pair a cellular phone (page 17). R The called unit is in use. R Other units are in use and the system is busy. Try again later. R The handset you are using is too far from the base unit. Move closer and try again. R The automated call block function is in operation. Try again later. R One of the units is screening for telemarketing calls. Try again later.
Useful Information General use Problem Cause/solution The handset does not turn on even after installing charged batteries. R Place the handset on the charger to turn on the handset. The unit does not work. R Make sure the batteries are installed correctly (page 9). R Fully charge the batteries (page 10). R Check the connections (page 9). R Unplug the base unit’s AC adaptor to reset the unit. Reconnect the adaptor and try again. R The handset has not been registered to the base unit.
Useful Information Problem Cause/solution The base unit beeps. R New messages have been recorded. Listen to the new messages (page 67). Error sound is heard when I press R Automated call block is being screened. Try again later. some keys on base unit. The unit does not emit the specified number of rings. R The number of rings decreases by 1 from the specified number of rings in below situations: – the first ring is turned off (“No”) (page 33). – automated call block is set to “Block” (page 35).
Useful Information Problem Cause/solution Noise is heard, sound cuts in and out. R You are using the handset or base unit in an area with high electrical interference. Re-position the base unit and use the handset away from sources of interference. R Move closer to the base unit. R If you use a DSL/ADSL service, we recommend connecting a DSL/ADSL filter between the base unit and the telephone line jack. Contact your DSL/ADSL provider for details. The handset or base unit does not ring.
Useful Information Problem Cause/solution The unit answers an incoming call on its own. R This situation might happen due to a false detection of ambient noise (dog barking, TV sound, etc.). Move the unit further away from the noise sources. R If you are using other telephone that has Talking Caller ID feature turned on, it may also trigger false detection. Turn the Talking Caller ID feature off on the other telephone.
Useful Information Problem Cause/solution Caller information is not announced. R The ringer volume for landline is turned off. Adjust the ringer volume (page 22, 27, 48). R The ringer volume for cellular line is turned off. Adjust the ringer volume (page 22, 27, 46). R The unit which is not selected to ring for cellular calls does not announce caller information. To change the selection, see page 18. R The Talking Caller ID feature is turned off. Turn it on (page 48).
Useful Information Problem Cause/solution I cannot have a conversation using the headset. or I cannot connect my headset to the base unit. R Confirm that the Bluetooth wireless headset supports the HeadSet Profile (HSP) specification. R Your Bluetooth headset is not paired. Pair it (page 63). R Turn your headset off, then turn it on and try again.
Useful Information Problem Cause/solution The desired app does not start when you try to start the app using remote voice assist. R In order to use this feature, your cellular phone’s voice recognition feature must be ready to use. – iPhone: Make sure Siri is turned on. – Android: In order to use Google Now, make sure your cellular phone is registered to your Google account.
Useful Information Voicemail Problem Cause/solution “Voicemail msg. via phone R This notification is displayed when your phone service provider’s voicemail service (not the unit’s answering system) co.” is shown on the display. has recorded a message for you. Typically you can remove this How do I remove this message notification from the display by listening to the message.
Useful Information FCC and other information This equipment complies with Part 68 of the FCC rules and the requirements adopted by the ACTA. On the bottom of this equipment is a label that contains, among other information, a product identifier in the format US:ACJ----------. If requested, this number must be provided to the telephone company. R Registration No.............(found on the bottom of the unit) R Ringer Equivalence No. (REN).......0.
Useful Information CAUTION: Any changes or modifications not expressly approved by the party responsible for compliance could void the user’s authority to operate this device. R The handset may be carried and operated with only the specific provided belt-clip. Other non-tested belt-clips or similar body-worn accessories may not comply and must be avoided. NOTE: This equipment has been tested and found to comply with the limits for a Class B digital device, pursuant to Part 15 of the FCC Rules.
Useful Information canceled when the corded handset comes off during or after setting up. n To deactivate the charge only mode: – Lift the corded handset from the base unit and replace it. – Press any key. – 24 hours passed after activating the charge only mode. For assistance, please visit http://shop.panasonic.
Guía Rápida Española Guía Rápida Española Conexiones Unidad base 1 Conecte el adaptador de corriente alterna a la unidad presionándolo firmemente. 2 Conecte el cable de la línea telefónica a la unidad hasta que escuche un clic. 3 Enganche el cable del adaptador de corriente alterna y el cable de la línea telefónica para fijarlos. 4 Conecte el adaptador de corriente alterna a la toma de corriente.
Guía Rápida Española Instalación de la batería de la unidad portátil/cargado de la batería de la unidad portátil Cargue aproximadamente durante 7 horas. 4 2 2 3 1 1 Nota: L UTILICE SOLO baterías recargables de Ni-MH tamaño AAA (R03) (1). L NO utilice baterías alcalinas, de manganeso ni de Ni-Cd. L Confirme que las polaridades estén correctas (S, T). L Cambie el idioma de la pantalla. L Confirme que aparezca “Cargando” (2). Retire la batería 1 2 Para obtener ayuda, visite http://shop.panasonic.
Guía Rápida Española Sugerencias de operación Teclas de función Al oprimir una tecla de función, puede seleccionar la función que aparece directamente encima de ella en la pantalla. Preste atención a la pantalla para ver qué funciones están asignadas a las teclas de función durante la operación. Tecla navegadora Auricular: - {^}, {V}, {<}, o {>}: Navegue por diversas listas y elementos. - VOL. (Volumen: {^} o {V}): Ajuste el volumen del receptor o el altavoz mientras habla.
Guía Rápida Española Cómo grabar el mensaje de saludo del contestador de llamadas para la línea terrestre (Auricular/Unidad base) Puede grabar su propio mensaje de saludo en lugar de usar uno pregrabado. 1 {MENU}(3)2 s {r}: “Sí” s {SELEC.} 2 Después de que suene un pitido, hable con claridad en el micrófono a una distancia aproximada de 20 cm (8 pulgadas) (máx. de 2 minutos). 3 Oprima {PARAR} para dejar de grabar. 4 Continúe operando su unidad.
Guía Rápida Española Enlace a celular Unidad base: Indicadores de CELL Estado Significado Encendido Un teléfono celular está conectado. Listo para hacer o recibir llamadas celulares. Parpadea lentamente - La línea del celular se está usando. - Las entradas del directorio telefónico se están copiando desde un teléfono celular. - La unidad base está buscando el teléfono celular emparejado. - La unidad base está emparejando un teléfono celular. - Hay una llamada de celular en espera.
Guía Rápida Española Enlace a celular Cómo conectar o desconectar el teléfono celular (Auricular/Unidad base) Conexión automática a los dispositivos con Bluetooth (teléfonos celulares) La unidad se conecta a los dispositivos Bluetooth a intervalos regulares si se pierde la conexión. Consulte las instrucciones de operación para cambiar el intervalo (predeterminado: “1 min”).
Guía Rápida Española Operaciones básicas Cómo hacer y contestar llamadas (Auricular) Para ajustar el volumen del receptor o del altavoz Oprima {^} o {V} repetidamente mientras habla. Cómo hacer una llamada usando la lista de remarcación 1 {>} REDIAL s {r}: Seleccione la entrada deseada. 2 Para hacer una llamada celular: Cuando solo 1 teléfono celular está emparejado: {CEL.} o Cuando hay 2 teléfonos celulares emparejados: {CEL.} s {r}: Seleccione el teléfono celular deseado. s {SELEC.
Guía Rápida Española Operaciones básicas Directorio telefónico (Auricular) Para hacer llamadas 1 {<} k s {r}: Seleccione la entrada deseada. 2 Para hacer una llamada celular: Cuando solo 1 teléfono celular está emparejado: {CEL.} o Cuando hay 2 teléfonos celulares emparejados: {CEL.} s {r}: Seleccione el teléfono celular deseado. s {SELEC.
Guía Rápida Española Cómo usar dispositivos Bluetooth Copiado de entradas del directorio telefónico desde un teléfono celular con Bluetooth (transferencia del directorio telefónico) (Auricular/Unidad base) Puede copiar entradas del directorio telefónico desde los teléfonos celulares emparejados o desde otros teléfonos celulares (no emparejados) al directorio telefónico de la unidad. 1 {MENU}(618 2 Para copiar desde teléfonos celulares emparejados: {r}: Seleccione el teléfono celular deseado. s {SELEC.
Guía Rápida Española Cómo usar dispositivos Bluetooth Cómo usar un audífono Bluetooth (opcional) Al emparejar un audífono Bluetooth con la unidad base, podrá tener conversaciones a manos libres para llamadas terrestres. L Solo se puede usar 1 dispositivo Bluetooth con la unidad al mismo tiempo.*1 *1 No es posible usar un audifono Bluetooth para hablar en una linea celular. 1 2 1 Empareje usando el auricularo la unidad base.
Guía Rápida Española Preguntas frecuentes Pregunta Causa y solución ¿Por qué aparece _? L El auricular está demasiado lejos de la unidad base. Acérquelo. L El adaptador para corriente de la unidad base no está conectado correctamente. Conecte de nuevo el adaptador para corriente a la unidad base. L El auricular no está registrado en la unidad base. Regístrelo. 1 Auricular: {MENU}(13) 2 Unidad base: Oprima y mantenga oprimido {LOCATOR} durante aproximadamente 5 segundos.
Appendix Customer services Shop Accessories! for all your Panasonic gear Go to hp://shop.panasonic.com/support Get everything you need to get the most out of your Panasonic products Accessories & Parts for your Camera, Phone, A/V products, TV, Computers & Networking, Personal Care, Home Appliances, Headphones, Baeries, Backup Chargers & more… Customer Services Directory For Product Informa!on, Opera!ng Assistance, Parts, Owner’s Manuals, Dealer and Service info go to hp://shop.panasonic.
Appendix Limited Warranty (ONLY FOR U.S.A.
Appendix Limited Warranty Limits and Exclusions This warranty ONLY COVERS failures due to defects in materials or workmanship, and DOES NOT COVER normal wear and tear or cosmetic damage.
Index Index # A B C D 3-way conference: 24, 28 Additional handset: 55 Alarm: 52 Answer by voice command: 30 Answering calls: 22, 27 Answering system Call screening: 71 Erasing messages: 67, 68, 71 Greeting message: 66 Greeting only: 72 Listening to messages: 67, 70 New message alerting: 68 Number of rings: 71 Recording time: 72 Remote access code: 70 Remote operation: 70 Ring count: 71 Toll saver: 71 Turning on/off: 66 Assist button: 12 Auto intercom: 31 Auto talk: 22, 50 Automated call block: 35 Baby
Index Telemarketing call block: 37 Temporary tone dialing: 23, 28 Time adjustment: 48 Transferring calls: 24, 28 Troubleshooting: 76 TTY: 99 V VM (Voicemail): 73 Voice announcement language: 15 Voice paging: 31 Voicemail: 73 Volume Receiver: 21, 26 Ringer (Base unit): 27, 46, 48 Ringer (Handset): 22, 46, 48 Ringer for intercom call (Handset): 48 Speaker: 21, 26 W Wall mounting: 74 103
IMPORTANT! If your product is not working properly. . . 1 Reconnect AC adaptor to the base unit. 2 Check if telephone line cord is connected. 3 Use rechargeable Ni-MH batteries for the handset. (Alkaline/manganese/Ni-Cd batteries CANNOT be used.) 4 Read troubleshooting page in the Operating Instructions. Visit our Web site: http://shop.panasonic.com/support L FAQ and troubleshooting hints are available.