
Digital Camera User Manual
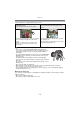
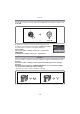
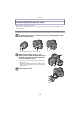
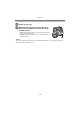
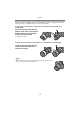

Table Of Contents
- Contents
- Before Use
- Preparation
- Basic
- Selecting the Recording Mode
- Tips for taking good pictures
- Taking a Still picture
- Taking Pictures using the Automatic Function (Intelligent Auto Mode)
- Taking Pictures with Defocus Control Function
- Taking Pictures with Your Favorite Settings (Program AE Mode)
- Recording Motion Pictures
- Playing Back Pictures/Motion Pictures
- Deleting Pictures
- Setting the Menu
- Setting the Quick Menu
- About the Setup Menu
- Recording
- Optical Image Stabilizer
- Taking Pictures with the Zoom
- Taking Pictures using the Built-in Flash
- Compensating the Exposure
- Taking Pictures using Burst Mode
- Taking Pictures using Auto Bracket
- Taking Pictures with the Self-timer
- Taking Pictures with Auto Focus
- Taking Pictures with Manual Focus
- Adjusting the White Balance
- Setting the Light Sensitivity
- Using the function button
- Taking Pictures by Specifying the Aperture/ Shutter Speed
- Taking Pictures that match the Scene being recorded (Scene Mode)
- Taking Pictures with different image effects (Creative Control Mode)
- Taking Pictures in Custom Mode
- Recording still pictures while recording motion pictures
- Taking a Picture with Face Recognition Function
- Entering Text
- Using the [REC] Mode Menu
- [PHOTO STYLE]
- [ASPECT RATIO]
- [PICTURE SIZE]
- [QUALITY]
- [FACE RECOG.]
- [FOCUS MODE]
- [QUICK AF]
- [METERING MODE]
- [FLASH]
- [RED-EYE REMOVAL]
- [FLASH SYNCHRO]
- [FLASH ADJUST.]
- [I.RESOLUTION]
- [I.DYNAMIC] (Intelligent dynamic range control)
- [ISO LIMIT SET]
- [ISO INCREMENTS]
- [LONG SHTR NR]
- [SHADING COMP.]
- [EX. TELE CONV.]
- [DIGITAL ZOOM]
- [BURST RATE]
- [AUTO BRACKET]
- [SELF-TIMER]
- [COLOR SPACE]
- [STABILIZER]
- Using the [MOTION PICTURE] Mode Menu
- Using the [CUSTOM] Menu
- Playback/Editing
- Connecting to other equipment
- Others

Before Use
- 12 -
This touch panel is a type that detects pressure.
Note
•
If you use a commercially available liquid crystal protection
sheet, please follow the instructions that accompany the sheet.
(Some liquid crystal protection sheets may impair visibility or
operability.)
• If a commercially available protection sheet is used, a little extra
pressure may be required if you notice that the touch panel is
not responsive.
• Avoid having the hand holding the camera accidently apply
pressure to the touch panel. Doing so may affect the touch panel
operation.
• Do not press on the LCD monitor with hard pointed tips, such as
ball point pens.
• Do not operate with your fingernails.
• Wipe the LCD monitor with dry soft cloth when it gets dirty with finger prints and others.
• Do not scratch or press the LCD monitor too hard.
• For information about the icons displayed on the touch panel, refer to “LCD Monitor Display/
Viewfinder Display
” on P185.
∫ About the Stylus pen
It is easier to use the stylus pen (supplied) for detailed operation or if it is hard to operate
with your fingers.
•
Only use the supplied stylus pen.
• Do not place it where small children can reach.
Touch Panel
Touch the screen
To touch and release the touch panel.
Drag
A movement without releasing the touch
panel.
Use this to perform tasks such as selecting
icons or images displayed on the touch
panel.
•
When selecting features using the touch
panel, be sure to touch the center of the
desired icon.
This is used to move the AF area, operate
the slide bar, etc.
This can also be used to move to the next
image during playback, etc.