
Digital Camera User Manual
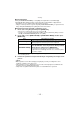
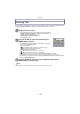
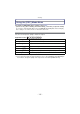
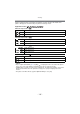
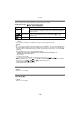
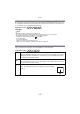
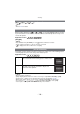
Table Of Contents
- Contents
- Before Use
- Preparation
- Basic
- Selecting the Recording Mode
- Tips for taking good pictures
- Taking a Still picture
- Taking Pictures using the Automatic Function (Intelligent Auto Mode)
- Taking Pictures with Defocus Control Function
- Taking Pictures with Your Favorite Settings (Program AE Mode)
- Recording Motion Pictures
- Playing Back Pictures/Motion Pictures
- Deleting Pictures
- Setting the Menu
- Setting the Quick Menu
- About the Setup Menu
- Recording
- Optical Image Stabilizer
- Taking Pictures with the Zoom
- Taking Pictures using the Built-in Flash
- Compensating the Exposure
- Taking Pictures using Burst Mode
- Taking Pictures using Auto Bracket
- Taking Pictures with the Self-timer
- Taking Pictures with Auto Focus
- Taking Pictures with Manual Focus
- Adjusting the White Balance
- Setting the Light Sensitivity
- Using the function button
- Taking Pictures by Specifying the Aperture/ Shutter Speed
- Taking Pictures that match the Scene being recorded (Scene Mode)
- Taking Pictures with different image effects (Creative Control Mode)
- Taking Pictures in Custom Mode
- Recording still pictures while recording motion pictures
- Taking a Picture with Face Recognition Function
- Entering Text
- Using the [REC] Mode Menu
- [PHOTO STYLE]
- [ASPECT RATIO]
- [PICTURE SIZE]
- [QUALITY]
- [FACE RECOG.]
- [FOCUS MODE]
- [QUICK AF]
- [METERING MODE]
- [FLASH]
- [RED-EYE REMOVAL]
- [FLASH SYNCHRO]
- [FLASH ADJUST.]
- [I.RESOLUTION]
- [I.DYNAMIC] (Intelligent dynamic range control)
- [ISO LIMIT SET]
- [ISO INCREMENTS]
- [LONG SHTR NR]
- [SHADING COMP.]
- [EX. TELE CONV.]
- [DIGITAL ZOOM]
- [BURST RATE]
- [AUTO BRACKET]
- [SELF-TIMER]
- [COLOR SPACE]
- [STABILIZER]
- Using the [MOTION PICTURE] Mode Menu
- Using the [CUSTOM] Menu
- Playback/Editing
- Connecting to other equipment
- Others
Recording
- 124 -
∫ Adjusting the picture quality
1 Press 2/1 to select the type of Photo Style.
2 Press 3/4 to select the items, and then press 2/1 to adjust.
•
Registered settings are memorized even if the camera is turned off.
• If you adjust the picture quality, [_] is displayed beside the Photo Style icon on the
screen.
• Selecting [MONOCHROME] will change the color tone through [SATURATION].
• Picture quality cannot be adjusted in the Intelligent Auto Mode and the Scene Mode.
3 Press 4 to select [Custom setting] and then press [MENU/SET].
•
Confirmation screen is displayed. It is executed when [YES] is selected.
• Setting can be registered in [CUSTOM].
Note
•
In Photo Style, the camera may do something equivalent to pull processing or push processing
to create a picture with particular characteristics. The shutter speed may become very slow at
this time.
This allows you to select the aspect ratio of the pictures to suit printing or the playback
method.
Applicable modes:
Note
•
The ends of the recorded pictures may be cut at printing so check before printing. (P205)
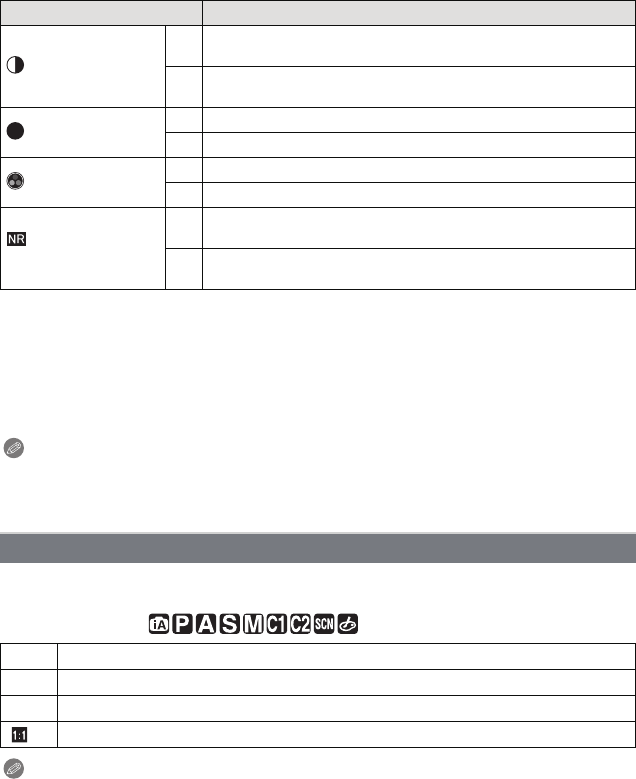
Item Effect
[CONTRAST]
[r]
Increases the difference between the brightness and the
darkness in the picture.
[s]
Decreases the difference between the brightness and the
darkness in the picture.
[SHARPNESS]
[r] The picture is sharply defined.
[s] The picture is softly focused.
[SATURATION]
[r] The colors in the picture become vivid.
[s] The colors in the picture become natural.
[NOISE
REDUCTION]
[r]
The noise reduction effect is enhanced. Picture resolution may
deteriorate slightly.
[s]
The noise reduction effect is reduced. You can obtain pictures
with higher resolution.
[ASPECT RATIO]
[X] [ASPECT RATIO] of a 4:3 TV
[Y] [ASPECT RATIO] of a 35 mm film camera
[W] [ASPECT RATIO] of a high-definition TV, etc.
[] Square aspect ratio
S