
Digital Camera User Manual
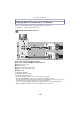

Table Of Contents
- Contents
- Before Use
- Preparation
- Basic
- Selecting the Recording Mode
- Tips for taking good pictures
- Taking a Still picture
- Taking Pictures using the Automatic Function (Intelligent Auto Mode)
- Taking Pictures with Defocus Control Function
- Taking Pictures with Your Favorite Settings (Program AE Mode)
- Recording Motion Pictures
- Playing Back Pictures/Motion Pictures
- Deleting Pictures
- Setting the Menu
- Setting the Quick Menu
- About the Setup Menu
- Recording
- Optical Image Stabilizer
- Taking Pictures with the Zoom
- Taking Pictures using the Built-in Flash
- Compensating the Exposure
- Taking Pictures using Burst Mode
- Taking Pictures using Auto Bracket
- Taking Pictures with the Self-timer
- Taking Pictures with Auto Focus
- Taking Pictures with Manual Focus
- Adjusting the White Balance
- Setting the Light Sensitivity
- Using the function button
- Taking Pictures by Specifying the Aperture/ Shutter Speed
- Taking Pictures that match the Scene being recorded (Scene Mode)
- Taking Pictures with different image effects (Creative Control Mode)
- Taking Pictures in Custom Mode
- Recording still pictures while recording motion pictures
- Taking a Picture with Face Recognition Function
- Entering Text
- Using the [REC] Mode Menu
- [PHOTO STYLE]
- [ASPECT RATIO]
- [PICTURE SIZE]
- [QUALITY]
- [FACE RECOG.]
- [FOCUS MODE]
- [QUICK AF]
- [METERING MODE]
- [FLASH]
- [RED-EYE REMOVAL]
- [FLASH SYNCHRO]
- [FLASH ADJUST.]
- [I.RESOLUTION]
- [I.DYNAMIC] (Intelligent dynamic range control)
- [ISO LIMIT SET]
- [ISO INCREMENTS]
- [LONG SHTR NR]
- [SHADING COMP.]
- [EX. TELE CONV.]
- [DIGITAL ZOOM]
- [BURST RATE]
- [AUTO BRACKET]
- [SELF-TIMER]
- [COLOR SPACE]
- [STABILIZER]
- Using the [MOTION PICTURE] Mode Menu
- Using the [CUSTOM] Menu
- Playback/Editing
- Connecting to other equipment
- Others
Connecting to other equipment
- 166 -
Connecting the camera to a 3D compatible television and playing back pictures taken in
3D allows you to enjoy 3D pictures for extra impact.
It is also possible to play back the recorded 3D pictures by inserting an SD card into the
3D compatible television with an SD card slot.
Connect the unit to a 3D compatible television using the HDMI mini cable
and display the playback screen. (P168)
• When [VIERA Link] (P67) is set to [ON] and the camera is connected to a TV supporting VIERA
Link, input of the TV will be switched automatically and playback screen will be displayed.
Refer to P170 for details.
• For the pictures recorded in 3D, [ ] will appear on the thumbnail display at playback.
∫ Playback in 3D by selecting only the still pictures recorded in 3D
Select [3D PLAY] in [PLAYBACK MODE] in the [PLAYBACK] Mode menu. (P150)
∫ Playback as a 3D slide show by selecting only the still pictures recorded in 3D
Select [3D] in [SLIDE SHOW] in the [PLAYBACK] Mode menu. (P148)
∫ Switch the playback method for the still pictures recorded in 3D
1 Select the picture recorded in 3D.
2 Select [2D/3D SETTINGS] on the [PLAYBACK] Mode menu and then press
[MENU/SET]. (P56)
•
Playback method will switch to 3D if it is playing back in 2D (conventional image), or it will
switch to 2D if it is playing back in 3D.
• If you feel tired, uncomfortable or otherwise strange when playing back pictures recorded
in 3D, set to 2D.
∫ Functions that cannot be set/do not work with 3D pictures
•
[HIGHLIGHT] in the [CUSTOM] menu
¢
• Playback Zoom
¢
• Deleting pictures
¢
• Editing functions of [PLAYBACK] Mode menu ([TITLE EDIT]/[TEXT STAMP]/[VIDEO DIVIDE]/
[RESIZE]/[CROPPING]/[ASPECT CONV.]/[ROTATE]/[ROTATE DISP.]/[FAVORITE]
¢
/[PRINT
SET]
¢
/[PROTECT]
¢
/[FACE REC EDIT]
¢
)
¢ Can be used when displayed in 2D.
Playing back 3D pictures
For current information regarding devices that can playback 3D pictures
recorded with this unit, please refer to the below support site.
http://panasonic.jp/support/global/cs/dsc/
(This Site is English only.)
Preparations: Set the [HDMI MODE] to [AUTO] or [1080i]. (P66)
Set the [3D PLAYBACK] to [ ]. (P67)