
Digital Camera User Manual
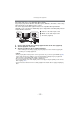
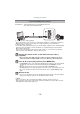

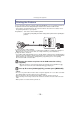
Table Of Contents
- Contents
- Before Use
- Preparation
- Basic
- Selecting the Recording Mode
- Tips for taking good pictures
- Taking a Still picture
- Taking Pictures using the Automatic Function (Intelligent Auto Mode)
- Taking Pictures with Defocus Control Function
- Taking Pictures with Your Favorite Settings (Program AE Mode)
- Recording Motion Pictures
- Playing Back Pictures/Motion Pictures
- Deleting Pictures
- Setting the Menu
- Setting the Quick Menu
- About the Setup Menu
- Recording
- Optical Image Stabilizer
- Taking Pictures with the Zoom
- Taking Pictures using the Built-in Flash
- Compensating the Exposure
- Taking Pictures using Burst Mode
- Taking Pictures using Auto Bracket
- Taking Pictures with the Self-timer
- Taking Pictures with Auto Focus
- Taking Pictures with Manual Focus
- Adjusting the White Balance
- Setting the Light Sensitivity
- Using the function button
- Taking Pictures by Specifying the Aperture/ Shutter Speed
- Taking Pictures that match the Scene being recorded (Scene Mode)
- Taking Pictures with different image effects (Creative Control Mode)
- Taking Pictures in Custom Mode
- Recording still pictures while recording motion pictures
- Taking a Picture with Face Recognition Function
- Entering Text
- Using the [REC] Mode Menu
- [PHOTO STYLE]
- [ASPECT RATIO]
- [PICTURE SIZE]
- [QUALITY]
- [FACE RECOG.]
- [FOCUS MODE]
- [QUICK AF]
- [METERING MODE]
- [FLASH]
- [RED-EYE REMOVAL]
- [FLASH SYNCHRO]
- [FLASH ADJUST.]
- [I.RESOLUTION]
- [I.DYNAMIC] (Intelligent dynamic range control)
- [ISO LIMIT SET]
- [ISO INCREMENTS]
- [LONG SHTR NR]
- [SHADING COMP.]
- [EX. TELE CONV.]
- [DIGITAL ZOOM]
- [BURST RATE]
- [AUTO BRACKET]
- [SELF-TIMER]
- [COLOR SPACE]
- [STABILIZER]
- Using the [MOTION PICTURE] Mode Menu
- Using the [CUSTOM] Menu
- Playback/Editing
- Connecting to other equipment
- Others
Connecting to other equipment
- 178 -
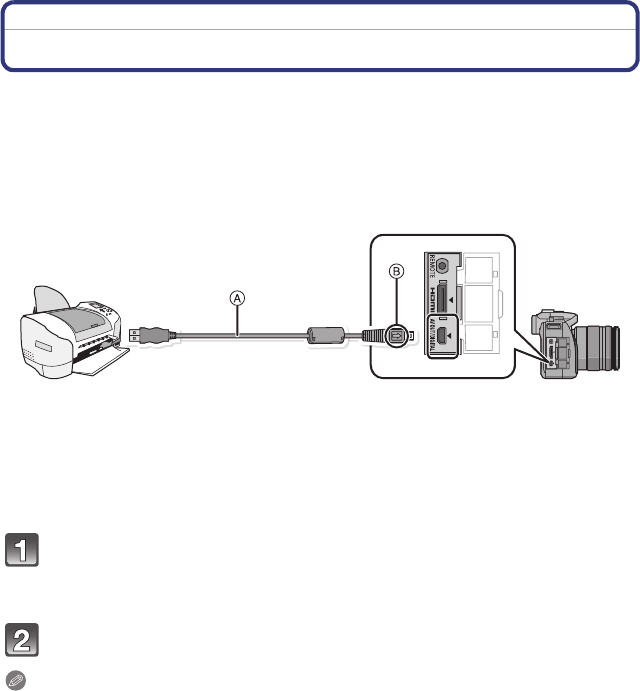
Printing the Pictures
If you connect the camera to a printer supporting PictBridge, you can select the pictures to
be printed out and instruct that printing be started on the camera’s LCD monitor.
•
Some printers can print directly from the card removed from the camera. For details, refer to
the operating instructions of your printer.
A USB connection cable (supplied)
• Check the directions of the connectors, and plug them straight in or unplug them straight out.
(Otherwise the connectors may be bent out of shape which may cause malfunction.)
B Align the marks, and insert.
• Use a battery with sufficient battery power or the AC adaptor (optional). If the remaining battery
power becomes low while the camera and the printer are connected, the status indicator blinks
and the alarm beeps. If this happens during printing, stop printing at once. If not printing,
disconnect the USB connection cable.
Connect the camera to a printer via the USB connection cable A
(supplied).
• When the camera is connected to the printer, the cable disconnect prohibit icon [å]
appears. Do not disconnect the USB cable while [å] is displayed.
Press 3/4 to select [PictBridge(PTP)], and then press [MENU/SET].
Note
•
Do not use any other USB connection cables except the supplied one. Use of cables other than
the supplied USB connection cable may cause malfunction.
• Before connecting or disconnecting the AC adaptor (optional), turn the camera off.
• Before inserting or removing a card, turn the camera off, and disconnect the USB connection
cable.
• Motion pictures recorded cannot be printed out.
Preparations: Turn on the camera and the printer.
Perform the print quality and other settings at the printer before printing the
pictures.