
Digital Camera User Manual
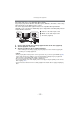
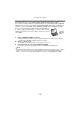
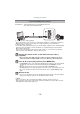

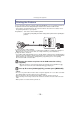
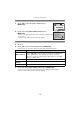
Table Of Contents
- Contents
- Before Use
- Preparation
- Basic
- Selecting the Recording Mode
- Tips for taking good pictures
- Taking a Still picture
- Taking Pictures using the Automatic Function (Intelligent Auto Mode)
- Taking Pictures with Defocus Control Function
- Taking Pictures with Your Favorite Settings (Program AE Mode)
- Recording Motion Pictures
- Playing Back Pictures/Motion Pictures
- Deleting Pictures
- Setting the Menu
- Setting the Quick Menu
- About the Setup Menu
- Recording
- Optical Image Stabilizer
- Taking Pictures with the Zoom
- Taking Pictures using the Built-in Flash
- Compensating the Exposure
- Taking Pictures using Burst Mode
- Taking Pictures using Auto Bracket
- Taking Pictures with the Self-timer
- Taking Pictures with Auto Focus
- Taking Pictures with Manual Focus
- Adjusting the White Balance
- Setting the Light Sensitivity
- Using the function button
- Taking Pictures by Specifying the Aperture/ Shutter Speed
- Taking Pictures that match the Scene being recorded (Scene Mode)
- Taking Pictures with different image effects (Creative Control Mode)
- Taking Pictures in Custom Mode
- Recording still pictures while recording motion pictures
- Taking a Picture with Face Recognition Function
- Entering Text
- Using the [REC] Mode Menu
- [PHOTO STYLE]
- [ASPECT RATIO]
- [PICTURE SIZE]
- [QUALITY]
- [FACE RECOG.]
- [FOCUS MODE]
- [QUICK AF]
- [METERING MODE]
- [FLASH]
- [RED-EYE REMOVAL]
- [FLASH SYNCHRO]
- [FLASH ADJUST.]
- [I.RESOLUTION]
- [I.DYNAMIC] (Intelligent dynamic range control)
- [ISO LIMIT SET]
- [ISO INCREMENTS]
- [LONG SHTR NR]
- [SHADING COMP.]
- [EX. TELE CONV.]
- [DIGITAL ZOOM]
- [BURST RATE]
- [AUTO BRACKET]
- [SELF-TIMER]
- [COLOR SPACE]
- [STABILIZER]
- Using the [MOTION PICTURE] Mode Menu
- Using the [CUSTOM] Menu
- Playback/Editing
- Connecting to other equipment
- Others
- 179 -
Connecting to other equipment
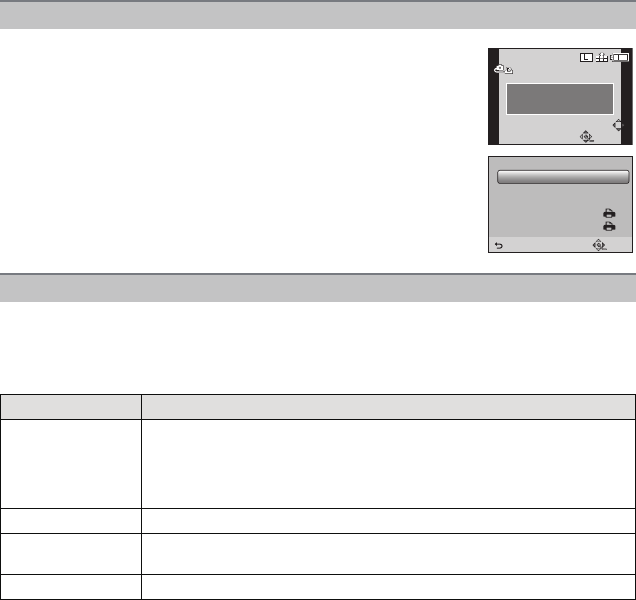
Selecting a single picture and printing it
1 Press 2/1 to select the picture and then press
[MENU/SET].
2 Press 3 to select [PRINT START] and then press
[MENU/SET].
•
Refer to P180 for the items which can be set before starting to print
the pictures.
• Disconnect the USB connection cable after printing.
Selecting multiple pictures and printing them
1 Press 3.
2 Press 3/4 to select an item and then press [MENU/SET].
•
If the print check screen has appeared, select [YES], and print the pictures.
Item Description of settings
[MULTI SELECT]
Multiple pictures are printed at one time.
• Press 3/4/2/1 to select the pictures and then press [MENU/SET].
(When [MENU/SET] is pressed again, the setting is canceled.)
• Once the selection is completed, press 2 a few times to select [OK],
and press [MENU/SET].
[SELECT ALL] Prints all the stored pictures.
[PRINT SET
(DPOF)]
Prints the pictures set in [PRINT SET] only. (P160)
[FAVORITE] Prints the pictures set as favorites only. (P159)
3 Press 3 to select [PRINT START] and then press [MENU/SET].
•
Refer to P180 for the items which can be set before starting to print the pictures.
• Disconnect the USB connection cable after printing.
100
_
0001100100
_
00010001100
_
0001
PLEASE SELECT
THE PICTURE TO PRINT
SELECTSELECT
PRINTPRINT
PictBridgePictBridgePictBridge
MULTI PRINTMULTI PRINT
OFF
1
PRINT START
PRINT WITH DATE
NUM. OF PRINTS
PAPER SIZE
PAGE LAYOUT
SINGLE SELECT
SETSELECT
CANCEL