
Digital Camera User Manual
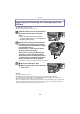

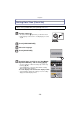
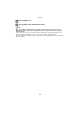
Table Of Contents
- Contents
- Before Use
- Preparation
- Basic
- Selecting the Recording Mode
- Tips for taking good pictures
- Taking a Still picture
- Taking Pictures using the Automatic Function (Intelligent Auto Mode)
- Taking Pictures with Defocus Control Function
- Taking Pictures with Your Favorite Settings (Program AE Mode)
- Recording Motion Pictures
- Playing Back Pictures/Motion Pictures
- Deleting Pictures
- Setting the Menu
- Setting the Quick Menu
- About the Setup Menu
- Recording
- Optical Image Stabilizer
- Taking Pictures with the Zoom
- Taking Pictures using the Built-in Flash
- Compensating the Exposure
- Taking Pictures using Burst Mode
- Taking Pictures using Auto Bracket
- Taking Pictures with the Self-timer
- Taking Pictures with Auto Focus
- Taking Pictures with Manual Focus
- Adjusting the White Balance
- Setting the Light Sensitivity
- Using the function button
- Taking Pictures by Specifying the Aperture/ Shutter Speed
- Taking Pictures that match the Scene being recorded (Scene Mode)
- Taking Pictures with different image effects (Creative Control Mode)
- Taking Pictures in Custom Mode
- Recording still pictures while recording motion pictures
- Taking a Picture with Face Recognition Function
- Entering Text
- Using the [REC] Mode Menu
- [PHOTO STYLE]
- [ASPECT RATIO]
- [PICTURE SIZE]
- [QUALITY]
- [FACE RECOG.]
- [FOCUS MODE]
- [QUICK AF]
- [METERING MODE]
- [FLASH]
- [RED-EYE REMOVAL]
- [FLASH SYNCHRO]
- [FLASH ADJUST.]
- [I.RESOLUTION]
- [I.DYNAMIC] (Intelligent dynamic range control)
- [ISO LIMIT SET]
- [ISO INCREMENTS]
- [LONG SHTR NR]
- [SHADING COMP.]
- [EX. TELE CONV.]
- [DIGITAL ZOOM]
- [BURST RATE]
- [AUTO BRACKET]
- [SELF-TIMER]
- [COLOR SPACE]
- [STABILIZER]
- Using the [MOTION PICTURE] Mode Menu
- Using the [CUSTOM] Menu
- Playback/Editing
- Connecting to other equipment
- Others
Preparation
- 24 -
Inserting and Removing the Card (optional)/the
Battery
• Check that this unit is turned off.
• We recommend using a Panasonic card.
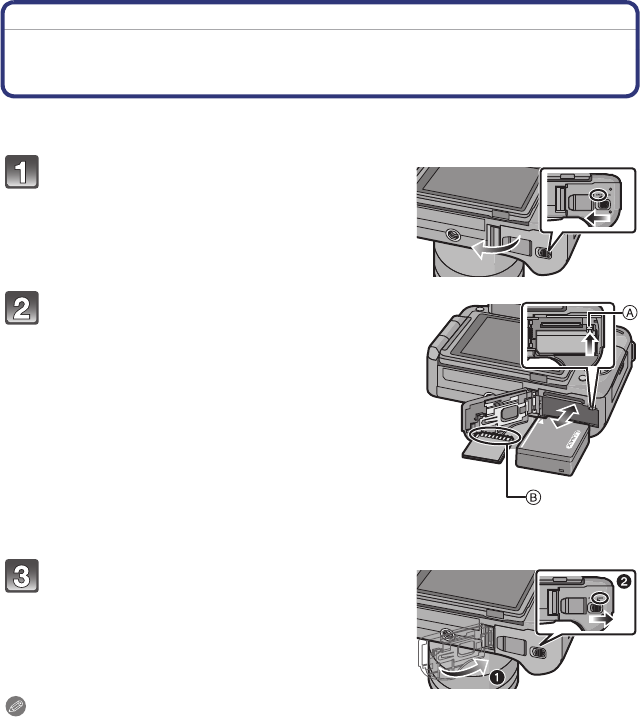
Slide the release lever in the direction of
the arrow and open the card/battery
door.
• Always use genuine Panasonic batteries.
• If you use other batteries, we cannot guarantee
the quality of this product.
Battery: Being careful about the battery
orientation, insert all the way until you
hear a locking sound and then check that
it is locked by lever A.
Pull the lever A in the direction of the
arrow to remove the battery.
Card: Push it securely all the way until
you hear a “click” while being careful
about the direction in which you insert it.
To remove the card, push the card until it
clicks, then pull the card out upright.
B: Do not touch the connection terminals of the card.
1:Close the card/battery door.
2:Slide the release lever in the direction
of the arrow.
Note
•
Remove the battery after use.
• The battery will be exhausted if left for a long period of time after being charged.
• The battery becomes warm after using it and during and after charging. The camera also
becomes warm during use. This is not a malfunction.
• Before removing the card or battery, turn the camera off, and wait until the status indicator has
gone off completely. (Otherwise, this unit may no longer operate normally and the card itself
may be damaged or the recorded pictures may be lost.)