
Digital Camera User Manual
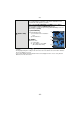
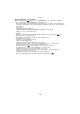
Table Of Contents
- Contents
- Before Use
- Preparation
- Basic
- Selecting the Recording Mode
- Tips for taking good pictures
- Taking a Still picture
- Taking Pictures using the Automatic Function (Intelligent Auto Mode)
- Taking Pictures with Defocus Control Function
- Taking Pictures with Your Favorite Settings (Program AE Mode)
- Recording Motion Pictures
- Playing Back Pictures/Motion Pictures
- Deleting Pictures
- Setting the Menu
- Setting the Quick Menu
- About the Setup Menu
- Recording
- Optical Image Stabilizer
- Taking Pictures with the Zoom
- Taking Pictures using the Built-in Flash
- Compensating the Exposure
- Taking Pictures using Burst Mode
- Taking Pictures using Auto Bracket
- Taking Pictures with the Self-timer
- Taking Pictures with Auto Focus
- Taking Pictures with Manual Focus
- Adjusting the White Balance
- Setting the Light Sensitivity
- Using the function button
- Taking Pictures by Specifying the Aperture/ Shutter Speed
- Taking Pictures that match the Scene being recorded (Scene Mode)
- Taking Pictures with different image effects (Creative Control Mode)
- Taking Pictures in Custom Mode
- Recording still pictures while recording motion pictures
- Taking a Picture with Face Recognition Function
- Entering Text
- Using the [REC] Mode Menu
- [PHOTO STYLE]
- [ASPECT RATIO]
- [PICTURE SIZE]
- [QUALITY]
- [FACE RECOG.]
- [FOCUS MODE]
- [QUICK AF]
- [METERING MODE]
- [FLASH]
- [RED-EYE REMOVAL]
- [FLASH SYNCHRO]
- [FLASH ADJUST.]
- [I.RESOLUTION]
- [I.DYNAMIC] (Intelligent dynamic range control)
- [ISO LIMIT SET]
- [ISO INCREMENTS]
- [LONG SHTR NR]
- [SHADING COMP.]
- [EX. TELE CONV.]
- [DIGITAL ZOOM]
- [BURST RATE]
- [AUTO BRACKET]
- [SELF-TIMER]
- [COLOR SPACE]
- [STABILIZER]
- Using the [MOTION PICTURE] Mode Menu
- Using the [CUSTOM] Menu
- Playback/Editing
- Connecting to other equipment
- Others
Basic
- 64 -
• When you connect the camera to a TV, the volume of the TV speakers does not change.
• It will adjust the LCD monitor when the LCD monitor is in use, and the viewfinder when the
viewfinder is in use.
• Some subjects may appear differently from actuality on the LCD monitor/viewfinder. However,
this does not affect the recorded pictures.
• The brightness of the pictures displayed on the LCD monitor is increased so some subjects
may appear differently from actuality on the LCD monitor. However, this does not affect the
recorded pictures.
• The LCD monitor automatically returns to standard brightness after 30 seconds when recording
in [MODE1]. It will light up brightly again by button or touch operation.
• If the screen is difficult to see because of light from the sun etc. shining on it, use your hand or
another object to block the light.
• The number of recordable pictures decreases in [AUTO] and [MODE1].
• [AUTO] is only available in the Recording Mode.
• [AUTO] is disabled during motion picture recording.
• When the menu screen is displayed in a dark environment etc., the LCD monitor becomes
darker even if [LCD MODE] is set to [MODE2].
• The initial setting when using the AC adaptor (optional) is [MODE2].
u [VOLUME] Adjust the volume of the speaker to any of 7 levels.
[MONITOR]/
[VIEWFINDER]
Brightness, color, or red or blue tint of the LCD monitor/viewfinder
is adjusted.
1 Select the settings by pressing 3/
4, and adjust with 2/1 or the rear
dial.
2 Press [MENU/SET] to set.
[LCD MODE]
The brightness of the LCD monitor can be adjusted depending on
how bright it is around the camera.
„ [AUTO]:
The brightness is adjusted automatically depending on how bright
it is around the camera.
[MODE1]:
Make the LCD monitor brighter.
[MODE2]:
Set the LCD monitor to the standard brightness.
[MODE3]:
Make the LCD monitor darker.
LCD
…
1
…
2
…
3