Digital Camera User Manual
Table Of Contents
- Contents
- Before Use
- Preparation
- Basic
- Selecting the Recording Mode
- Tips for taking good pictures
- Taking a Still picture
- Taking Pictures using the Automatic Function (Intelligent Auto Mode)
- Taking Pictures with Defocus Control Function
- Taking Pictures with Your Favorite Settings (Program AE Mode)
- Recording Motion Pictures
- Playing Back Pictures/Motion Pictures
- Deleting Pictures
- Setting the Menu
- Setting the Quick Menu
- About the Setup Menu
- Recording
- Optical Image Stabilizer
- Taking Pictures with the Zoom
- Taking Pictures using the Built-in Flash
- Compensating the Exposure
- Taking Pictures using Burst Mode
- Taking Pictures using Auto Bracket
- Taking Pictures with the Self-timer
- Taking Pictures with Auto Focus
- Taking Pictures with Manual Focus
- Adjusting the White Balance
- Setting the Light Sensitivity
- Using the function button
- Taking Pictures by Specifying the Aperture/ Shutter Speed
- Taking Pictures that match the Scene being recorded (Scene Mode)
- Taking Pictures with different image effects (Creative Control Mode)
- Taking Pictures in Custom Mode
- Recording still pictures while recording motion pictures
- Taking a Picture with Face Recognition Function
- Entering Text
- Using the [REC] Mode Menu
- [PHOTO STYLE]
- [ASPECT RATIO]
- [PICTURE SIZE]
- [QUALITY]
- [FACE RECOG.]
- [FOCUS MODE]
- [QUICK AF]
- [METERING MODE]
- [FLASH]
- [RED-EYE REMOVAL]
- [FLASH SYNCHRO]
- [FLASH ADJUST.]
- [I.RESOLUTION]
- [I.DYNAMIC] (Intelligent dynamic range control)
- [ISO LIMIT SET]
- [ISO INCREMENTS]
- [LONG SHTR NR]
- [SHADING COMP.]
- [EX. TELE CONV.]
- [DIGITAL ZOOM]
- [BURST RATE]
- [AUTO BRACKET]
- [SELF-TIMER]
- [COLOR SPACE]
- [STABILIZER]
- Using the [MOTION PICTURE] Mode Menu
- Using the [CUSTOM] Menu
- Playback/Editing
- Connecting to other equipment
- Others

- 75 -
Recording
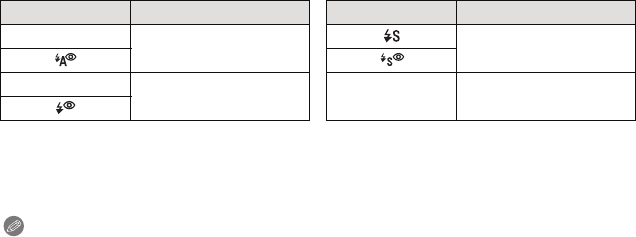
∫ Shutter speed for each flash setting
¢1 This becomes 60 seconds in Shutter-Priority AE Mode.
¢2
This becomes 60 seconds in Shutter-Priority AE Mode and B (Bulb) in the Manual Exposure Mode.
¢3 This becomes B (Bulb) in the Manual Exposure Mode.
• When the flash is activated the fastest shutter speed that can be selected is 1/160 of a second.
• In Intelligent Auto Mode, shutter speed changes depending on the identified scene.
Note
•
Do not bring the flash too close to objects or close the flash while it is activated. The objects
may be discolored by its heat or lighting.
• Do not close the flash soon after the flash is activated prior to taking pictures due to AUTO/
Red-Eye Reduction etc. It causes a malfunction.
• Flash pictures taken closer or beyond the flash’s rated distance may appear too bright or too
dark.
• You must wait a moment to take the next picture while the flash icon is blinking RED indicating
the flash is charging.
• When you take a picture beyond the available flash range, white balance may be set
incorrectly.
• When you use certain lenses, light from the flash may be blocked or fail to cover the lens
field of view, causing dark areas to appear in the resulting pictures.
• When taking pictures with flash with the lens hood attached, the lower portion of the photo may
turn dark (vignetting effect) and the control of the flash may be disabled because the photo
flash may be obscured by the lens hood. We recommend detaching the lens hood.
• It may take time to charge the flash if you repeat taking a picture. Take a picture after the
access indication disappears.
• The Red-Eye Reduction effect differs between people. Also, if the subject was far away from
the camera or was not looking at the first flash, the effect may not be evident.
• When you attach an external flash, it takes priority over the built-in flash. Refer to P182 for the
external flash.
Flash setting Shutter speed (Sec.) Flash setting Shutter speed (Sec.)
‡
1/60
¢1
to 1/4000th 1 to 1/4000th
‰
1/60
¢2
to 1/160th Π60
¢3
to 1/4000th


