
Instruction Manual (UK)


5
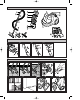
How to empty the dust compartment
IMPORTANT: Empty the dust compartment before the dust
reach the maximum dust level mark.
NOTE: When vacuuming fine dust, such as powder or similar,
there may be a loss of suction power. If this happens,
empty the dust compartment and check for possible
dust trapped on filters.
We recommend a dust compartment maintenance
operation, after a long cleaning session.
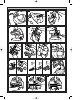
D-1 Remove dust compartment pulling upwards.
D-2 Open the rear cover of the dust compartment.
D-3 Fix the rear cover pressing until it "clicks".
D-4 Empty the dust into a bag or a waste bin.
D-5 To clean the pre-filter, press the locks at both sides of
dust compartment and remove the dust compartment
cover.
D-6 Clean the pre-filter by brushing the dust off with a soft
brush.
D-7 To clean the main filter A and B remove the dust
compartment cover.
D-8 Remove dust accumulated in the main filter A and B by
tapping them against a hard surface.
NOTE: If dust remains on main filter A, replace with
the spare and carry out further cleaning
detailed following described.
Re-assemble filters and dust compartment
cover in the reverse order.
D-9 Insert claws in to dust compartment cover slots and
close.
D-10 Place back dust compartment and press until it
"clicks".
IMPORTANT: If after having emptied the dust compartment
the airflow is not enough, check for any
possible blockage in the hose, pipe or suction
inlet.
• NOTE: The dust compartment may be washed with
warm water.
• DO NOT use detergents or other cleaning fluids to avoid
deterioration of the plastic.
• DO NOT attempt to clean the dust compartment in a
dishwasher.
• IMPORTANT: Before re-assembling the dust
compartment, ensure it is completely dry.
Cleaning or replacing the filters
Pre-filter / Main filter A / Main filter B
NOTE: To clean or replace the filters, remove the dust
compartment and take out dust compartment cover.
D-11 Remove dust accumulated in the filters by tapping
them against a hard surface. If after having removed
the dust there is not enough airflow, clean them out in
warm water or replace with a new one.
Central filter
NOTE: For ease of access to the central filter, remove the
dust compartment.
D-12 Take out the central filter and remove dust by tapping
it against a hard surface. If dust remains on the central
filter, replace it with a new one and re-install.
Electrostatic clean air filter (depending on model)
D-13 To replace the electrostatic clean air filter, press the
exhaust cover lock and take it out.
D-14 Remove the filter support and take out the electrostatic
clean air filter. Replace the electrostatic clean air filter
with a new one and re-install in the reverse order.
HEPA Filter (depending on model)
NOTE: Even if HEPA Filter appears not to require
replacement, we recommend to change it once a
year.
D-15 To replace the HEPA filter, press the exhaust cover
lock and take it out. Replace the HEPA filter with a new
one and re-install in the reverse order.
IMPORTANT: Make sure the rubber seal of the HEPA filter is
faced inside the cleaner.
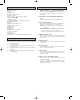
What to do if your cleaner does not work
Check that the appliance is correctly plugged in and that the
electrical socket is working. In case that the thermal cut-out
device has operated, wait until it resets after aproximately 40
minutes.
If after having checked the mentioned points, the cleaner
does not work, take it to an Authorised Service Centre to be
repaired.
What to do when the suction performance
reduces
• Stop the cleaner and unplug from the socket.
• Check whether the tubes, hose and accessories are
blocked or not.
If they are blocked, remove the obstruction.
• Check that the dust compartment is full.
If it is full, empty it.
• Check that the main filter A or B is blocked with dust.
If they are blocked, clean them out or replace.
REMINDER FOR CUSTOMER
The model and serial number of this product may be found on
the nameplate located at the underside of your cleaner. You
should note the model and serial number in the spaces
provided and retain this book as a permanent record of your
purchase. ...............................................................................
Model Number. ......................................................................
Serial No. ...............................................................................
Date Purchased. ....................................................................
Where Purchased. .................................................................
D - MAINTENANCE AND SERVICING
CAUTIONS
• DO NOT use detergents or other cleaning fluids to clean
the filters. They may deteriorate the plastic.
• DO NOT use hot air or hot surface to dry filters. Keep at
room temperature for approximately 24 hours.
• IMPORTANT: Before re-installing the washable filters,
make sure they are completely dry to avoid damaging
the cleaner.
MC-E8024, MC-E8024K
MC-E8023, MC-E8023K
230-240 V~50 Hz
2000 W
1650-1800 W
300 mm x 420 mm x 290 mm
6.0 kg
√
√
√
MC-E8021, MC-E8021K
230-240 V~50 Hz
1900 W
1600-1750 W
300 mm x 420 mm x 290 mm
6.0 kg
√
√
√
SPECIFICATIONS
Power source
Max. Output
Nominal Output
Dimensions
(W x L x H)
Net weight
Telescopic tube
Crevice nozzle
Dusting brush
ZXL008-MC-E802405.2.37:00PMページ7