
user manual
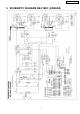
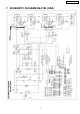


11.2. Digital programmer circuit
board
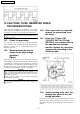
1. Remove grounding screw for membrane switch and D.P.C.
ground.
2. Remove 2 screws holding control panel assembly to detach
it from main unit then remove connectors.
3. Remove 2 screws holding the D.P.C. board and remove the
board by freeing catch hooks.
NOTE:
Please use care in handling the power supply P.C.B.
and D.P.C. board to avoid damage.
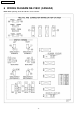
11.3. Low voltage transformer
and/or power relays
NOTE:
Be sure to ground any static electric charge built up on
your body before handling the DPC.
1. Using solder wick or a desoldering tool and 30W soldering
iron, carefully remove all solder from the terminal pins of the
low voltage transformer and/or power relays.
NOTE:
Do not use a soldering iron or desoldering tool of
more than 30 watts on DPC contacts.
2. With all the terminal pins cleaned and separated from DPC
contacts, remove the defective transformer/power relays
and install new transformer/power relays making sure all
terminal pins are inserted completely. Resolder all terminal
contacts carefully.
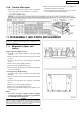
11.4. Disassembly of door assembly
1. Detach the door spring ends from right and left door arms.
2. Remove the arm lever right and left by removing 2 screws
each on both sides.
3. Remove the sashes right and left by removing 1 screw each
on both sides.
4. By holding the door assembly, remove the right and left
sides door hinge pins. The door assembly is now free from
the oven.
5. Remove 3 screws holding the door A.
6. Remove the door C by using a flat screwdriver as figure.
7. Remove 4 screws holding door handle.
8. Separate door A and door E.
9. Remove the door arms by removing 1 pin each on both
sides.
18
NE-3280 / NE-2180 / NE-2180C