Operating & Installation Instructions Fully Automatic Washing Machine (Household Use) Model No. NA-FS95A1 Contents Safety Precautions 2 Part Names 3 Operation Panel 4 Variety of Programs 5 Detergent 6 Washing 7 8 Washing Options • • • • • Thank you for purchasing this product. - Read these instructions carefully for optimum performance and safety before use. - Keep this manual for future reference. OM_NA-FS95A1.
Safety Precautions Read and follow these safety precautions. WARNING Never disassemble, repair or modify the appliance yourself. May cause serious injury or death. Home hot water heater safety ● Under certain conditions, hydrogen gas may be produced in your hot water heater that has not been used for two weeks or more. Hydrogen gas can be explosive under these circumstances.
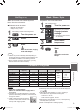
Part Names CAUTION May cause injury or property damage. Lint filter (P. 10) Leveller (P. 14) Operation panel (P. 4) Lid Power cord and plug (P. 14) Tub Softener case (P. 6) Detergent inlet (P. 6) Pulsator Observe the following Turn off the water faucet after operation. (To prevent water leakage) This appliance is only suitable for textiles labelled washing machine washable. Adjustable leg (P. 14) Part Names ● Locate away from direct sunlight or heat. (To prevent malfunction or deformation.
Operation Panel Change water amount During the wash process, press “Water Level” to change the water amount. ● Some water amounts cannot be selected depending on the program. ● Only during the wash process, press “Water Level” to check the water amount. Water amount/remaining time Water level/water amounts Level After starting operation, indicates the water amount according to the amount of laundry.
Variety of Programs Purpose Everyday clothes Daily washing Speedy washing for light soil Program Maximum capacity Cotton (P. 7) 9.5 kg Quick Wash (P. 7) 9.5 kg Delicate (P. 8) 5.0 kg Using extra softener Stronger scent Fragrance (P. 7) 9.5 kg Cotton Eco (P. 8) 9.5 kg Soak (P. 7) 9.5 kg Blankets Bedding (P. 8) 4.2 kg Drying synthetic fibre clothes Air Dry (90 min) 3.
Detergent Put in detergent, bleach and softener according to the water amount displayed. Putting in detergent Do not put detergent directly into the tub. Detergent may remain undissolved. ● Follow the instructions on each package. ■ Softener case Softener ● The level of foaming depends on condition such as load size, degree of soiling, detergent type, and water hardness. Putting in bleach ● Do not use whiten bleach (chlorine bleach) for coloured clothes to prevent loss of colour.
Washing Temp setting Preparation: ● Check if the washing machine is properly installed. (P. 12) ● Turn on the water faucet. ● When using Temp Setting, turn on both hot and cold water faucets. Quick Wash Bedding 3 Timer preset Turn the power on. ● The Cotton program is selected when the power is turned on. ■ Temp Setting ■ Timer preset Start. The pulsator moves without water and measures the amount of laundry (approx. 10 seconds).
Washing Options Bedding Delicate ■ Washable blankets ● Material: 100 % synthetic fibre or 100 % cotton ● Weight: 4.2 kg or less (King size bed) ● Blankets with a machine-washable tag attached Use this program to gently wash delicate clothes and stylish garments. ■ Load laundry evenly ● Load lighter items first and press them from above. ● Use laundry nets for delicate underwear only. ● Amount that can be washed at one time: ● Put a blanket in the net and load it in the tub.
Air Dry (90 min) Wash / Rinse / Spin Water is removed from clothes by the air blown from the tub rotation. ■ Clothes that can be dried • Material: Synthetic fibre • Weight: 3.0 kg or less 1 2 3 After loading clothes and closing the lid Turn the power on. Press. Start. After 90 minutes, drying ends with beeps. Preparation: Turn on the water faucet. 1 2 After loading laundry Turn the power on. According to your purpose Change process settings. ● Change the water amount as necessary.
Convenient Functions Maintenance Cancelling end buzzer 1 Lint filter After each operation Pressing down, Lint filter press. Then hold on for 3 seconds. 2 short beeps 4 short beeps ● To reset, do the same procedure. Setting Child Lock To prevent children from falling into the tub and drowning, if the lid is opened while the washing machine is operating, this function sounds a buzzer until it is closed. Not closing it within 10 seconds flushes the water out.
Water supply filter Tub If water does not flow smoothly Once a week ● Follow the procedure below to prevent splashing of water. 1 2 3 4 5 After turning off both hot and cold water faucets Turn the power on. Select Hot or Warm. Start. After approx. 40 seconds Turn the power off. Loosen the nut and remove the hose. 1 Preparation: Turn on both hot and cold water faucets. 1 2 3 Without loading laundry Turn the power on. Press. Start. When the tub is filled with water Pause.
Installation COLD HOT COLD Water supply hose (Grey) HOT Elbow Water supply valve screw Holes for the hose holder A B Water supply hose (white) Bottom cover Drain hose 1. Check the location. ■ Avoid the following locations for installation. • Damp locations or locations where it may be exposed to rain, etc. (To prevent electric shock or fire) • Uneven or unstable locations (on blocks, timbers, a table with wheels, etc.
■ Make sure to ask a service person for installation. Do not install by yourself. ■ If the installation, test run and inspection of the washing machine are not carried out following this installation method, Panasonic will not be liable for any accident or damage caused. 3. Attach the drain hose. 1 Connect. Do not connect here. 2 3 Insert all the way. Slide the hose band in the arrow direction. ● Slide all the way until it stops.
Installation (continued) 4. Connect the water supply hose. . Water faucet 1 Water supply valve screw COLD HOT Nut 1 Hold the elbow and tighten the nut. Elbow 2 Check that the elbow is not loose. Water supply hose CAUTION ● ● Do not make wrong connection for the HOT and COLD water supply faucets. ● Tighten the nut firmly. ● Do not twist, squash, modify or cut the hose. 2 NOTE 3 ● If you have an uncontrolled water heating source (e.g., wet back, solar heating), fit a tempering device (e.g.
Troubleshooting Symptoms Points to be checked Time Time indication increases ● Time indication is approximate. Remaining time is corrected during operation and displayed. or does not decrease. Operation time is longer than the time indication. ● The operation time may be longer if laundry is concentrated on one side or the water supply or drainage is not good. Operation does not stop (P. 16 “U 11” “U 14”) even after the preset time.
Error Display ● The buzzer sounds and “U”/“H” and a number are alternately displayed. ● Cancel Child Lock (P. 10) if it is set. Error display Points to be checked Water cannot drain. Check the drain hose for the following abnormalities: ● Is it crushed? ● Is it clogged with lint? ● Is the hose tip under water? When the above problems are solved, you can resume operation by opening and closing the lid. The lid is open. ● Did you try to run the washing machine with the lid open? →Close the lid.