Operating Instructions NE-2156/NE-1856/NE-1456 NE-2146/NE-1846 2100/1800/1400 Watts Microwave Oven x2 A B x3 1 2 3 4 5 6 7 8 9 0 FOR COMMERCIAL USE R Please read these instructions completely before operating this oven and keep for future reference.
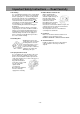
Table of Contents For Your Safety . . . . . . . . . . . . . . . . . . . . . . . . . . . . . . . . . . . . . . . . . . . . . . . . . . .2 Unpacking Your Oven . . . . . . . . . . . . . . . . . . . . . . . . . . . . . . . . . . . . . . . . . . . . . .2 Placement of Your Oven . . . . . . . . . . . . . . . . . . . . . . . . . . . . . . . . . . . . . . . . . . . .3 Using Your Oven . . . . . . . . . . . . . . . . . . . . . . . . . . . . . . . . . . . . . . . . . . . . . . . . .3 Maintenance of Your Oven . . . . .
For Your Safety Earthing Instructions WARNING: THIS APPLIANCE MUST BE EARTHED. WARNING: (NE-2156/NE-2146) This appliance must be connected to an outlet having a rated current greater than 13 amps. A 13 amp, B.S. 1363 plug is, therefore, not suitable. It is recommended that this unit should be installed by a professional contractor, as the installation wiring should be in accordance with current IEE regulation and connected to the circuit with all poles having a disconnection of at least 3mm.
Placement of Your Oven 1. Oven must be placed on a flat, stable surface. For proper operation, the oven must have sufficient air flow to the air vents i.e. 5 cm (2 inches) at the side and rear; 20 cm (8 inches) at the top. 2. Do not place the microwave oven on a shelf directly above a gas or electric hob. This may be a safety hazard and the oven may be damaged. It is dangerous to position this oven on a shelf which is so high that food cannot be safely removed by the user. The oven may be stacked.
Important Safety Instructions –– Read Carefully Short Cooking Times As microwave cooking times are much shorter than other cooking methods it is essential that recommended cooking times are not exceeded without first checking the food. Factors that may affect cooking times are: preferred degree of cooking, starting temperature, altitude, volume, size and shape of foods and utensils used. As you become familiar with the oven, you will be able to adjust these factors.
Important Safety Instructions –– Read Carefully 11. Reheating It is essential that reheated food is served “piping hot”. Remove the food from the oven and check that it is “piping hot”, i.e. steam is being emitted from all parts and any sauce is bubbling. If you wish you may choose to check the food has reached 72˚C with a food thermometer - (but remember do not leave this thermometer inside the microwave.) or to a temperature recommended by Government Food Hygiene Regulations.
How Does the Microwave Work? Microwaves are a form of high frequency radio waves similar to those used by a radio including AM, FM and CB. They are, however, much shorter than radio waves; approximately 12 cm long. Electricity is converted into microwave energy by the magnetron tube. From the magnetron tube, microwave energy is transmitted and absorbed. Absorption During heating, microwaves will be absorbed by food. They penetrate to a depth of about 1-5 cm.
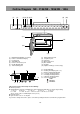
Outline Diagram NE - 2146/NE - 1846 (3) (4)(5) (1) (2) (7) (9) (1) (2) (3) (4) (5) (6) (7) (8) (9) Digital Display Window (see below) Power Level Indicator Display Power Level Selector Buttons Timer Dial Start Button Door Handle Oven Lamp Cover Air Filter Splatter Shield (top of inner cavity) A (6) B A –– Heating Time Display (min. sec.
Outline Diagram NE - 2156/NE - 1856/NE - 1456 (1) (3)(4) (5) (6)(7) (2) x2 x3 A B (8) (9) (10) 1 2 3 4 5 6 7 8 9 0 (11) (14) (12) (13) (1) (2) (3) (4) (5) (6) (7) A C (8) (9) (10) (11) (12) (13) (14) Digital Display Window (see below) Power Level Indicator Display Program pad Shift (A/B) pad Power Level Selector pad Double Quantity pad Treble Quantity pad A –– Program Display B –– Heating Time Display (min. sec.
How to Operate NE - 2156/NE - 1856/NE - 1456 A. MANUAL HEATING –– single stage heating –– Example: To cook food at HIGH power for 2 minutes PAD INSTRUCTION 1 Open the door and put the food in the oven. ☛ The oven lamp will turn on and “0” will appear. Note: While “0” appears, operation is available. One minute after the door is closed, “0” will disappear. 2 Press Power Level Selector pad once. ☛ The selected power level will be indicated and 1st Stage Heating Indicator “1” will start to blink.
How to Operate NE - 2156/NE - 1856/NE - 1456 A. MANUAL HEATING –– 2 or 3 stages heating –– Example: To cook food at HIGH power for 2 minutes and at DEFROST power for 1 minute PAD INSTRUCTION DIGITAL DISPLAY WINDOW Follow steps 1 to 3 on page 9. 1 4 5 6 Press Power Level Selector pad three times. ☛ The selected power level will be indicated and 2nd Stage Heating Indicator “2” will start to blink. 1 0 0 Press Number/Memory pads “1”, “0” and “0”. ☛ The set heating time will appear. Note: up to 15 min.
How to Operate NE - 2156/NE - 1856/NE - 1456 B. PROGRAMMED HEATING ◆ In Program Unlock Mode: Example: To select Number/Memory pad “3” at A side in which your desired heating program (at HIGH power for 3 min., single stage heating) is set INSTRUCTION PAD 1 2 DIGITAL DISPLAY WINDOW Open the door and put the food in the oven. ☛ The oven lamp will turn on and “0” will appear. Note: While “0” appears, operation is available. One minute after the door is closed, “0” will disappear.
How to Operate NE - 2156/NE - 1856/NE - 1456 3 Press Number/Memory pad “5”. ☛ The selected pad number will appear and currently programmed information will be indicated. 5 4 5 Press Power Level Selector pad three times. ☛ The selected power level will be indicated, 1st Stage Heating Indicator “1” will start to blink, and Heating Time Display will go blank. 1 0 0 6 Press Number/Memory pads “1”, “0” and “0”. ☛ The set heating time will appear. Note: up to 15 min. on HIGH or MEDIUM power, 30 min.
How to Operate NE - 2156/NE - 1856/NE - 1456 D. PROGRAMMING DOUBLE OR TREBLE QUANTITY PAD THE OVEN CAN NOT BE PROGRAMMED WHEN PROGRAM LOCK IS ACTIVATED! (see below) DO NOT OPEN THE DOOR WHILE PROGRAMMING! Example: To program 1.5 times of heating time for double quantity into Number/Memory pad “5” PAD INSTRUCTION 1 Keep the door closed. ☛ Digital Display Window must be blank. 2 Press Prog pad. ☛ “PROG” will start to blink. 3 4 5 Press Double Quantity pad.
How to Operate NE - 2156/NE - 1856/NE - 1456 ◆ To Release Program Lock: PAD 1 2 In • • • • INSTRUCTION DIGITAL DISPLAY WINDOW Open the door and leave it open. ☛ The oven lamp will turn on, and “0” will appear. + While pressing Stop/Reset pad, press Prog pad until “PROG” and “P” appear. (more than five seconds) ☛ “PROG” and “P ” will appear. PROG Program Unlock mode: Oven reverts to a two-touch operating mode (Number/Memory pad + Start pad). Repeat and interrupt feature are operational.
How to Operate NE - 2156/NE - 1856/NE - 1456 ◆ For selecting length of tone “short beeps for 60 seconds”: Example: To select short beeps for 60 seconds PAD INSTRUCTION Follow step 1-4 on page 14. DO NOT CLOSE THE DOOR! DIGITAL DISPLAY WINDOW PROG 1 5 Within three seconds after pressing Prog pad at step 4, press Number/Memory pad “0” once. ☛ “PROG” will start to blink and 2nd Stage Heating Indicator “2” (the length of beep tone “short beeps for 60 seconds”) will be indicated. 0 6 Press Prog pad.
How to Operate NE - 2156/NE - 1856/NE - 1456 ◆ To Read Total Cumulative Cycles That The Oven Has Been Used: PAD INSTRUCTION 3 DIGITAL DISPLAY WINDOW Close the door while the display is still showing the number of cycles that each pad has been used. ☛ The total cumulative cycles that the oven has been used in Number/Memory pads at A/B sides and manual mode will appear.
Installation Instructions for Stacking IMPORTANT 1. Disconnect or unplug all units from the wall socket before attempting to stack. 2. For stacking installation, you must use the PANASONIC Joining Plate which is enclosed with this unit. 3. The following PANASONIC models only are suitable for stacking: NE-1057, NE-1457, NE-1247, NE-1747, NE-1047, NE-1447, NE-1257, NE-1757, NE-1442, NE-1856, NE-1456, NE-1846, NE-1446, NE-2156, NE-2146 4. The maximum stacking height is the total heights of two units.
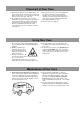
Care of Your Microwave Oven 1. Disconnect the appliance from the electricity supply before cleaning. 2. Keep the inside of the oven clean. If pieces of food or spilled liquids stick to the oven walls, or between door seal and door surface, they will absorb microwaves and may cause arcing or sparks. Wipe up all spills with a damp cloth. Kitchen detergent or Food Sanitizer Solution may be used if the oven gets very dirty. Do not use harsh detergents or abrasives. 3.
Cooking Instructions COOKWARE 1. Heat-proof glassware, such as Pyroceram and Pyrex, is best suited for use in the microwave oven. 2. Do not use metal ware, ceramics trimmed with gold or silver, or any container with a metal content. 3. If “arcing” should occur, check the cookware carefully again for metal. 4. You may use ordinary glassware, chinaware, plastic-ware and paper-ware, when cooking food that requires a low temperature.
Cooking Instructions MICROWAVE BASICS Fundamental principles determine the success of microwave food preparation. They include: 1. TEMPERATURE OF FOODS –– Frozen or refrigerated food items will require longer heating times to reach a desired serving temperature than foods from room temperature. 2. FOOD COMPONENTS –– Foods high in sugar, salt, fats and moisture content heat faster because these properties attract microwave energy.
Cooking/Defrosting Guide The times given in the chart below are a guideline only. Many factors eg starting temperature of the food can affect the final heating time required. The cooking and defrosting times must be adjusted when necessary. All times are tested using foods at starting temperatures as below; Chilled foods . . . . . .Approx. +5˚C Frozen foods . . . . . .Approx.
Technical Specifications NE-1456 NE-1856 / NE-1846 Power Source NE-2156 / NE-2146 230 - 240 V, 50 Hz, single phase Required Power 10.2 A, 2270 W Output HI MED DEF 12.3 A, 2830 W HI MED DEF 1400 W * 700W 340 W Frequency 13.
Matsushita Electric Industrial Co., Ltd. Web Site: http://www.panasonic.co.