® Operating Instructions & Installation Instructions Heat Pump Tumble Dryer (Domestic use) Model No. NH-P80G2 Read Before Using SAFETY PRECAUTIONS Drying Instructions Maintenance Troubleshooting Installation Instructions 2 4 10 17 21 24 Thank you for purchasing this appliance. - For optimum performance and safety, please read these instructions carefully. - Before connecting, operating or adjusting this appliance, please read the instructions completely. Please keep this manual for future reference.
Consider the Environment Disposing of packaging The packaging used to protect the appliance from damage during transportation is all recyclable. For information on recycling, contact your local authority. Disposing of Waste Electrical & Electronic Equipment Information on disposal for users of waste electrical & electronic equipment (private households) Information on disposal in other countries outside the European Union This symbol is only valid in the European Union.
Contents Read Before Using Maintenance Consider the Environment . . . . . . . . 2 SAFETY PRECAUTIONS . . . . . . . . . 4 Checking Your Tumble Dryer . . . . . . 6 Maintenance . . . . . . . . . . . . . . . . . . 17 Your tumble dryer . . . . . . . . . . . . . . . . . 6 Accessories . . . . . . . . . . . . . . . . . . . . . 6 Before You Start Drying . . . . . . . . . . 7 Checking before use . . . . . . . . . . . . . . 7 Preparing the laundry . . . . . . . . . . . . . . 7 Using the Buttons . . . . . . .
SAFETY PRECAUTIONS Please read and follow these safety precautions. WARNING This describes issues which could cause death or serious injury. General Use -- This appliance is not intended for use by persons (including children) with reduced physical, sensory or mental capabilities, or lack of experience and knowledge, unless they have been given supervision or instruction concerning use of the appliance by a person responsible for their safety.
SAFETY PRECAUTIONS -- Check the mains lead and mains plug for any damage. If the mains lead is damaged, it must be replaced by the manufacturer, its service agent or similarly qualified person to avoid a hazard. -- Do NOT use a mains plug adaptor or extension cable. There is a possibility of overheating which may cause a fire. Use an unused household mains socket, fully rated at AC 220 V to 240 V. If you are not sure, contact a qualified electrician.
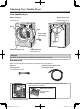
Checking Your Tumble Dryer Your tumble dryer Water container Water-drain hose (see page 17) (see pages 26-27) Drum Door Mains lead/ Mains plug Heat exchanger unit Adjustable feet (see page 25) Caution Do NOT bend the mains lead when the appliance is running. Accessories Make sure that all the accessories are supplied with the appliance. Spanner (see page 25) Extended water-drain hose (see pages 26-27) For adjusting the foot. A Using the optional drying basket can dry sports shoes, etc.
Before You Start Drying Checking before use Preparing the laundry Before the appliances initial operation or after a prolonged period of non-operation, perform the following procedures if you are using the extended water-drain hose: Sorting clothing 1. Connect the power. 2. Make sure that the extended waterdrain hose is positioned towards a drain. For more details, see pages 26-27. -- Read clothing drying labels to help you sort them into different loads.
Using the Buttons 9 10 11 Cotton Easy-care Gentle Dry Buzzer Anti-crease Drying Level r/min Time Add Time Speed Eco Cupboard Dry Iron Dry 8 7 6 5 4 1. Power buttons - If you do not press the Start button within 10 minutes after the appliance has been switched on, the appliance automatically switches itself off. - The display below appears for 10 seconds after the appliance has been switched off. You cannot turn the appliance on until this display disappears. 2.
Using the Buttons 11. Process indicators -- These indicators show the programme’s processes. Processes consist of Dry , Iron Dry , Cupboard Dry , and Cupboard Dry Plus (Extra Dry) . -- After drying starts, the dry indicator starts flashing, and the other indicators light up in sequence from top to bottom as each corresponding process is completed. After the programme finishes, the dry indicator goes out, and the last process indicator remains lit until the appliance switches itself off, or is turned off.
Drying Setting drying Cotton Easy-care Gentle Dry Buzzer Anti-crease Drying Level r/min Time Add Time Speed Eco Cupboard Dry Iron Dry 4 1. Open the door and put the laundry into the drum. For details about preparing and sorting the laundry, see pages 7, 12, and 13. Caution - Make sure that no laundry gets caught in the door. - Do NOT overload the drum. Observe the capacity of the selected programme. Overloading may cause excessive vibration, damage to the appliance, and more creasing of the load. 2.
Drying Required time Preset timer Times depend on the programmes, Drying Level settings and other settings that have been selected. -- Since the displayed times change automatically according to the sizes and moisture levels of the loads and the ambient temperatures of the appliance, the times might not decrease for a while or might suddenly decrease. You can preset the time for when the drying finishes.
Selecting the Programme Extra Dry Cupboard Dry Plus Cupboard Dry Iron Dry Easy-care 8 kg 4 kg Tea towel ― ― ― ― Terrycloth towel Towelling dressing gown Socks Underwear Work clothing Sport wear Skirt/dress Anorak Bed linen Colours For white and coloured cottons or linens ― ― ― ― ― ― ― ― ― ― ― ― ― ― ― ― ― ― ― ― ― ― ― ― ― ― ― ― ― For non-iron synthetic fibres, cottons, or blended fabrics ― ― ― ― ―
Selecting the Programme Sub-programme description Post-drying ironing Extra Dry Applicable drying method Lightly iron Not iron Mangle Subprogramme Iron For multi-layered and very thick fabrics Example: towelling dressing gowns and bed linens Do not use this sub-programme for loop knitted fabrics (T-shirts, underwear and baby clothes, for example), as they have a tendency to shrink.
Details of Programmes Programme Load weighed Default setting Drying Level 1) Spin speed 1) Approximate time Extra Dry 3:10 2) Cotton Cupboard Dry Plus 3:00 2) Colours Cupboard Dry 3 1000 Extra Dry Cupboard Dry 1:30 3 1000 Iron Dry Cupboard Dry 1 2:50 2) 2:20 2) Iron Dry Easy-care Dryin 1:10 1 0:50 1:30 3 1000 3 1000 0:40 1 Outdoor/Sports 3 1000 2:00 1 Wool ― ― ― 0:15 ― Silk/Lingerie ― ― ― 1:00 ― Shirts ― ― ― 1:00 ― ― ― ― 0:10 ― Mixe
mate e Details of Programmes Manual setting Additional functions Anticrease Speed 3) Eco Add Time Drying Level Spin speed Gentle Dry 3) 1-5 500 - 1600 ― 1-5 500 - 1600 ― ― 1-5 500 - 1600 ― ― 0 1-5 500 - 1600 ― ― 1-5 500 - 1600 5 ― ― 4) ― ― 0 ― ― 4) ― ― 0 ― ― ― ― ― ― 0 0 ― ― ― ― 2) 2) 2) 2) 0 0 0 0 0 the 4) ― ― ― ― ― 3) The Gentle Dry function and Speed function cannot be used toget
Drying Outdoor/Sport Wears and Delicates Outdoor/Sports programme Tips for drying delicates Make sure that the item to be dried can be dried with this programme. Putting laundry in the drum Delicate laundry loads If clothing shrinks -- Wool programme: 2 kg or less -- Silk/Lingerie programme: 1 kg or less Approximate weights Pile them one on top of each other. Spread the item out to its original size on an ironing board. Use dress pins to hold the size and shape.
Maintenance Emptying water Empty the water after every drying. Do not empty it while drying. 1. Pull out the water container and hold it level. Cleaning the outside of the appliance Clean the outside of the appliance with a soft cloth and mild detergent, for example, kitchen detergent, and soapy water. Remove lint and dust that accumulate around the appliance. Warning - Do NOT splash water over the appliance. 2. Remove the water container by simultaneously lifting and pulling it forward.
Maintenance Cleaning the moisture sensors Clean once a month. The appliance is equipped with stainlesssteel moisture sensors. They measure how damp the laundry is. After long periods of use, a fine layer of limescale can form on the moisture sensors. Filter locations Filters are located in the following 3 locations.
Maintenance Cleaning the fluff filter Clean the fluff filter after every drying programme. 4. Replace the fluff filter to its original position. 1. Open the door, and then slide the lever on the top of the door. Extra cleaning Remove any fluff from the hollow part of the door with a bottle brush or a vacuum cleaner. Cleaning the filter frame Clean the filter frame when foreign particles build up on it. 2. Pull out the fluff filter. 1.
Maintenance Cleaning the fine filter Clean the fine filter every month. 4. Separate the fine filter from the inner cover. Fine filter 1. Open the panel. Inner cover 2. Turn the levers on the inner cover. 3. Pull the handle to remove both the inner cover and fine filter. 5. Clean the fine filter using a vacuum cleaner or with water. 6. Replace every part to its original position. Fit the projections of the inner cover into the holes of the fine filter while joining both parts together.
Fault Checklist Problem Appliance does not work. Cause -- The fuse may have blown out or breaker may have tripped. -- The mains plug may not be connected firmly to the mains socket. -- The On button may have not been pressed. -- The Start button may have not been pressed. -- The door may not be closed properly. Buttons do not work -- Settings cannot be changed while drying is in progress. To change settings, switch the appliance off and on again. Then, set the settings again.
Fault Checklist Problem Drying takes too long. Cause -- The laundry may be too wet. -- The laundry may have become tangled. -- The laundry may be too heavy. -- Clothes which dry quickly and clothes which dry slowly may have been dried together. -- The ambient air temperature may be too low. Items made of synthetic fibres are charged with static electricity after drying. -- Reduce static electricity charges by adding fabric conditioners to wash loads during the final rinse cycles.
Error Display Error Display What to do Make sure that the door is shut properly. Close the door securely and press the Start button. Door is open Unable to drain Aberrant ambient temperature Empty the water if the water container is full. (See page 17.) Set the water drain hose properly. (See pages 26-27.) After the above procedures, turn the power on again and press the Start button. Operate the appliance within an operating ambient temperature range (5 ºC - 35 ºC). Inspection is required.
Choosing the Right Location Transporting the appliance If the appliance has to be transported at a tilt, only tip it toward the water container side but not more than 90 degrees. Water container side The right place for the appliance Make sure that there is enough space for the appliance and that openings on the base are not obstructed by a carpet. 561 845 Max. 90° Rear Front Max. 90° The appliance must be carried by 2 or more people.
Choosing the Right Location Installing the set-in appliance -- You need a space at least 60 cm wide. At least 2 mm of clearance on the sides, and 3 mm of clearance above and behind the appliance are required (in case you do not use the extended water-drain hose). Levelling the appliance Using a level helps when making of adjustments. To adjust the feet, use the ‘A’ end of the spanner. A -- The counter above the appliance must be firmly fixed to the adjoining cupboards.
Connecting Power Supply and Hose Follow the instructions in this section to prevent water leaks. If you are unsure, ask a service agent to connect the hoses. Hose and mains lead lengths Left side connections Right side connections ~ 90 cm ~ 135 cm ~ 150 cm Connecting to the power supply Name plate ~ 140 cm Connecting the extended water-drain hose Caution Do NOT twist, pull out, or bend the drain hose. The water container does not require emptying when water is externally drained. 1.
Connecting Power Supply and Hose 2. Connect the water-drain hose to the extended water-drain hose, and then affix the spring clamp to it. - Left side connection For a left side connection, the first pattern is recommended. 2 1 3. Run the extended water-drain hose toward the right side (as viewed from the front of the unit) and wind it in one of the following patterns. - Right side connection - When using the water drain hose, water can be drained at the height of appliance (approx.
Checking After Installation Installation checklist 4) 1) 2) 3) 1) Location Is the appliance on a flat, stable surface? Does it run without vibrating? 2) Adjustable feet Are they bolted securely to the appliance? 2) 3) 2) 3) 3) Foot cushions Are they standing flat? If the appliance is not level, there may be abnormal sounds when water is drained out.
Electrical Connection (UK and Republic of Ireland only) For your safety, please read the following text carefully. This appliance is supplied with a moulded three pin mains plug for your safety and convenience. A 13-ampere fuse is fitted in this plug. Should the fuse need to be replaced, please ensure that the replacement fuse has a rating of 13 ampere and that it is approved by ASTA or BSI to BS1362. Check for the ASTA mark or the BSI mark on the body of the fuse.
Power Consumption Programme Cotton/ Colours Cupboard Dry Additional function Load Eco 8 kg Speed Iron Dry Easy-care Cupboard Dry Iron Dry Final spin speed Power in a washing consumption machine Time (mins) 1600 r/min 1.47 kWh 2:30 1000 r/min 1.67 kWh 2:50 4 kg 1000 r/min 1.05 kWh 1:50 8 kg 1600 r/min 1.60 kWh 1:42 1000 r/min 1.80 kWh 2:02 1600 r/min 1.17 kWh 2:00 1000 r/min 1.37 kWh 2:20 1600 r/min 1.30 kWh 1:10 Eco 8 kg Speed 8 kg 1000 r/min 1.
Specifications Model No. NH-P80G2 Rated voltage 220 - 240 V Rated frequency 50 Hz Maximum energy rated power input 870 - 910 W Off-mode 0.18 W Left-on mode 1.36 W Power consumption Product weight 55 kg Maximum mass of dry cloth 8 kg Product dimensions 596 mm (W) x 625 mm (D) x 845 mm (H) Customer Communications Centre Fridge-Freezer, Washing Machine, and Heat Pump Tumble Dryer Please note, we are unable to assist with calls regarding Audio Visual and other Home Appliance products on this line.
Web Site: http://panasonic.net Pursuant to the directive 2004/108/EC, article 9(2) Panasonic Marketing Europe GmbH Panasonic Testing Centre Winsbergring 15, 22525 Hamburg, Germany © Panasonic Corporation 2013 NH-P80G2_English.