Refrigerator-Freezer (Household use) Model No. Contents Introduction NR-B53V2 NR-B53VW2 Safety instructions................................................................................................... 2 Caring for the environment..................................................................................... 6 Installation Installation................................................................................................................. 7 Choosing the right location.............
Introduction Safety instructions For your safety, please read the following text carefully. This appliance is intended to be used in household and similar applications such as -- staff kitchen areas in shops, offices and other working environments; -- farm houses and by clients in hotels, motels and other residential type environments; -- bed and breakfast type environments; -- catering and similar non-retail applications.
Introduction English Make sure the supply cord and plug are not squashed or damaged. ●●A damaged power plug or cord can cause short-circuit, fire or electric shock. ●●If the supply cord is damaged, it must be replaced by the manufacturer, its service agent or similarly qualified persons in order to avoid a hazard. ●●DO NOT ATTEMPT TO REPLACE IT YOURSELF. If LED or LED cover is damaged or if anything appears questionable, contact your dealer or an authorized service centre.
Introduction Do not try to disassemble, repair or modify the refrigerator yourself. ●●You may injure yourself – or others – with burns or electric shock, or damage the refrigerator. If your appliance needs alterations or repair, please consult authorized service centre. Ensure that the refrigerator is plugged into an earthed mains socket. DO NOT plug into an unearthed mains socket. Remove any dirt or dust from the plug’s pins before connecting to the power supply.
Introduction English If there’s a power cut, avoid opening the refrigerator frequently or putting unchilled food in it. ●●This can cause the temperature in the refrigerator to rise and spoil food stored inside. If you’re not going to use the refrigerator for a long time, unplug it from the mains. Also, be careful of the gap between the fridge and freezer doors, especially if they are both open at the same time. ●●This may cause personal injury.
Introduction Caring for the environment Disposing of the packaging Please recycle where possible (e.g. cardboard, plastic bags, adhesive tape and polystyrene) and make sure you dispose of all other packing materials safely. Keep the packaging out of the reach of babies and young children, to avoid injury or suffocation. Before disposing of your old appliance Please follow either the disposal instructions from the manufacturer of the old appliance, or local disposal regulations for the appliance.
Installation Installation Choosing the right location ●●Where there is a main water supply line nearby ●●Where the refrigerator will not be exposed to direct sunlight ●●Where the refrigerator will be at a distance from heating appliances, cooking appliances and other sources of heat ●●A location which is well-ventilated and dry ●●Where the floor is sturdy and level Place a solid board underneath if the refrigerator is to be installed on top of a carpet or vinyl floor.
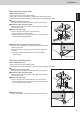
Installation Removing the doors If the refrigerator will not pass through a doorway or entrance, its doors can be removed. CAUTION Before removing the doors, be absolutely sure to check that the power of the refrigerator has been turned off. When you want to remove the doors, please contact your dealer, an authorized service centre or access to our Web site (http://panasonic.net). Panasonic or its Authorized agent cannot be held responsible if you remove the doors by yourself.
Installation Removing the freezer door English When removing the door ●●Ensure the door is in the closed position. ●●Take care not to bend the hinges or damage the water supply hoses. ●●Handle the removed door carefully to keep it safe from damage and impact. 1 Remove the top hinge cover. Turn the hinge cover screw counterclockwise, and remove it. 2 Disconnect the connecting cable. While pressing on the knob, pull out the cable in the direction shown by the arrow. 3 Remove the top hinge.
Installation Attaching the doors and front grille 1 Follow the steps for removing the doors and grille in their reverse order. 2 Tighten up fixing screws after checking that the door is parallel to the body and cold air does not leak from around the gasket. 3 Tighten up screws to fix hinges using both the screwdriver (Phillips head) and hex wrench. 4 When installing the front grille and top hinge cover, be sure not to get the hoses and cord caught in.
Installation Connecting the refrigerator 1 Attach the hose connector to the water service pipe opening. Turn the hose connector clockwise to attach it. ●●After tightening up the hose connector as far as it will go by hand, use a tool to further tighten the hose connector through another half-turn or so. ●●Check that the strainer is fitted inside the hose connector.
Installation Installing the water filter The water filter is not installed at the time the refrigerator is purchased. Install the water filter provided with the refrigerator. 1 Remove the drawer of the Vitamin-Safe Zone. 2 Remove the filter panel. Place your fingers in the cutout at the front of the filter panel, and remove the filter panel. Filter panel 2 1 3 Install the water filter and rotate it 90 degrees clockwise.
Installation Installing the refrigerator English The refrigerator comes on four casters to enable it to be moved easily. Carefully read through the section “Choosing the right location”, and install the refrigerator in the best location. Once the installation location has been decided upon, secure the refrigerator, and adjust it so that it is level.
Installation Preparations Maintenance Remove all the packing materials and tapes. Wipe the inside of the refrigerator using a soft cloth which has been dipped in lukewarm water and then wrung out. Wash and completely dry the icebox before installing it. (Do not use a dish dryer, hair dryer or other appliance when drying.
Operation Parts and their functions Interior and foods stored English 6 7 8 9 1 4 2 3 3 : 4 ; > < 5 = Freezer 1 Automatic ice maker 2 Icebox 3 Glass shelves The positions of these shelves (except for the third shelf from the top in the freezer) can be adjusted. 4 Door shelves The positions of these shelves (only the second shelf from the bottom in the fridge) can be adjusted. Egg tray, bottle stopper provided (one each).
Operation Freezer -17 °C to -25 °C Frozen foods, meats, fish, ice cream, etc. Butter, dairy products, eggs, drinks, seasonings, cooked foods, etc. 0° Zone Fridge 1 °C to 7 °C Vitamin-Safe Zone 5° Fresh Zone Meats, fish, ham, sausages, etc. Vegetables, fruits, etc. stored at low temperatures Vegetables, fruits, etc. Notes: ●●The 0° Zone and 5° Fresh Zone temperatures change depending on the temperature set for the fridge.
Operation Exterior and operation panel English Control panel Ice/Water dispenser panel Ice/Water dispenser Door handle Ice/Water dispenser panel Display area 1 Water filter change icon This indicates that it is time to change the water filter. 2 Service engineer display This does not appear during normal operation.
Operation Control panel Display area 1 1 Cooling power level Cooling power by the refrigerator is indicated here.
Operation Setting the temperature 1 2 3 4 5 6 English The temperatures of the fridge, freezer and Vitamin-Safe Zone can be changed. At the time of purchase, the temperatures are set as shown below. Fridge: 4 °C Freezer: -20 °C Vitamin-Safe Zone: 2 °C 1 The control panel lights up, the temperature inside the refrigerator is displayed. 2 The temperature display start flashing, indicating that the temperatures can be set. 3 The temperature set for the fridge starts flashing.
Operation Using the handy functions This refrigerator comes with a number of useful functions for specific applications. 1 2 3 4 5 1 The control panel lights up. 2 The function display start flashing, indicating that the functions can be set. 3 “ ” starts flashing. 4 Select the function to be used. 5 The display corresponding to the selected function stops flashing and lights up, indicating that the function is set. Each time the button is pressed, the display switches from “on” to “off”.
Operation Setting the Vitamin-Safe Zone and 5° Fresh Zone to the Vitamin-Safe Mode helps to protect the vitamin C contained in vegetables and fruit. The blue and green LED lights. Super Freeze Mode In this mode, the freezer can be cooled rapidly, enabling the fresh foods, etc. which are placed there to be frozen. The Super Freeze Mode is automatically released after about 50 hours.
Operation How to use the Ice/Water dispenser The Ice/Water dispenser can dispense water, crushed ice or ice cubes. The Ice/Water dispenser panel lights up. The icon corresponding to what was dispensed last appears. Each time the button is pressed, the icon changes. Keep pressing the button until what you want to be dispensed is lit up. Guide Pad Place a cup against the pad and push it gently in. Water or ice is now dispensed from the Ice/Water dispenser.
Appendix Removing and re-installing Glass shelves 1 English Raise the back part of the shelf slightly, and pull out the shelf. To re-install the shelf, align it with the left and right guides, and push it into place. 2 Drawers Pull the drawer out all the way, and while raising the back part of the drawer slightly, and pull out the drawer. To re-install the drawer, align it with the left and right guides, and push it into place.
Appendix Cleaning and maintenance Conduct periodic cleaning and maintenance to ensure that the refrigerator will be kept clean and that it will continue to operate for a long time to come. Before cleaning or conducting maintenance, be absolutely sure to disconnect the power plug from the power outlet. Do not connect or disconnect the power plug with wet hands. Doing so may result in an WARNING electric shock or injury.
Appendix Changing the water filter English Change the water filter periodically. As a rule of thumb, it should be changed once every six months. When it is time to change the filter, the “ ” icon appears on the Ice/Water dispenser panel. This time differs depending on the quantity of water used as well as the quality and pressure of the water, and it may be much shorter than six months.
Appendix Stopping the automatic ice-making The automatic ice-making function can be shut down when, for instance, it is not going to be used for a prolonged period of time to dispense ice. Remove the icebox, and set the switch on the inside of the automatic ice maker to the OFF position. Note: ●●After the switch has been set to the OFF position, return the icebox to its original position. Even after the switch has been set to OFF, the ice remaining on the ice-cube tray will be deposited in the icebox.
Appendix When moving or transporting the refrigerator English Before moving or transporting the refrigerator First, ensure the main water supply line has been shut off. Remove all the food and ice inside the refrigerator, and disconnect the power plug. 1 Disconnect the water service hose from the hose connector. Have a container ready to catch the water which will spill out from inside the water service hose.
Appendix Troubleshooting If you feel that the refrigerator is not working properly, check out the following points first. If the trouble persists, disconnect the power plug and contact your dealer or an authorized service centre. General You hear unusual sounds from the ●●Has the refrigerator been installed on a sturdy and level floor? refrigerator.
Appendix ●●Is the power to the refrigerator on? ●●Has the refrigerator been set to the Child Lock? The LED light does not come on. ●●Has the refrigerator been set to the Holiday Mode? In the Holiday Mode, the front tower LED light of the fridge does not come on. ●●Is the power to the refrigerator on? English The controls on the control panel cannot be operated. The alarm sounds, and the ●●One or both of the refrigerator's doors have been left ajar. Close the temperature display of the control doors.
Appendix It smells inside the refrigerator. ●●Were any food items with strong odours sealed before they were placed in the fridge? Place the items inside a sealed container and store them or store them on the sealed case door shelf. ●●Odours may stick to the surfaces inside the refrigerator. Wipe the surfaces using a soft cloth which has been dipped in lukewarm water. Ice/Water dispenser 30 The water and ice have an odour. ●●Is the water filter being used an old one? No water comes out.
Appendix Specifications Product fiche (EU Regulation 1060/2010) MODEL CATEGORY ENERGY EFFICIENCY CLASS ANNUAL ENERGY CONSUMPTION Panasonic NR-B53V2-XB NR-B53VW2-WB 7 (Refrigerator-Freezer) A++ 346 kWh/year*1 NET FRIDGE VOLUME 324 L NET FREEZER VOLUME 206 L STAR RATING OF THE FREEZER Four-star 'FROST FREE' COMPARTMENTS Fridge: Frost-free / Freezer: Frost-free TEMPERATURE RISE TIME FREEZING CAPACITY CLIMATE CLASS AIRBORNE ACOUSTICAL NOISE EMISSIONS English SUPPLIER'S NAME 16 hours 15 kg/24 h S
Appendix Information on Disposal for Users of Waste Electrical & Electronic Equipment (private households) This symbol on the products and/or accompanying documents means that used electrical and electronic products should not be mixed with general household waste. For proper treatment, recovery and recycling, please take these products to designated collection points, where they will be accepted on a free of charge basis.
Fridge-Freezer and Washing Machine Please note, we are unable to assist with calls regarding Audio Visual and other Home Appliance products on this line Monday to Thursday 9:00 - 20:00, Friday 9:30 - 20:00 and Saturday to Sunday 10:00 - 16:00 (UK Only) 0844 844 3899 Monday to Thursday 9:00 - 5:30, Friday 9:30 - 5:30 (For Republic of Ireland) If calling from the Republic of Ireland, please call 01-630-9799 Panasonic Corporation Website : http://panasonic.