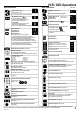
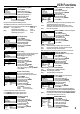
Operating Instructions DVD Player / Video Cassette Recorder Page Contents (DVD/CD Player with MP3 and Hi-Fi Video Cassette Recorder) NV-VHD1EC NV-VHD1EE Warning and Precautions 2 Setting up 3 VCR / DVD Controls 4 VCR / DVD Operations 5 VCR Recording 6 VCR Playback / VCR Functions 8 VCR Tuning 10 Connecting External Equipment 11 PAL b R Y X DVD Easy Setup 13 DVD Operation 14 DVD Playback 15 DVD Settings 17 DVD OSD Menu 19 Information about the player 20 Accessories Infor
Warnings and Precautions This unit is intended for use in moderate climates. Please observe copyright laws when recording sound tracks and film. Inside of product Produktets innside (Norwegian) Caution ! Do not install, or place this unit, in a bookcase, built-in cabinet or in another confined space. Ensure the unit is well ventilated. To prevent risk of electric shock or fire hazard due to overheating, ensure that curtains and any other materials do not obstruct the ventilation vents.
Setting up VCR / DVD Aerial (not supplied) TV RF IN AV1 (not supplied) Set up the connections shown here and connect the mains lead (supplied) to your AC IN. The RF (radio frequency) coaxial lead must be connected for TV reception, even if the video recorder is already connected with a 21-pin scart lead. For more information about the remote control buttons and cursors see pages 4-5.
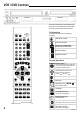
VCR / DVD Controls VCR display DVD display The functions of these buttons can be operated by the remote control or directly on the unit. In this description, the remote control symbols are used in most cases. TV Operations To set the remote control code to operate the TV, see page 23. Switch the TV on and off. Select TV or AV channel. Switch the screen format between the wide screen and other formats. Select the TV channel. Operate the TV volume.
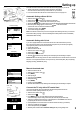
VCR / DVD Operations VCR Operations VCR display DVD Operations DVD display Playback (indicated by 9) Playback (indicated by 9) Stop (indicated by < ) To stop winding a tape, recording or playback. Restart from the memorized position Still Playback (indicated by ) Press this button during playback. Resume normal playback by pressing this button again or Playback 9 . Slow Playback Keep this button pressed down for more than 2 seconds during playback.
VCR Recording Switch on and set the TV to the video output channel and insert a cassette with an intact erasure prevention tab into the VCR. Before recording, select the channel with the |CH| button. Select the AV channel |INPUT SELECT AV| if you want to record a programme from scart AV1, AV2, front input = A3 or Disc = dc. VCR display Switch the remote control to VCR . Press |REC| to start recording. Press Stop < to stop recording. to pause recording.
VCR Recording Show View Panasonic Timer recording with ShowView VCR 8 3 5 4 2 - - - - Panasonic VCR 1/2 Timer recording Pos Name Date Start Stop VPS PDC 1. ARD 20/4 15:00 16:00 SP ON 2. - - - - - - -/- - - -:- - - -:- - - - - 3. - - - - - - -/- - - -:- - - -:- - - - - - Switch on and set the TV to the video output channel, insert a cassette with an intact erasure prevention tab into the VCR and set the remote control to VCR operation. Press |ShowView| Enter the ShowView number.
VCR Playback / VCR Functions VCR Playback When a cassette is inserted, the VCR switches on automatically. When a cassette without an erasure prevention tab is inserted, the VCR will automatically start playback. The cassette will automatically rewind when the tape end is reached. The CVC System (Crystal View Control) ensures optimum picture quality. Normal Playback Press this button to start Playback. Stop Playback Press this button to stop winding a tape or to stop recording.
VCR Functions Panasonic VCR Setting the Audio playback Timer recording Press |MENU| Tuning Select [Other settings] Clock setting Other settings Access by pressing |ENTER| Select [Audio playback] Panasonic VCR Select the input field Other settings 1/2 Tape length : AUTO ( E-240) Select the settings Audio playback : MIX Store by pressing |ENTER| Press |EXIT| For tapes recorded with audio dubbing function, select [MIX] to hear the mono and Hi-Fi audio track together.
VCR Tuning Setting the sound system This system can receive transmissions which are broadcast with NICAM sound. Timer recording Tuning This is a sound system with two sound channels Clock setting which broadcasts either stereo sound Other settings or two separate mono channels Panasonic VCR (M1 and M2).
Connecting External Equipment VCR/DVD TV (not supplied) AV1 AV2 VCR/DVD TV AV1 AV2 (not supplied) Receiver (not supplied) Decoder (not supplied) Connecting a Receiver With some Satellite- or Digital Receivers it is possible to start a Timer recording, with a 21-pin scart lead (not supplied) by using EXT LINK function. (Please read the operating instructions for your Satellite- or Digital Receiver for further information).
Connecting External Equipment Connecting with Audio / Video cable Connecting with S-VIDEO lead Connect the Audio / Video cable (white=L, red=R, yellow=video) according to the colours / markings of the terminals. The S-VIDEO terminal achieves a more vivid picture than the VIDEO OUT terminal (only DVD OUT).
DVD Easy Setup Panasonic EASYSETUP English Français Español Nederlands Deutsch Italiano Svenska Português Select DVD output Switch remote control to DVD Select desired language Press |ENTER| to confirm Press |SETUP| or |RETURN| to exit the screen Initial settings for the unit can be adjusted in a easy way in the shown succession. Adjust the settings with the buttons on the remote control .
DVD Operation Playback Reading disc information - please wait Switch remote control to DVD Press |VCR / DVD OUTPUT| to select DVD output Press |5 OPEN/CLOSE| on the unit Place the disc on the disc tray Press Playback 9 and playback begins automatically Note: The procedure of reading disc information’s can take longer time! Playback Pause (DVD, VCD, CD) Press Pause during playback Press Playback 9 restart of playback Playback Stop (DVD, VCD, CD) Playback Stop Resume, Playback Stop, p
DVD Playback Panasonic MP3 Menu \MY FAVOURITES\ Track 01 -special remixTrack 02 Track 03 Track 04 Track 05 Track 06 Track 07 ENTER to select PLAY MODE to add to PLAYLIST Panasonic No.
DVD Playback REPEAT CHAPTER REPEAT TITLE REPEAT OFF Repeat Playback (DVD, VCD, CD, MP3) Press |REPEAT| during playback. The display changes as illustrated. CHAPTER DVD Video CD TRACK CD TRACK MP3 TITLE TITLE DISC DISC FOLDER OFF OFF OFF OFF Note: Repeat playback does not work if the elapsed playback time is not shown on the unit’s display. There is no mode for repeating the whole DVD. Repeat of a Video-CD (VCD) Press Stop < during playback until PBC PLAY disappears from the display.
DVD Settings ADVANCED SURROUND NORMAL (1) ADVANCED SURROUND (DVD) Dolby Digital, 2-channel or over only Makes it possible to have a surround-like effect during playback, if you are using 2 front speakers. [ADVANCED SURROUND NORMAL (1) ] [ADVANCED SURROUND EMPHASIZED (2) ] [ADVANCED SURROUND OFF] Factory preset Turn [ADVANCED SURROUND] off if it causes distortion. BASS PLUS (DVD, VCD, CD) BASS PLUS ON When you have connected an active subwoofer to the SUBWOOFER terminal on the rear of the unit.
DVD Settings Panasonic DVD SETUP DISC VIDEO AUDIO DISPLAY DEMO EASYSET to select Panasonic DVD SETUP DISC VIDEO AUDIO DISPLAY DEMO EASYSET to select Soundtrack language English Subtitle language Automatic DVD Menu language English Child lock Level Off All to access Menu TV Aspect AV1 Output (Scart) Still mode NTSC Disc output ZOOM 4:3 Pan&Scan Video Automatic PAL 60 Off to access Menu SETUP DISC (DVD, VCD) Language codes see page 23.
DVD OSD Menu OSD-screens are menus that contain information about the disc or unit. These menus allow you to perform operations by changing this information. Note: For some DVD-VIDEO discs certain settings are not allowed by disc. Please use the DVD menu.
Information about the player This product incorporates copyright protection technology that is protected by the method claims of certain U.S. patents and other intellectual property rights owned by Macrovision Corporation and other rights owners. Use of this copyright protection technology must be authorized by Macrovision Corporation, and is intended for home and other limited viewing uses only unless otherwise authorized by Macrovision Corporation. Reverse engineering or disassembly is prohibited.
Information about the VCR VCR Special Features I-TIMER page 7 Easy Guide OSD SQPB I-TIMER: Through this INTELLIGENT TIMER function the programming and the recording will be even easier than before. The INTELLIGENT TIMER is storing the programme data up to 8 timer recordings. For example, if you want to record the continuation of your favourite series, you need only to press the I-TIMER button and the stored programme data will be displayed with today's date.
Troubleshooting The display is not illuminated The mains lead is not connected. Check the connection. Safety devices are operating. Disconnect the unit from AC mains for one minute, then check if the unit can be operated. The VCR display is set to OFF. Settings can be changed (see page 9). The display is illuminated, but the unit cannot operate: The unit is in Timer recording Standby mode. Cancel Standby mode by pressing the TIMER button. The child lock is activated.
Troubleshooting Adjusting the VCR Playback picture If the picture is distorted with noise bars, press the TRACKING / V-LOCK button in the (+) or (-) direction during Playback, Still Playback or Slow Playback. Noise bars on the TV picture For automatic adjustment, press (+) and (-) at the same time. The tracking cannot be adjusted on certain cassettes. This is not a functional fault of the VCR.
Index Page A-B repeat play 16 Add 10 ADVANCED SURROUND 17,19 Aerial 3 Analogue recording 12 ANGLE 19 AUDIO 5,19 Automatic Setting 3 AV input / AV Output (Scart) 3,11,12,18 AV LINK 11 BASS PLUS 17,19 Batteries 2 Bitstream 12,18,20 Brightness of VCR display 9 CANCEL 4,5,7,15,17 Channel 3,10 CHAPTER / Chapter review 15,16,19,20 Child lock 8,13,17,18,23 CINEMA 17 Clock 3,9 Country 3 CVC 8 DATE 3,9 Decoder 11 Delete 10 DIALOGUE ENHANCER 17,19 Digital Audio-output 12 Digital recording 12 DIMMED 9 DIRECT TV REC 6