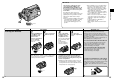
Digital Video Camera Model No. NV-DS12B NV-DS15B NV-DS150B NV-DS25B NV-DS12B Operating Instructions NV-DS15B NV-DS150B NV-DS25B LCD Monitor MultiMediaCard DV In Before use, please read these instructions completely.
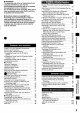
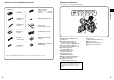
Check List for the Standard Accessories Controls and Functions AC Adaptor Set . . . . . . AC Adaptor ...... . . . . . . Remote Controller NV-DS12, NV-DS15, NV-DS25 . . . . . . . . VEQ2398 NV-DS150 . . . . . . . VEQ2405 1 . . . . . . AC Mains Lead . . . . . . (VJA0940) . . . . . . Button-Type Battery (CR2025) . . . . . . DC Input Lead . . . . . . (VJA1088) . . . . . . Lens Cap and Lens Cap Cord (VYF2700) . . . . . . Battery Pack . . . . . . (VSB0418) . . . . . . Shoulder Strap (VFC3299) . . . . .
Controls and Functions (continued) M C Q R S _ ^ Basic Operations N O D P E T F ] = > ? \ H G AUTO V MNL @ A MODE SELECT I B MENU D.STILL PICTURE S-VIDEO OUT AV OUT/ PHONES U PROGRAMME AE FOCUS EDIT E ` c a b W K [ W.B/SHUTTER/IRIS MIC ¥ DV Z Y PUSH RESET J = Zoom Lever [W/T] (p. 30) > Photoshot Button [PHOTO SHOT] (p. 30, 68) ? Camera (Recording) Mode/VCR (Playback) Mode/ Card Playback Mode Button (and Lamps) [MODE] (p.
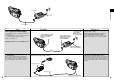
Basic Operations AC Adaptor AC Mains Lead DC Input Lead Title Procedure Remarks, etc. The 3 Types of Power Supply 1) AC Adaptor (supplied) to supply power from an AC mains socket 2) Car Battery Charger (optional) to supply power from the cigarette lighter socket in a vehicle 3) Battery (supplied) (p. 10) Connect the plug of the DC Input Lead to the [DC IN] Socket on the Movie Camera. Connect the other plug of the DC Input Lead to the [DC OUT] Socket on the AC Adaptor.
Charge Lamp Power Lamp CGP-D210 CGR-D220 CGP-D320 AC Adaptor CGR-D815 Title 3) Supplying Power with the Battery Before use, fully charge the Battery. When charging, do not connect the DC Input Lead to the AC Adaptor. Have the front edge of the battery lined up with the 1 mark on the side of the AC Adaptor, and then slide it horizontally until it locks with a click.
The desired recording speed can be selected with [REC SPEED] on the [RECORDING SETUP] Sub-Menu. (p. 18) If you select the LP Mode, the possible recording time is 1.5 times as long as in the SP Mode. Recording in the LP mode does not deteriorate the picture quality. However, the playback picture may contain mosaic-like patterns and certain functions may be restricted.
Eyepiece Corrector Knob 1 3 Pass the longer loop of the Lens Cap Cord through the attached eye on the Lens Cap. Attach the shorter loop to the Grip Belt. Basic Operations Attaching the Lens Cap 2 Then pass the shorter loop of the Lens Cap Cord through the centre of the longer loop and pull tight. ON OFF You can hook the removed Lens Cap onto the Grip Belt. When not actually recording, always attach the Lens Cap to the Lens to protect it.
CAMERA PROGRAMME AE FOCUS VCR MNL MODE SELECT MENU CARD P.B W.B/SHUTTER/IRIS PRESS PUSH FUNCTIONS VCR 1.CAMERA SETUP 2.DIGITAL EFFECT 3.CARD SETUP 4.RECORDING SETUP 5.DISPLAY SETUP 6.OTHER FUNCTIONS 7.DEMO MODE CAMERA AUTO 2 VCR Functions Main-Menu MENU TO FUNCTIONS 1.PLAYBACK FUNCTIONS 2.DIGITAL EFFECT 3.CARD SETUP 4.RECORDING SETUP 5.DISPLAY SETUP 6.OTHER FUNCTIONS EXIT PRESS MENU TO EXIT 3 Card Functions Main-Menu CARD FUNCTIONS 1.ERASE PICTURE 2.CARD EDITING 3.DISPLAY SETUP 4.
Menu Functions Camera Functions Menu CAMERA 1 2 3 D.ZOOM CINEMA M.SENSOR SETUP 40 OFF OFF 400 ON ON DIGITAL 5 6 4 RETURN PRESS ---MENU TO SETUP PICTURE QUALITY FINE NORMAL RETURN PRESS ---MENU TO ECONOMY YES EXIT The illustrations of the menus are intended for explaining the functions; the actual menus look somewhat different.
Menu Functions (Continued) VCR Functions Menu Card Functions Menu (NV-DS25 only) 1 1 2 3 4 5 ERASE PLAYBACK FUNCTIONS BLANK SEARCH ---YES AUTO PRINT ---YES SEARCH PHOTO SCENE 12bit AUDIO ST1 ST2 MIX 6 7 EFFECT OFF EFFECT SELECT OFF WIPE STROBE NEGA B/W TRACER MOSAIC MIRROR ON 8 PICTURE QUALITY FINE NORMAL ECONOMY PICTURE 1.ERASE BY SELECTION 2.
Adjusting the LCD Monitor/Viewfinder Setting the Date and Time (LCD Monitor adjustment is only for models NV-DS15, NV-DS150 and NV-DS25.) If you set [CLOCK SET] on the [OTHER FUNCTIONS] Sub-Menu to [YES], the menu shown below appears. If you set [LCD/EVF SET] on the [DISPLAY SETUP] Sub-Menu to [YES], the following items are displayed.
PROGRAMME AE CAMERA FOCUS VCR AUTO MNL CARD P.B MENU MODE Basic Operations MODE SELECT W.B/SHUTTER/IRIS PUSH ON MF/VOL/JOG OFF Title Recording (Filming) After setting the [OFF/ON] Switch to [ON] to turn the Movie Camera on and setting the Mode Selector Switch to [AUTO], you can start recording simply by pressing the Recording Start/Stop Button. In this case, the Movie Camera adjusts the focus and white balance fully automatically. Procedure 1 Set the [OFF/ON] Switch to [ON].
CARD MULTI S j SEARCH i 6 5 FADE STILL BLC ∫ ; 1 When the video heads (which contact the tape) are dirty, the playback picture contains mosaic-like patterns or the whole screen becomes black. If they become even more dirty, the recording performance deteriorates and in the worst case, recording may not be possible at all. Causes of Dirty Video Heads ³A lot of dust in the air. ³High-temperature and high-humidity environment. ³Damaged tape. ³Long-time use.
You are used to looking at yourself in the mirror. Therefore, when recording yourself with the LCD Monitor facing forward, the picture (as it is being recorded) might look unusual and distracting. If you prefer to see yourself on the LCD Monitor in the same way as you see yourself in a mirror, i.e. with the sides reversed, set [SELFSHOOT] on the [OTHER FUNCTIONS] Sub-Menu to [MIRROR]. However, the picture will still be recorded in the normal, non-reversed way.
S j SEARCH i 6 5 FADE STILL BLC ∫ ; 1 W T Recording Extra Close-up Shots of Small Subjects (Macro Close-up Function) When the zoom magnification is 1k, the Movie Camera can focus on subjects down to a distance of approximately 5 mm between lens and subject. This allows recording very small subjects such as insects. Basic Operations CARD MULTI Using the Zoom Microphone Function When using Zoom-In to shoot from a distance, you can also clearly record the sound.
CARD MULTI S j SEARCH i 5 6 FADE STILL BLC ∫ ; 1 For longer Cue or Review Playback, press the Cue Button [5] or the Review Button [6] only briefly. As this locks the search function, you do not need to keep the button pressed for a long time. ³To resume normal playback, press the Play Button [1]. ³In Cue and Review Playback, pictures with fastmoving subjects may contain mosaic-like patterns.
Using the Jog Dial (Jog Playback) By turning the Jog Dial ([PUSH] Dial) on the Movie Camera in the Still Playback Mode, you can advance the still pictures one by one in forward or reverse direction. VIDEO CAMERA OSD DATE/ TIME START/ STOP PHOTO SHOT DISPLAY RESET ZOOM /REW PLAY FF/W 6 1 5 STILL ADV PAUSE STILL ADV E ; D INDEX STOP INDEX : ∫ 9 W forward PROGRAMME AE FOCUS MNL MODE SELECT SELECT VAR. SEARCH W.B/SHUTTER/IRIS AUTO P.B. ZOOM MENU STORE PUSH W.
[AV OUT] 21 pin Adaptor [S-VIDEO IN] Controller. The On-Screen Indications also appear on the TV screen. VIDEO CAMERA 1 OSD DATE/ TIME DISPLAY RESET ZOOM T A.DUB V [VIDEO IN] [AUDIO IN] S-VIDEO OUT START/ STOP PHOTO SHOT AV Cable /REW PLAY sVOL r AV OUT/ PHONES If you want to use headphones to listen to the playback sound, connect them to the [PHONES] Socket on the Movie Camera.
PROGRAMME AE FOCUS AUTO MNL MODE SELECT MENU W.B/SHUTTER/IRIS PUSH Title Recording in Special Situations (Programme AE) This function lets you select Automatic Exposure settings optimized for special recording situations. Procedure 1 Cancelling the Programme AE Function Set the Mode Selector Switch to [AUTO]. Slide the Mode Selector Switch down repeatedly from the [MNL] position, until the Movie Camera is put in the desired mode ([5], [7], [4], [½] or [¼]).
1 CAMERA FUNCTIONS 2 D.ZOOM 1.CAMERA SETUP 2.DIGITAL EFFECT 3.CARD SETUP 4.RECORDING SETUP 5.DISPLAY SETUP 6.OTHER FUNCTIONS 7.DEMO MODE 6 7 PRESS MENU TO EXIT 4 D.ZOOM 8 5 WIPE 9 MIX : STROBE PROGRAMME AE FOCUS 3 TRACER GAIN UP STROBE AUTO MOSAIC MIRROR MNL STROBE MODE SELECT MENU DIGITAL EFFECT ; EFFECT1 OFF [&ZOOM [ ZOOM WIPE MIX STROBE GAINUP TRACER MOSAIC MIRROR EFFECT2 OFF NEGA SEPIA B/W SOLARI W.
CAMERA FUNCTIONS 1.CAMERA SETUP 2.DIGITAL EFFECT 3.CARD SETUP 4.RECORDING SETUP 5.DISPLAY SETUP 6.OTHER FUNCTIONS 7.DEMO MODE PROGRAMME AE FOCUS AUTO PRESS MENU TO EXIT MNL MODE SELECT W.
1 1AWB 2 11 W T PROGRAMME AE FOCUS AUTO MNL MODE SELECT 3 1z MENU W.B/SHUTTER/IRIS PUSH MF/VOL/JOG Title Recording with Natural Colours (White Balance) This Movie Camera automatically adjusts the white balance to ensure that the pictures are recorded with natural colours. For certain types of subjects and lighting conditions, however, this Auto White Balance Adjustment Mode may not be able to ensure natural colours (p. 95).
Remarks, etc. Range of Shutter Speed Adjustment 1/50–1/8000 s The standard shutter speed is 1/50 s. The nearer to [1/8000] a setting you select, the faster the shutter speed becomes. ³The playback picture of subjects lit by strong lights or with much light reflection may contain vertical streaks of light. ³During normal playback, the scene-to-scene transitions may not be smooth.
VIDEO CAMERA OSD DATE/ TIME START/ STOP PHOTO SHOT DISPLAY RESET ZOOM /REW V PLAY sVOL r T A.DUB CAMERA FF/W 6 1 5 STILL ADV PAUSE STILL ADV E ; D INDEX STOP INDEX : ∫ 9 VCR W CARD P.B SELECT VAR. SEARCH P.B. ZOOM MODE STORE MENU SET P.B.DIGITAL ITEM 1 Title Playing Back with Special Effects (Playback Digital Effects) There are various modes available for adding special digital picture effects to your recordings during playback.
VIDEO CAMERA OSD DATE/ TIME START/ STOP PHOTO SHOT DISPLAY RESET ZOOM /REW PLAY FF/W 6 1 5 STILL ADV PAUSE STILL ADV E ; D INDEX STOP INDEX : ∫ 9 V sVOL r T A.DUB CAMERA VCR W CARD P.B MODE ON SELECT VAR. SEARCH P.B. ZOOM OFF STORE MENU SET OFF/ON ITEM Title Adding New Sound on a Recorded Cassette (Audio Dubbing) You can add music or narration on a recorded cassette.
CAMERA VCR CARD P.B MODE ON Title Procedure Using the MultiMediaCard 1 (NV-DS25 only) You can use the supplied MultiMediaCard to record still pictures onto it, even without a cassette inserted. You can also take favourite scenes recorded on the cassette and copy them as still pictures onto the MultiMediaCard, or you can copy still pictures recorded on the MultiMediaCard onto the cassette. Slide the [OPEN] Lever to the left to open the Card Slot Cover.
CARD MULTI S j SEARCH i 6 FADE STILL BLC ∫ ; 1 5 Maximum recordable number of pictures on the supplied 8 MB MultiMediaCard FINE: Approx. 50 pictures NORMAL: Approx. 100 pictures ECONOMY: Approx. 200 pictures PHOTO SHOT CAMERA ³To record pictures in high quality, set [PICTURE QUALITY] on the [CARD SETUP] Sub-Menu to [FINE]; to record as many pictures as possible, set it to [ECONOMY].
CARD MULTI S j SEARCH i 6 5 FADE STILL BLC ∫ ; 1 1 SLIDE 2 SLIDE CAMERA VCR Using the Picture Search Mode After setting the [PICTURE SEARCH] on the [CARD EDITING] Sub-Menu to [YES] to appear the picture search screen, turn the [PUSH] Dial to select the desired number of the picture and press it. CARD CARD P.
CARD FUNCTIONS 1.ERASE PICTURE 2.CARD EDITING 3.DISPLAY SETUP 4.OTHER FUNCTIONS PHOTO SHOT PRESS MENU TO EXIT A B ERASE PICTURE ERASE PICTURE 1.ERASE BY SELECTION 2.ERASE ALL 1.ERASE BY SELECTION 2.ERASE ALL PROGRAMME AE FOCUS AUTO PRESS MENU TO RETURN PRESS MENU TO RETURN MNL MODE SELECT ERASE ALL ERASE BY SELECTION MENU W.
Remote Controller : 9 Index Search Button [:, 9] (p. 42) To search for recorded scenes marked with an index signal. (:: in reverse direction, 9: in forward direction) 8 1 VIDEO CAMERA 2 OSD DATE/ TIME START/ STOP PHOTO SHOT DISPLAY RESET 7 Pause Button [;] (p. 36) To pause playback. To pause slide playback. (NV-DS25 only) /REW ¥REC A.DUB PLAY FF/W 6 1 5 STILL ADV PAUSE STILL ADV E ; D INDEX STOP INDEX : ∫ 9 sVOL r T V W 5 Playback Digital Effects 6 SELECT 5 VAR.
º Selecting the Remote Controller Mode When using two Movie Cameras at the same time, selecting different Remote Controller Modes makes it possible to operate them separately. VIDEO CAMERA OSD ³If the Remote Controller Mode set on the Movie Camera and on its Remote Controller are not matched, the [REMOTE] Indication appears. ³Replacing the batteries in the Remote Controller automatically resets it to the [VCR1] Mode.
Copying onto an S-VHS (or VHS) Cassette (Dubbing) Using with Digital Video Equipment (Dubbing) (NV-DS150 only) You can copy the picture and sound recorded on this Movie Camera onto an S-VHS or VHS cassette in a home video recorder. VIDEO CAMERA OSD DATE/ TIME START/ STOP PHOTO SHOT DISPLAY RESET ZOOM /REW V A.DUB PLAY FF/W 6 1 5 STILL ADV PAUSE STILL ADV E ; D INDEX STOP INDEX ∫ 9 : sVOL r T ¥REC W SELECT VAR. SEARCH P.B.
Using the Movie Camera with a Computer Copying with the Help of an Editing Controller If you connect the Movie Camera to an Editing Controller equipped with 5-pin Edit Socket, this Movie Camera’s playback functions can be controlled from the Editing Controller. [IR TRANSMITTER] Editing Controller (VW-EC500E) To Edit Socket [DIGITAL STILL PICTURE] 21 pin Adaptor 2 1 [EDITE] 21 pin Adaptor [D.STILL PICTURE] EDIT E D.STILL PICTURE S-VIDEO OUT AV OUT/ PHONES [S-VIDEO IN] [VIDEO IN] EDIT E D.
Using the Movie Camera with a Video Printer If you connect the Movie Camera to a Video Printer, you can print still pictures from scenes recorded with the Movie Camera. If you do not intend to use the Automatic Printing Function, connecting the Edit Cable is not necessary. If you connect the Movie Camera to a Video Printer equipped with 5-pin Edit Socket, you can use the Autoprint Function to automatically print all still pictures recorded in the Photoshot Mode.
Cautions for Use Keep the Movie Camera away from magnetized equipment (TVs, video games, etc.). ³If you use the Movie Camera on or near a TV, the electromagnetic radiation may cause picture and sound distortion. ³Strong magnetic fields generated by speakers and large motors may damage the recordings on the tape and distort the picture. ³The electromagnetic radiation from microprocessors can adversely influence the Movie Camera and cause picture and sound distortion.
Cautions for Use (Continued) Special Characteristics of the Battery This Battery is a rechargeable lithium-ion battery. Its ability to generate electric energy is based on an internal chemical reaction. This reaction is easily influenced by ambient temperature and humidity, and the useful operation time that the Battery can provide becomes shorter at high and low temperatures. When used in extremely cold surroundings, the Battery may only be able to provide approximately 5 minutes of operation time.