
Operating Instructions


Basic Operations
10 11
Title Procedure Remarks, etc.
PUSH
AC Adaptor
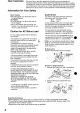
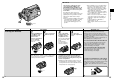
3) Supplying Power with the Battery
Before use, fully charge the Battery.
When the [CHARGE] Lamp Flashes Continuously
If the temperature of the Battery is extremely low or
extremely high, the [CHARGE] Lamp on the AC
Adaptor flashes continuously. It also flashes
continuously when some malfunction has occurred in
the Battery or the AC Adaptor. For details, read “Notes
about the AC Adaptor” (p. 90).
³Charge the Battery at a room temperature between
10oC and 30oC.
³If the DC Input Lead is connected to the AC Adaptor,
disconnect it as charging is not possible otherwise.
³If the [CHARGE] Lamp does not light even though the
Battery is attached, remove the Battery and then re-
attach it.
³During recording and charging, the Battery becomes
warm. However, this is normal.
³If the temperature of the Battery is extremely high or
extremely low, the [CHARGE] Lamp may keep on
flashing and charging is not possible. After the
Battery has cooled down or warmed up sufficiently,
charging starts automatically.
1
Have the front edge of
the battery lined up with
the
1 mark on the side
of the AC Adaptor, and
then slide it horizontally
until it locks with a
click.
5
Insert the Battery into the Battery Holder on the
Movie Camera and slide it downward until it locks
with a click.
2
Connect the AC Mains
Lead to the AC Adaptor
and an AC mains
socket.
³
The [POWER] Lamp and
the [CHARGE] Lamp light
and charging starts.
³The AC Mains Lead
does not fit entirely into
the AC Adaptor socket,
but this has no effect on
operation.
4
Tilt the Viewfinder
upward.
³Also disconnect the AC
Mains Lead.
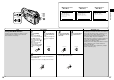
Charging Time and Maximum Time for
Continuous Recording
The times shown in the above chart are
approximations. The figures in parentheses show the
recording time when using the LCD Monitor.
The times listed above for your information indicate the
duration of recording performed at an ambient
temperature of 20°C and 60% relative humidity. The
charging time may be longer when you charge the
Battery at higher or lower temperature.
) Charging Time
* Maximum Continuous Recording Time
+ Intermittent Recording Time
(The Intermittent Recording Time indicates the total
recording time possible when you start and stop
recording repeatedly.)
³The Battery Model VSB0418 is supplied.
³During use and charging, the Battery becomes warm.
The Movie Camera, too, becomes warm during use.
³
When you repeatedly stop and restart recording, the
recording time per Battery is shorter than listed above.
³If you do not use the Battery for a long time, please
read “Precautions for Storage” (p. 92).
³The Battery models CGP-D110 and CGP-D105
cannot be charged with this AC Adaptor.
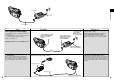
Removing the Battery from the Movie Camera
While pressing the [PUSH] Button, slide the Battery
upward to remove it.
³Be careful not to drop the Battery by accident.
³Before removing the Battery, set the [OFF/ON] Switch
to [OFF].
1
3
Remove the Battery by
sliding it in the
opposite direction of
Step
1
.
When charging,
do not connect
the DC Input
Lead to the
AC Adaptor.
Power Lamp
Charge Lamp
Battery Eject Button
Charge Lamp [CHARGE]
Lit: During charging.
Off: When the Battery is fully charged.
Charge Lamp
CGP-D210
NV-DS12 NV-DS15, NV-DS150 NV-DS25
CGR-D220
CGP-D320
CGR-D815
VSB0418
CGR-D120
A
B
C
A
B
C
A
B
C
A
B
C
A
B
C
1 h. 1 h. 1 h.
1 h 50 min. 1 h 50 min. 1 h 50 min.
2 h.
3 h 15 min.
5 h 20 min.
2 h.
3 h 15 min.
5 h 20 min.
2 h.
3 h 15 min.
5 h 20 min.
1 h 20 min. (1 h 10 min.)
40 min. (35 min.)
2 h 20 min. (2 h.)
1 h 10 min. (1 h.)
2 h 50 min. (2 h 25 min.)
1 h 25 min. (1 h 15 min.)
4 h 50 min. (4 h 15 min.)
2 h 25 min. (2 h 10 min.)
4 h 40 min. (4 h.)
9 h 20 min. (8 h.)
1 h 20 min. (1 h 5 min.)
40 min. (35 min.)
2 h 15 min. (1 h 55 min.)
1 h 10 min. (1 h.)
2 h 40 min. (2 h 20 min.)
1 h 20 min. (1 h 10 min.)
4 h 40 min. (4 h 5 min.)
2 h 20 min. (2 h 5 min.)
4 h 30 min. (3 h 50 min.)
9 h. (7 h 40 min.)
1 h 20 min.
40 min.
2 h 20 min.
1 h 10 min.
2 h 50 min.
1 h 25 min.
4 h 50 min.
2 h 25 min.
4 h 40 min.
9 h 20 min.