
Operating Instructions


Basic Operations
14 15
Title Procedure Remarks, etc.
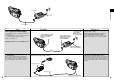
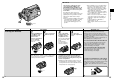
Using the Viewfinder
Before using the Viewfinder, adjust it to your eyesight
so that the indications in the Viewfinder are clear and
easy to read.
³Due to limitations in production technology, there may
be some tiny bright or dark spots on the Viewfinder,
however, these are not recorded on the tape.
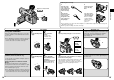
Using the LCD Monitor
(NV-DS15, NV-DS150, NV-DS25 only)
It is also possible to record while viewing the picture on
the opened LCD Monitor.
Relationship between Viewfinder and LCD
Monitor
Opening the LCD Monitor turns off the Viewfinder.
Closing the LCD Monitor turns the Viewfinder on again.
However, turning the LCD Monitor forward also turns
on the Viewfinder again. (p. 28)
³Due to limitations in production technology, there may
be some tiny bright or dark spots on the LCD Monitor
screen, however, these are not recorded on the tape.
1
Set the [OFF/ON] Switch
to [ON].
1
Set the [OFF/ON] Switch
to [ON].
2
Tilt the Viewfinder
upward.
The angle of the
Viewfinder can be
adjusted upward.
2
Push the [3OPEN]
Button and turn out the
LCD Monitor
approximately 90x in the
direction of the arrow.
The Viewfinder turns off.
3
Adjust by sliding the Eyepiece Corrector Knob.
³Do not leave the Viewfinder exposed to direct
sunlight, as its magnifying glass could bundle the light
beams and seriously heat-damage the Viewfinder.
³The Viewfinder can be tilted upward by up to
approximately 70o.
Closing the LCD Monitor
Push the LCD Monitor close until the [3OPEN] Button
locks with a click.
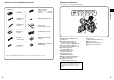
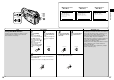
3
Attach the shorter
loop to the Grip
Belt.
You can hook the
removed Lens Cap
onto the Grip Belt.
When not actually
recording, always
attach the Lens Cap
to the Lens to
protect it.
ON
OFF
3OPEN
Eyepiece Corrector Knob
ON
OFF
3OPEN
180˚
90˚
12:30:45
15.10.2000
12:30:45
15.10.2000
12:30:45
15.10.2000
12:30:45
15.10.2000
70˚
3
Adjust the angle of the LCD Monitor according to
the desired recording angle.
The LCD Monitor rotates upward a maximum of 180o
and downward a maximum of 90o from its normal
vertical position. Trying to forcefully rotate it beyond
this range could seriously damage the Movie
Camera.
ON
OFF
Attaching the Lens Cap
1
Pass the longer
loop of the Lens
Cap Cord through
the attached eye
on the Lens Cap.
2
Then pass the
shorter loop of the
Lens Cap Cord
through the centre
of the longer loop
and pull tight.
³Do not leave the Lens exposed to direct sunlight, as it could bundle the light beams and seriously heat-
damage the CCD-Sensor.
³Before you start recording, remove the Lens Cap.