
Operating instructions


Edit mode
49
VQT1A45
Printing pictures by directly
connecting to the printer (PictBridge)
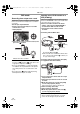
To print pictures by directly connecting the movie
camera to the printer, use a printer compatible
with PictBridge. (Read the operating instructions
for the printer.)
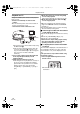
≥Insert a card and set to Card Playback Mode.
1 Connect the movie camera and the printer
with the supplied USB cable.
1 USB cable
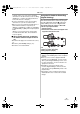
≥The [PictBridge] indication appears on the
screen of the movie camera.
(When the printer is being recognized, the
[PictBridge] indication blinks.)
≥When no card is inserted in the movie camera,
the [PictBridge] indication does not appear.
(You cannot print any pictures.)
≥When the movie camera and the printer are not
connected properly, the [PictBridge] indication
keeps blinking. (It will blink for over
approx.1 minute.) Connect the cable or check
the printer.
≥When images are displayed in multi-screen,
they cannot be printed.
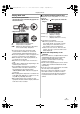
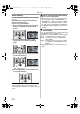
2 Select [SINGLE PRINT] or [DPOF PRINT].
≥If there is no file with a DPOF setting, you
cannot select [DPOF PRINT].
≥When you select [DPOF PRINT] for printing,
set the number of prints in DPOF setting.
≥When [DPOF PRINT] is selected, print after
you determine the paper size. (Step 6)
≥When [DPOF PRINT] is selected,date
printing is unavailable.
3 Move the joystick left and right to select a
desired picture, and then press it.
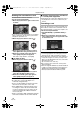
4 Select the desired number of prints.
≥You can set up to 9 prints.
5 Select the setting for date printing.
≥If the printer is not capable of date printing,
this setting is unavailable.
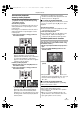
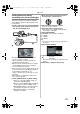
6 Select [PAPER SIZE].
[STANDARD]: Size specific to the printer
[4a5 INCH]
[5a7 INCH]
[4a6 INCH]
[A4]
≥You cannot set paper sizes not supported on
the printer.
7 Select [PAGE LAYOUT].
[STANDARD]: Layout set on the printer
[]: No frame
[]: With frame
≥You cannot set a layout not supported on the
printer.
8 Set [PRINT] >> [YES] to start printing.
1
PictBridge
VQT1A45_EP_ENG.book 49 ページ 2006年12月6日 水曜日 午前9時10分