Video Cassette Recorder NV-HS820 Series Operating Instructions Bedienungsanleitung Contents VQT9200 Page Warning and Important Information 2 Controls and Components 3 VCR Operation 4 Menu Operation 4 TV Operation 4 Connecting and Setting up 5 Playback 9 Recording 10 Satellite or Digital Receiver 13 Timer Recording 14 Search Functions 16 Editing 16 Connecting a Decoder 17 Connecting a Stereo Amplifier 17 Manual Tuning 18 Setting the VCR’s Clock 20 Various Settings 20 Ot
Warning and Important Information As this equipment gets hot during use, operate it in a well ventilated place; do not install this equipment in a confined space such as a book case or similar unit. Important Your attention is drawn to the fact that the recording of pre-recorded tapes or discs or other published or broadcast material may infringe copyright laws. Warning To reduce the risk of fire or shock hazard, do not expose this equipment to rain or moisture. For your safety Do not remove outer cover.
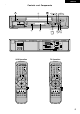
ENGLISH Controls and Components TIMER A Í Á EJECT EXT LINK TIMER REC CVC 6/ REC/OTR S-VHS/S-VHS ET B C /5 TRACKING/V-LOCK + – S-VIDEO AC IN~ SECTEUR~ AV1 (TV) NORMAL S-VIDEO OUT/ SORTIE DIRECT TV REC TV ASPECT TV / TEXT Í TRACKING/V-LOCK 1 4 2 5 3 + 6 – TRACKING/V-LOCK 1 2 3 + 4 5 6 – 7 8 9 VOLUME 7 8 9 + INPUT SELECT AV OUT/ SORTIE TV Operation DIRECT TV REC TV ASPECT TV / TEXT Í RF/ ANT L/G AUDIO R/D OUT/SORTIE AV2 (DECODER/DECODEUR/EXT) VCR Operation
VCR Operation When you want to operate the VCR, set the [VCR/TV] switch to [VCR]. Menu Operation Cursor buttons To select items on the menu. VCR TV r Í VCR-ON/OFF button To switch the VCR from on to standby mode or vice versa. In the standby mode, the VCR is still connected to the mains. MENU EXIT Numeric buttons To select the programme positions (1–99) of the VCR. Example: 09: 9 19: 1 OK MENU button To display the Main menu. EXIT button To exit the menu.
Connecting and Setting up If you are connecting your VCR to a TV equipped with the [Q Link]°1 function, then follow the steps. For a TV equipped with the [DATA LOGIC]°2, [Easy Link]°3, [Megalogic]°4 or [SMARTLINK]°5 function and with a 21-pin Scart socket, also read from this page. For details about the connections, also read TV’s operating instructions.
Preset Download (To Simultaneously Set Up this VCR with a New TV) First of all, make sure that the VCR is switched off. Switch the TV on. Switch the TV on. The TV starts to tune all available TV stations and to adjust the clock. Select the AV input on your TV. When the TV has finished its own auto setup, the VCR is automatically switched on, and the downloading of the setup data from the TV to the VCR starts.
If you are connecting your VCR to a TV using RF coaxial cable and 21-pin Scart cable, then follow the steps. (AV Connection) RF Coaxial cable must be connected to watch TV channels even if 21-pin Scart cable is used to connect VCR to TV. Auto Setup Function The Auto Setup function automatically tunes all available TV stations and sets the VCR’s clock to the current date and time. Panasonic VCR Press the [VCR-ON/OFF] button Country Í to turn on the VCR.
If you are connecting your VCR to a TV using only RF coaxial cable, then follow the steps. (RF Connection) RF Coaxial cable must be connected to watch TV channels. When no station has been set, confirm all connections of the VCR again and restart the Auto Setup See page 19. 3 1 4 When the station names and/or channel numbers have not been set correctly See page 18.
Playback To Play back a Recorded Part Repeatedly Press the [Play] button on the remote control for more than 5 seconds. The [R] indication appears on the TV screen. – If [OSD] is set to [OFF] (See page 20), the [R] indication will not appear in repeat playback mode. For Normal Playback Press the [Play] button. For Cue or Review Playback During playback, tap the [Fast Forward] or [Rewind] button. – To return to normal playback, press the [Play] button.
To Display the Approximate Remaining Tape Time Recording See page 20 to set the tape length. Í TRACKING/V-LOCK + – REC Insert a video cassette with an intact erasure prevention tab. – If it has already been inserted, press the [VCR-ON/ OFF] button to turn the VCR on. Select the TV station using the [Channel] button. (Set the [VCR/TV] switch to [VCR].) – It is also possible to select by pressing the [Numeric] buttons. Press the [REC] button to start recording.
Recording from an external source Recording from an external source, for example from a video movie camera, can be performed. Video movie camera Other VCR To Immediately Record the Same TV Programme That You Are Viewing on the TV (Direct TV Recording) This function allows you to immediately start recording the same programme that you are viewing on the TV. The programme position selected on the VCR automatically changes to that of the TV programme that you are viewing on the TV.
To Make an S-VHS Recording on a Cassette For recordings that you intend to play back on this VCR or another S-VHS VCR, we recommend that you record in the S-VHS format to take advantage of this system’s superior picture quality. Be sure to use a cassette bearing the S-VHS logo. Insert an S-VHS cassette so that the S-VHS indicator is lit. Recording is performed in the S-VHS format.
Satellite or Digital Receiver Connecting the VCR to a Satellite Receiver or Digital Receiver If the satellite receiver is equipped with a 21-pin scart socket Linked Timer Recordings by External Equipments (EXT LINK) If an external equipment (for example a satellite receiver) with a timer function is connected to the AV2 socket of this VCR by a 21-pin cable, it is possible to control the recording of the VCR from this equipment. Make sure that [AV2] is set to [EXT LINK 1] or [EXT LINK 2]. (See page 21.
To Programme with the ShowView Function Timer Recording The ShowView numbers make it extremely easy to set the VCR for timer recording. The duration of a timer recording programmed with ShowView number may be slightly longer than the actual duration of the TV programme. This VCR lets you programme up to 16 TV programmes (including weekly and daily programmes) for unattended recording up to one month in advance.
If [ – –] Appears under [Pos/Name] after Entering a ShowView Number Pos/Name stands for Programme Position/TV Station Name. Normally, the name of the TV station or the number of the programme position is displayed under [Pos/Name]. However, if the [ – –] indication appears, follow the operation steps below. Press the [Channel] button repeatedly to select the programme position on which the TV programme to be recorded will be broadcast.
Search Functions Editing Album Function Programme List Search – Each timer recording programming on the tape must be at least 15 minutes long. (25 minutes in the EP mode) SEARCH Press the [SEARCH] button to display the Programme List menu. Programme List Pos Name 1. ZDF 2. ARD Panasonic VCR Date 27/10 28/10 The album function lets you collect desired scenes (both moving and still pictures) and create the equivalent of a photo album, but on video cassette.
Connecting a Decoder Connecting a Stereo Amplifier Decoder here refers to the device used to decode scrambled broadcasts (Pay TV). 1 3 2 1 3 1 2 3 Audio cable (not supplied) Stereo amplifier (not supplied) Audio Input sockets 2 1 2 3 Decoder (not supplied) 21-pin Scart socket 21-pin Scart cable (not supplied) Connect a 21-pin Scart cable (not supplied) to the AV2 21-pin Scart socket on the VCR and to the 21-pin Scart socket on the decoder.
Fine tuning: To obtain the best tuning condition. – Press the [Cursor] buttons 34 to obtain the best tuning condition. – If you do not want to change the tuning condition, press the [Cursor] button 1 to return to the original condition [AUTO]. Manual Tuning This VCR has 99 programme positions that can be preset to receive TV stations.
To Delete, Add or Move a Programme Position MENU Press the [MENU] button to display the Main menu on the TV screen. Press the [Cursor] buttons 34 to select [Tuning]. Press the [OK] button to display the Tuning menu on OK the TV screen. Press the [Cursor] buttons 34 to select [Manual]. Press the [OK] button to display OK the list of tuned TV stations.
– If [Clock setting] is set to [AUTO] and [Power save] to [ON], the Automatic time correction function does not work while the VCR is turned off. However, as soon as it is turned on, the Automatic time correction function is activated and the clock is set correctly. Setting the VCR’s Clock To Manually Adjust the Clock MENU Press the [MENU] button to display the Main menu on the TV screen. Various Settings Panasonic VCR Press the [Cursor] buttons 34 to select [Clock setting].
Power save: To reduce the VCR’s power consumption when the VCR is switched off. – Set Power save mode as follows: [ON]: The power consumption is greatly reduced when the VCR is turned off. [OFF]: The power consumption is not reduced when the VCR is turned off. Refer to the followings when [Power save] is set to [ON]. – [VCR display] is automatically set to [OFF]. – To turn the VCR on, keep the [VCR-ON/OFF] button pressed on the VCR main unit. It is not possible to turn it on with the remote control.
– Some of the above indications do not appear when using NTSC tapes. Other Function Indications that Can Be Displayed on the TV Screen 2 1 3 4 OSD/DISPLAY At a press of the [OSD/ DISPLAY] button, the following indications appear on the TV screen. ARD STEREO L R SP 1 TV station name 2 5 6 STEREO or BILINGUAL Indicator (For NV-HS820EG Series) When receiving a TV programme, the type of sound system in which it is broadcast is automatically indicated.
Convenient Automatic Functions NICAM Broadcasting System VCR Auto Power On When you insert a video cassette, the VCR switches on automatically. (For NV-HS820EC Series) NV-HS820EC Series feature the NICAM digital sound system, a 2-channel sound broadcast system that provides either 2 high-quality stereo sound tracks or 2 independent mono sound tracks, M1 and M2.
The VCR Does Not Work Correctly [The VCR display is not illuminated.] – The AC mains lead is disconnected. Connect the AC mains lead securely. – VCR display setting is [OFF]. Set [VCR display] to [ON] or [DIMMED]. (See page 21.) – Power save setting is [ON]. (See page 21.) [The VCR display is illuminated, but the VCR cannot be operated.] – The VCR is in the timer recording standby mode. Press the [TIMER] button to cancel the standby mode. – Safety devices are operating.
Index Audio Auto Setup AV input AV link Battery Child lock Clock setting Condensation Country setting Cue CVC Decoder Digital receiver Direct TV recording Download EP Erasure protection EXT LINK Fast forward Fine tuning Hi-Fi Intro-jet scan JET SEARCH Language setting LP Manual tuning Menu MESECAM Mono NICAM NTSC playback OSD OTR PAL Playback Playback off timer Pos Power save Programme list search Page 22 7, 19 4 17 2 4 20 2 6, 7, 8, 21 9 22 17, 18, 21 13 11 6, 19 9, 10, 14 10 13, 21 9 18 11, 18, 23 16 9
Specifications Power Source: Power Consumption: Power Consumption When in Standby Mode: Video Recording System: Video Heads: Audio Heads: Tape Speed: Tape Format: Record/Playback Time: FF/REW Time: VIDEO Television System: Modulation System: Input Level: Output Level: RF Modulated; AUDIO Input Level: Output Level: Video Horizontal Resolution: Signal-to-Noise Ratio: Dynamic Range: Audio Frequency Response: Operating Temperature: Operating Humidity: Weight: Dimensions: 220–240 V AC 50/60 Hz 21 W Approx.