Model No.
Warning and Important Information As this equipment gets hot during use, operate it in a well ventilated place; do not install this equipment in a confined space such as a book case or similar unit. WARNING: To reduce the risk of fire electric shock or product damage, do not expose this equipment to rain, moisture, dripping or splashing and ensure that no objects filled with liquids, such as vases, shall be placed on the equipment.
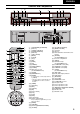
ENGLISH Controls and Components 1 ? W INTELLIGENT TIMER X Y VIDEO \ L MONO AUDIO R ] Z EJECT TIMER REC CVC EXT LINK [ J 3D DNR A.
Menu Operation [Teletext] (37) If your TV is equipped for Teletext reception, you can use these buttons to change the teletext information displayed on the screen and select desired information. For details, refer to your TV’s operating instructions. [Cursor] (38) To select items on the menu. [MENU] (7) To display the Main menu. [EXIT] (27) To exit the menu. [OK] (24) To confirm or store the selection. VCR Operation When you want to operate the VCR, set the [VCR/TV] (23) to [VCR].
If the TV cannot be operated properly: In step 3, enter the other code listed for that manufacturer and repeat step 4.
Preset Download (To Simultaneously Set Up this VCR with a New TV) Preset Download (To Set Up this VCR with a TV Already in Use) First of all, make sure that the VCR is switched off. 1) Switch the TV on. 1) Switch the TV on. The TV starts to tune all available TV stations and to adjust the clock. 2) Select the AV input on your TV. • When the TV has finished its own auto setup, the VCR is automatically switched on, and the downloading of the setup data from the TV to the VCR starts.
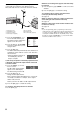
If you are connecting your VCR to a TV using RF coaxial cable and 21-pin Scart cable, then follow the steps. (AV Connection) RF Coaxial cable must be connected to watch TV channels even if 21-pin Scart cable is used to connect VCR to TV.
If you are connecting your VCR to a TV using only RF coaxial cable, then follow the steps. (RF Connection) RF Coaxial cable must be connected to watch TV channels. 3 1 4 5 7 05 TV (not supplied) 06 Aerial Input socket 07 RF Coaxial cable (supplied) 1) Press the [VCR-ON/OFF] (1) to turn on the VCR and tune your TV until the Country setting menu appears on the TV screen. 2) Press the [Cursor] (38) 3421. Select the country where you are using the VCR.
Playback For Normal Playback Press the [Play] (26). For Cue or Review Playback During playback, tap the [Fast Forward] (25) or [Rewind] (8). • To return to normal playback, press the [Play] (26). • Press and hold down the [Fast Forward] (25) or [Rewind] (8). Cue or review playback continues for as long as you keep the button pressed. For High speed Cue or Review Playback (JET SEARCH) During playback, tap the [Fast Forward] (25) or [Rewind] (8) twice.
Recording 1) Insert a video cassette with an intact erasure prevention tab. • If it has already been inserted, press the [VCR-ON/OFF] (1) to turn the VCR on. 2) Select the TV station using the [Channel] (33). (Set the [VCR/TV] (23) to [VCR].) • It is also possible to select by pressing the [Numeric] (2). 3) Press the [REC] (28) to start recording. REC 2) Press the [REC/OTR] (51) on the VCR repeatedly to select the desired recording duration.
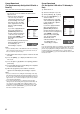
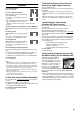
Recording from an external source Recording from an external source, for example from a video movie camera, can be performed. S-VIDEO INTELLIGENT TIMER 3D DNR AV1 (TV) AV3 IN 4S-VIDEO VIDEO NORMAL L MONO AUDIO R S-VIDEO OUT/ SORTIE AV2 (DECODER/DECODEUR/EXT) (44) (45) (46) Video movie camera (57) IN/ ENT VIDEO RF/ ANT L/G AUDIO R/D OUT/SORTIE OUT/ SORTIE (56) Other VCR • Connect a video movie camera or a VCR to this VCR, as shown in the illustration.
• We recommend entering [S-VHS ET] into the cassette label on any cassette that you have recorded using the S-VHS ET function so that you will be able to distinguish such cassettes from VHS cassettes. The following table lists the playback formats that are compatible with this VCR’s recording standard.
Linked Timer Recordings by External Equipments (EXT LINK) If an external equipment (for example a satellite receiver) with a timer function is connected to the AV2 socket of this VCR by a 21-pin cable, it is possible to control the recording of the VCR from this equipment. Connecting a Decoder Decoder here refers to the device used to decode scrambled broadcasts (Pay TV). Make sure that [AV2] is set to [EXT LINK 1] or [EXT LINK 2]. (See page 21.
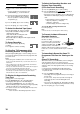
To Programme with the SHOWVIEW Function Timer Recording This VCR lets you programme up to 16 TV programmes (including weekly and daily programmes) for unattended recording up to one month in advance. To Programme with the On Screen Display (OSD) This method offers easy step-by-step programming with the remote control while you view the prompts on the TV screen. Panasonic VCR 1/2 1) Press the [PROG./CHECK] (14) VPS PDC to display the menu for 1. : : 2. : : : : programming timer recordings on 3.4.
If [ss] Appears under [Pos/Name] after Entering a SHOWVIEW Number To Check, Change or Cancel Timer Recording Programmings Pos/Name stands for Programme Position/TV Station Name. Normally, the name of the TV station or the number of the programme position is displayed under [Pos/Name]. However, if the [ss] indication appears, follow the operation steps below. 1) Press the [PROG./CHECK] (14) to display the timer recording programmings on the TV screen.
Panasonic VCR Intelligent Timer Function Many TV programmes are broadcast as a series, like dramas or Soaps, on different days of the week. These are often broadcast on the same channel and time each day. The Intelligent Timer Function remembers the channel number along with the start and end times of the last 8 programmes that you have recorded using timer recording or SHOWVIEW.
Search Functions Editing Programme List Search Album Function • Each timer recording programming on the tape must be at least 15 minutes long. (25 minutes in the EP mode) The album function lets you collect desired scenes (both moving and still pictures) and create the equivalent of a photo album, but on video cassette. 1) Press the [LIBRARY/SEARCH] (4) to display the Programme List menu. Programme List Pos Name 1. ZDF 2.
Audio Dubbing (For NV-HS880 Series) Manual Tuning The audio dubbing function lets you record new sound onto the normal (mono) audio track. INTELLIGENT TIMER This VCR has 99 programme positions that can be preset to receive TV stations. If available TV stations are not received due to extraordinary transmission circumstances, or if you want to change the name of a TV station or change a TV station, you can set it up manually. 3D DNR A.
Decoder: To preset pay TV stations. • Press the [Cursor] (38) 34 to select [ON]. If [Decoder] is set to [OFF], normal TV stations are preset. Video system: To change the type of video system. • Press the [Cursor] (38) 34 to select [PAL] or [MESECAM]. AUTO: The VCR automatically distinguishes PAL, SECAM/MESECAM system. PAL: For receiving PAL signals. MESECAM: For receiving SECAM signals. Mono: To select the type of sound to be recorded.
Setting the VCR’s Clock Various Settings To Manually Adjust the Clock 1) Press the [MENU] (7) to display the Main menu on the TV screen. 2) Press the [Cursor] (38) 34 to select [Clock setting]. Press the [OK] (24) to display the Clock setting menu on the TV screen. Panasonic VCR Clock setting Clock setting : MAN. Time Date : 20:30:24 : 16.10.05 3) Confirm that [Clock setting] is set to [MAN.], and then press the [OK] (24).
VCR display: For automatic change of the brightness of the VCR display when the VCR is switched off. • Set the brightness of the VCR display as follows: [ON]: [OFF]: [DIMMED]: Indications are brightly lit. Indications are not lit. Indications are dimly lit. To select the type of external source equipment which is connected to the VCR’s AV2 21-pin socket. • Set the external source equipment as follows: Audio playback: To set the Audio mode to be used during playback.
Other Function Indications that Can Be Displayed on the TV Screen At a press of the [OSD/DISPLAY] (18), the following indications appear on the TV screen. 1 ARD 2 STEREO 3 4 L R SP 1) TV station name 2) STEREO or BILINGUAL Indicator (For NV-HS880EG and 0:00:29 NV-HS830EG) When receiving a TV 5 6 programme, the type of sound system in which it is broadcast is automatically indicated.
Convenient Automatic Functions VCR Auto Power On When you insert a video cassette, the VCR switches on automatically. Auto Playback Start When you insert a video cassette with a broken erasure prevention tab, playback start automatically without having to press the [Play] (26). VCR-off Playback When the VCR is off, an inserted cassette can be played back by pressing the [Play] (26). Auto Rewind When the tape reaches the end, the VCR automatically rewinds it to the beginning.
The VCR Does Not Work Correctly [The VCR display is not illuminated.] • The AC mains lead is disconnected. Connect the AC mains lead securely. • VCR display setting is [OFF]. Set [VCR display] to [ON] or [DIMMED]. (See page 21.) • Power save setting is [ON]. (See page 20.) [The VCR display is illuminated, but the VCR cannot be operated.] • The VCR is in the timer recording standby mode. Press the [TIMER] (20) to cancel the standby mode. • Safety devices are operating.
Index ∫A ∫J Audio ............................................. 21, 22 Audio dubbing ..................................... 18 Auto Setup ...................................... 7, 19 AV input ................................................. 4 AV link ................................................. 13 ∫B Battery ................................................... 2 ∫C Child lock ............................................. 22 Clock ................................................... 20 Condensation ....
Specifications Power Source: Power Consumption: Power Consumption When in Standby Mode: Video Recording System: Video Heads: Audio Heads: Tape Speed: Tape Format: Record/Playback Time: FF/REW Time: 220–240 V AC 50/60 Hz 21 W (NV-HS 880 Series) 20 W (NV-HS 830 Series) Approx. 3 W (When Power save function is activated) 2 rotary heads, helical scanning system 4 heads 2 heads (Hi-Fi) SP; 23.39 mm/s S-VHS/VHS tape SP; 240 min with NV-E240 LP; 480 min with NV-E240 Approx. 60 s with NV-E180 LP; 11.