Video Cassette Recorder NV-FJ610PMP NV-SJ410PMP Operating Instructions Instrucciones de funcionamiento VQT9132 Before attempting to connect, operate or adjust this product, please read these instructions completely.
Dear Customer Thank you for purchasing this Panasonic Video Cassette Recorder. We strongly suggest that you carefully study the Operating Instructions before attempting to operate the VCR, and that you note the listed precautions. CVC (Crystal View Control) Indicator The crystal view control function ensures that you always obtain the optimum picture quality so that you get the best picture automatically.
Contents As this equipment gets hot during use, operate it in well ventilated place; do not install this equipment in a confined space such as a book case or similar unit. Before Use Controls and Connection Sockets ............ 04 Infra-red Remote Controller ....................... 06 Remote Controller Setup ............................ 08 Setting Up FOR YOUR SAFETY ∫ DO NOT REMOVE OUTER COVER. To prevent electric shock, do not remove cover. No user serviceable parts inside.
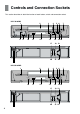
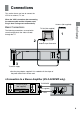
Controls and Connection Sockets This section describes in detail the function of each button, switch and connection socket.
Before Use FRONT REAR 01 POWER Í/I (POWER Í) (‘ 12) 17 VIDEO IN (AV1) (‘ 37) 02 Cassette Compartment (‘ 24) 18 VIDEO OUT (‘ 10) 03 TIMER REC Á (TIMER Á) (‘ 31)0 19 RF IN (‘ 9) 04 I J (‘ 13, 38) 20 AUDIO IN (AV1) (‘ 9, 37) 05 STOP ∫ (‘ 24, 27) 21 AUDIO OUT (‘ 9, 10) 06 PLAY 1 (‘ 24) 22 RF OUT (‘ 9) 07 < EJECT (‘ 13) 08 VIDEO IN (AV2) (‘ 37) (NV-FJ610PMP only) 09 AUDIO IN (AV2) (‘ 37) (NV-FJ610PMP only) POWER DIRECT REC 6 JET SEARCH 5 Í 1 1 2 3 4 5 6 7 8 4 VOLUME 10 PICTURE MODE (
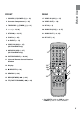
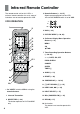
Infra-red Remote Controller The remote control unit for this VCR is a universal remote controller. As such, some of its buttons are not used to operate this VCR. 03 Numeric Buttons (‘ 16, 27) Selects program positions of the VCR. ≥Ensure that VCR/TV switch is set to VCR.
18 VCR/TV (‘ 12) TV OPERATION § Set VCR/TV switch to TV for using POWER Í, the I and J buttons and the numeric buttons. POWER DIRECT REC 6 JET SEARCH 5 22 TV is still connected to the mains. ≥With some TV models, it may only be possible to switch the TV to the standby mode using this button. In this case, use AV or the I and J buttons to switch the TV on. ≥Ensure that VCR/TV switch is set to TV. Before Use 17 VCR/TV switch 20 Numeric Buttons Selects program positions of the TV.
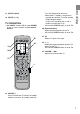
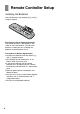
Remote Controller Setup Installing the Batteries Insert the batteries with the polarity (+ and -) correctly aligned. + - + Power Source for the Remote Controller: The remote controller is powered by 2 “AA”, “UM3” or “R6” size batteries. The life of the batteries is about one year, although this depends on the frequency of use. Precautions for Battery Replacement: ≥Load the new batteries with their polarity (+ and -) aligned correctly.
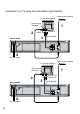
Connections This section shows you how to connect the VCR to an antenna, TV, etc. When the VCR is turned on after connecting the antenna cable and the AC power cord, Plug in Auto Tuning starts automatically. TV Set (Not supplied) The following connections are required to record and play back the video cassette through the TV.
Connection to a TV using the Audio/Video Input Sockets Antenna (Not supplied) TV Set (Not supplied) Antenna Input Connector 2 1 AUDIO IN 3 NV-FJ610PMP VIDEO IN (Not supplied) IN (AV1) OUT IN VIDEO L RF AUDIO R OUT 4 To mains supply Antenna (Not supplied) TV Set (Not supplied) Antenna Input Connector VIDEO IN AUDIO IN 2 NV-SJ410PMP 1 3 (Not supplied) IN IN (AV1) OUT RF VIDEO OUT AUDIO 4 To mains supply 10
Cable Connection The VCR has an extended range, and can tune the Low-Band, Mid-Band, Super-Band, HyperBand, Ultra-Band, and Special cable channels (Channels A-5–A-1, A–W, AA–FFF, GGG– WWW, WWWr1–WWWr12, 100–125, 5A). Also, the VCR can tune to any of the 56 UHF channels (14–69). Refer to Storing TV Broadcasts in your VCR on page 14. BASIC Hook-Up The cable hook-up shown at the bottom left allows VCR-TV functions except for viewing one channel while recording another.
Tuning the TV to your VCR The VCR is fitted with its own tuner (just like a normal TV) and can be preset to receive up to 181 TV broadcast stations. IN (AV1) OUT IN VIDEO L RF AUDIO R 1 OUT Auto Tuning searches for TV stations from VHF minimum to UHF maximum and memorizes every tuned program position. 3 Notes: ≥If the VCR is turned on with the antenna not connected, all channels are skipped.
AUTO CHANNEL SET PROCEEDING END If Auto Tuning stops halfway by turning the VCR off, playback or a power failure: 1 Disconnect the mains lead and then reconnect it. 2 Turn off the VCR and then turn it on. ≥Auto Tuning commences. To Change the RF Output Channel 2 AUTO TUNING IS COMPLETED. : MENU END: MENU To Cancel Auto Tuning MidOperation Press MENU during Auto Tuning. Auto Tuning is cancelled.
Storing TV Broadcasts in your VCR Auto Tuning Using the On Screen Display The VCR is tuned automatically by Plug in Auto Tuning. However, Auto Tuning using the On Screen Display should be performed according to the following method if necessary. Preparations ≥Confirm that the TV is on and the VCR viewing channel is selected. ≥Turn on the VCR and select any program position except AV input. ≥Press VCR/TV to select the VCR mode. On Screen Display Operations 1 Press MENU.
Manual System Setting Procedure Channel Plan TV mode 5 Select MANUAL by pressing 3 or 4 and then press OK. CHANNEL SET ANTENNA SYSTEM AUTO ≥MANUAL SELECT END CHANNEL CHANNEL RECEIVED OF DESIGNATIONS THE AIR CHANNEL SELECTION & INDICATION ON VCR VHF 2–13 2–13 UHF 14–69 14–69 : , OK :MENU 6 Select CH by pressing 3 or 4 and then select the program position by pressing 2 or 1. Setting Up Follow steps 1 to 4 on page 14.
Setting the Remote Controller for Operation of your TV You can operate the TVs of the manufacturers listed below with the remote controller after setting it. Preparation ≥Install the batteries in the remote controller. Operations 1 Find the manufacturer number of your TV while referring to the table. POWER DIRECT REC 6 JET SEARCH 5 Í 1 2 3 4 5 6 7 8 9 2 While holding down POWER Í, use the numeric buttons to enter the manufacturer number. This completes the settings for the TV manufacturer.
Language Setting of the On Screen Display To Select the Desired Language Select one of the four languages displayed: English, Spanish, Portuguese and French. On Screen Display 1 Press MENU. OSD MENU ≥LANGUAGE CLOCK SET CHANNEL SET OPTION SELECT END : , OK :MENU POWER DIRECT REC 6 JET SEARCH 5 Í 1 2 3 4 5 6 7 8 9 AV 0 VOLUME 2 Select LANGUAGE (IDIOMA) by pressing 3 or 4 and then press OK. OSD MENU Setting Up Preparations ≥Confirm that the TV is on and the VCR viewing channel is selected.
Setting the Clock of your VCR The built-in digital clock is used to activate the timer for automatic recording and must be set to the correct time. It employs the 24-hour system. 4 Set each item by pressing 3 or 4 and 1. Press 2 to return to the previous item. Set Year to “2005”. CLOCK SET Y 2005 Preparations ≥Confirm that the TV is on and the VCR viewing channel is selected. ≥Turn on the VCR. ≥Press VCR/TV to select the VCR mode. M 1 D. S. T. D 1 : YES ¡NO SELECT: START :MENU Set Month to “10”.
Settings Using the On Screen Display On Screen Display 1 Press MENU. To Use the On Screen Display Press OSD/DISPLAY. 12 3 1 L and R Indicators (NV-FJ610PMP only) 4 5 CH 1 STEREO LR 0:00.22 SP 6 7 8 2 Indicator for STEREO and SAP Reception (NV-FJ610PMP only) When receiving a TV program, automatically indicates when a TV program is broadcast with the stereo and/or AUDIO II (SAP) sound system. STANDARD 2 Select OPTION by pressing 3 or 4 and then press OK.
4 Tape running display Stop, Eject Rewind, Review, Index Search :, JET SEARCH 6 6 Fast forward, Cue, Index Search 9, JET SEARCH 5 5 Playback 1 Recording ¥ Recording pause M Repeat playback R1 5 Present time/Tape counter/Remaining tape time/Index search Information Present time Follow steps 1 to 2 on page 19. On Screen Display 3 Select TAPE SELECT by pressing 3 or 4. Display j2:35.
When BLUE BACK is ON, the screen will always have a blue background when you play back the unrecorded portions. Follow steps 1 to 2 on page 19. 3 Select BLUE BACK by pressing 3 or 4. OPTION OSD ≥ON TAPE SELECT ≥T120 T160 T180 BLUE BACK ≥ON OFF JET NAVIGATOR ≥ON ≥OFF DELETE NAVIDATA ≥NO YES JET SEARCH x27 ≥x35 SELECT END 4 Select ON or OFF by pressing 2 or 1. 1/2 OFF Follow steps 1 to 2 on page 19. 3 Select DELETE NAVIDATA by pressing 3 or 4.
Audio Channel Selection (NV-FJ610PMP only) When a stereo and/or AUDIO II (SAP) broadcast is received, STEREO and/or SAP are lit to inform you of the type of broadcast. Follow steps 1 to 2 on page 19. On Screen Display 3 Select MTS by pressing 3 or 4. OPTION MTS ≥MAIN DIRECT REC SELECT END 4 Select the desired mode by pressing 2 or 1.
To Set to the Conditions for Direct Recording Function (NV-FJ610PMP only) Follow steps 1 to 2 on page 19. OPTION MTS ≥MAIN DIRECT REC SELECT END 4 Select ON or OFF by pressing 2 or 1. : s/r: :MENU OPTION MTS ≥MAIN DIRECT REC SELECT END 2/2 SAP MONO ON ≥OFF 2/2 SAP MONO ON ≥OFF Setting Up 3 Select DIRECT REC by pressing 3 or 4. : s/r: :MENU OFF: Initially set at this position. ON: This setting enables Direct Recording. AV Input (A1) becomes exclusive channel for Direct Recording. (See page 29.
Playback EJECT STOP PLAY TIMER REC PICTURE MODE REC/OTR 1 SEARCH 6 / REW FF / 5 7 243 Operations 1 Insert a recorded video cassette tape. Display Symbols POWER DIRECT REC 6 JET SEARCH 5 2 Start viewing the picture by pressing 1 (PLAY). Í 1 2 3 4 5 6 7 8 VOLUME 9 + 100 NAVI 4 7 – 0 AV INDEX INPUT SELECT SEARCH PICTURE MODE REC OK VCR TV 2 3 4 r r r DATE ON OFF s s s SPEED TIMER PROG. / CHECK CANCEL Á AUDIO 3 Search forward by tapping 5 (FF).
Press JET SEARCH 5 or 6 to search forward or backward during playback or in the stop mode. ≥Select search speed to view the picture recorded. (See page 21.) ≥The picture that appears in the EP mode at approx. 35 times speed may be disturbed. A vertical scroll may happen due to combination with the TV monitor. It is not a malfunction but if it happens, change to approx. 27 times speed. ≥Jet Search function also works during fast forward or rewind.
To Play back the Recorded Part Repeatedly Keep 1 (PLAY) pressed for 5 seconds or more. The “R 1” indication appears on the TV screen. Beginning of Tape End of Recorded Part Repeat Playback Control signal Interruption PLAY (at least 5 sec.) REW Notes: ≥Repeat Playback function does not work during Play-Off Timer. ≥Press ∫ (STOP) to release the VCR from the Repeat Playback mode.
Manual Recording EJECT STOP PLAY TIMER REC REC/OTR 1 POWER DIRECT REC 6 JET SEARCH 5 Í 1 2 3 4 5 6 7 8 3 VOLUME 9 + 100 – 0 AV NAVI INDEX INPUT SELECT SEARCH PICTURE MODE 4 5 OK § VCR TV 2 3 4 r r r DATE s PROG. / CHECK CANCEL ON OFF s s SPEED TIMER 2 Á AUDIO 6 / REW FF / 5 4 3 5 Operations Display Symbols 1 Insert a video cassette tape with an intact erasure prevention tab. ≥If it has already been inserted, press POWER Í/I (POWER Í) to turn the VCR on.
To Select the Desired Tape Speed Press SPEED before recording. Display Symbol SP POWER DIRECT REC 6 JET SEARCH 5 Í To Interrupt Recording Press ;/D (PAUSE/SLOW) during recording. Press it again to continue recording. 1 2 3 4 5 6 7 8 VOLUME REC 9 To View One TV Program while Recording Another One 1 Refer to steps 1–4 of the manual recording operation. – 0 AV NAVI INDEX SEARCH PICTURE MODE REC OK 3 Select the TV program on your TV that you wish to view now.
AV1 (AUDIO IN/ VIDEO IN) IN (AV1) OUT IN EJECT VIDEO STOP L PLAY TIMER REC AUDIO SEARCH 6 / REW FF / 5 2 One-Touch Recording (OTR) Whenever you are in a hurry to start a timer recording with automatic stop in your absence, simply set the recording duration by pressing ¥ REC/OTR repeatedly. The duration indicated on the VCR display changes by pressing ¥ REC/OTR as follows: Counter display (normal recording mode) >30 (min.)>60 (min.)>120 (min.)> 180 (min.)>240 (min.
Timer Recording Operations 1 Press PROG./ CHECK. 4-Key Programming On Screen Display Up to 16 timer programs, including weekly and daily programs, can be recorded up to one month in advance by setting the timer. CH DATE ON OFF – – – – – – – – : – – – – : – – SP CATEGORY : 1 Preparations ≥Insert a video cassette tape with an intact erasure prevention tab. ≥Confirm that the TV is on and the VCR viewing channel is selected. ≥Turn on the VCR. ≥Check that the clock is set to the correct time.
7 Press MENU to make the previous display appear. CH DATE ON OFF 2 27SA 2 0 : 0 2 2 1 : 3 0 SP CHECK : PROG./CHECK 8 To activate timer recording, press TIMER Á. ≥When JET NAVIGATOR is set to ON, the [PROGRAM IS COMPLETED REMAINING PROGRAM 49] message appears. (See page 21.) ≥When JET NAVIGATOR is set to OFF, the [PROGRAM IS COMPLETED] message appears. (See page 21.) ≥The VCR will be set to the timer recording standby mode after about 1 minute if TIMER Á is not pressed.
Example for T120 tape: 15 min. Recording by SP mode 90 min. Video Tape Timer Programming 30 min. 90 min. Recording by SP mode 45 min. Recording by EP mode 1st Program (90 min.) 3 Press 1 to display the Category. (When JET NAVIGATOR is set to ON.) Press 1 again to make the previous display appear.
Search Functions This VCR can display a list of the recorded programs on the inserted video cassette on the TV screen. You can then select the desired program, and the VCR will quickly locate its beginning and start playback. VOLUME 7 8 AV 0 9 + 100 NAVI – INDEX INPUT SELECT SEARCH PICTURE MODE REC MENU OK VCR TV 1 2 3 4 r r r DATE ON OFF s PROG.
To Set the Category The category setting allows you to find what kind of programs are recorded by the character and the icon indications. On Screen Display CATEGORY SETTING Press 1 while the Jet Navigator list appears.
When Recording Over the Same Location on a Tape: ≥The originally recorded program is deleted from the list. ≥Program contents starting near the start and end of the newly recorded program (within 10 minutes before the start and after the end of the newly recorded program in the EP mode) are also erased. (Although old program contents are also similarly erased in the case of ordinary recording, the newly recorded program is not registered in the list.
To Find the Beginning of Each Recording (VHS Index Search System) Searching while checking the video cassette contents (Intro-Jet Scan) Example: Searching for the 2nd recorded segment in the forward direction. Display Symbol Press INDEX 9 twice. (This operation is performed while the VCR is in the stop mode or normal playback mode.) ≥After finding the specific recorded segment, playback starts automatically. ≥If you press INDEX 9 too many times, simply press INDEX : to correct it.
Editing This function can be used to make up an edited tape from other recordings or video sources. A new scene can be added to the end of previous one. Preparations ≥Connect a movie camera or another VCR to this VCR as shown. ≥Insert a recorded cassette tape with an intact erasure prevention tab. ≥Select the audio source required by pressing INPUT SELECT to set AV input.
Other Functions EJECT STOP PLAY TIMER REC PICTURE MODE Tracking Adjustment and Vertical Locking Adjustment ≥For manual tracking adjustment The I and J buttons are used to adjust the tracking when, for example, noise bars on the picture during normal playback are better removed manually than by automatic digital tracking control. To return to automatic digital tracking control, press both buttons together.
Before Requesting Service Before requesting service, check the following points again. Self-diagnostic Indications This VCR has a self-diagnosis and display function. If the VCR detects trouble during installation or during use, the following indications automatically appear in the VCR display. Indications are in the form of a single English letter plus two numbers, such as [H01]. On screen display messages are displayed. The error message is indicated in brackets [ [PLEASE PUT IN A VIDEO CASSETTE.
Playback will not operate correctly The symptom description is indicated in quatations “ ”. “The picture is noisy or is not in color. Horizontal bars or lines run down the screen.” ‘ Tracking is not correct. Adjust the tracking. See page 38. ‘ The TV has not been tuned to the VCR. Tune the TV to the VCR. See page 12. ‘ The video heads are clogged or worn. Consult your dealer for further advice. Recording will not operate correctly The symptom description is indicated in quatations “ ”.
Usage Precautions Please read these precautions before you operate this VCR. Avoid Sudden Changes in Temperature If the VCR is suddenly moved from a cold to a warm place, dew may form on the tape and inside the VCR. Humidity and Dust Avoid places where there is high humidity or much dust, which may cause damage to internal parts. Do Not Obstruct the Ventilation Holes The ventilation holes prevent abnormal increases in temperature. Do not block or cover these holes.
Dirt on the video heads If the video heads get dirty, pictures will not be recorded or played back clearly. (See the following conditions.) Normal picture Small amount of dirt Large amount of dirt If this happens, insert and eject a cassette 5–10 times successively to remove the dirt from the video heads. If a clear picture is not produced, insert a commercially available cleaning cassette. Then, press REC ¥ (¥ REC/OTR) and keep it running for approximate 10 seconds to clean the video heads.
Specifications NV-FJ610PMP NV-SJ410PMP Video Recording System: Video Heads: Audio Heads: Tape Speed: Tape Format: Record/Playback Time: FF/REW Time: VIDEO Television System: Modulation System: Input Level: Output Level: AUDIO Input Level: Output Level: Audio Track: Video Horizontal Resolution: Signal-to-Noise Ratio: Dynamic Range: Audio Frequency Response: Wow and Flutter: Operating Temperature: Operating Humidity: Weight: Dimensions: 110–240 V AC 50/60Hz 15 W (NV-FJ610PMP) 13 W (NV-SJ410PMP) 4 rotary h