Model No. NV-VS50EN/A NV-VS70EN/A pJsepJ` ! S-VHS-C Movie Camera !" Operating Instructions Инструкция по эксплуатации qOGA « «œU —≈ !"#$%&'()*+ Before use, please read these instructions completely. Перед использованием прочитайте, пожалуйста, эту инструкцию полностью.
ENGLISH !"# Information for Your Safety WARNING !"#$%&'()*+,-./0)1234 !"#$%&'()*+,-. !" !" !"#$%&'() * !"#$%&'( !)*+ To reduce the risk of fire or shock hazard and annoying interference, use only the recommended accessories and do not expose this equipment to rain or moisture. Do not remove the cover (or back); there are no user serviceable parts inside. Refer servicing to qualified service personnel.
ENGLISH Contents !"#$%&'()*+,-./ !"# If you want to start using the Movie Camera immediately, be sure to read at least the pages marked with ♠.
ENGLISH ! Advanced Operations L KKKKKKKKKKKKKKKKKKKKKKKKKKKKKKKKKKKKKKKKKKKKKKKKKKKKKKKKKKKKKKKKKKKKKKKKKK TQ !"#$ !"#KKKKKKKKKKKKKKKKKKKKKKKKKKKKKKKKKKKKKKKKKKKKKKK TS !"# !"#KKKKKKKKKKKKKKKKKKKKKKKKKKKKKKKKKKKKKKKKKKKKKKKKKK TU ≥ !"#$%& KKKKKKKKKKKKKKKKKKKKKKKKKKKKKKKKKKKKKKKKKKKKKKKKKKKKKKK TU ≥ ! Nxbccb`qNz KKKKKKKKKKKKKKKKKKKKKKKKKKKKKKKKKKKKKKKKKKKKKKKKKKKKK UM ≥ ! Oxbccb`qOz KKKKKKKKKKKKKKKKKKKKKKKKKKKKKKKKKKKKKKKKKKKKKKKKKKKKK UQ ≥ !"#$%&'() KKKKKKKKKKKKKKKKKKKKKKKK
ENGLISH ! Advanced Operations !" KKKKKKKKKKKKKKKKKKKKKKKKKKKKKKKKKKKKKKKKKKKKKKKKKKKKKKKKKKKKKKKKKKKKKK NNS ≥ !"#$%&'( KKKKKKKKKKKKKKKKKKKKKKKKKKKKKKKKKKKKKKKKKKKKK NOO !"#$%&'()*+,-./0 KKKKKKKKKKKKKKKKKKKK NOQ !"#$%&'()*+,-.
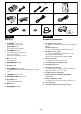
1. 2. 4. 5. 8. [A] [B] 6. 9. 3. 7. 11. 10. ENGLISH ! Standard Accessories 1K !" l NU OM NSQ 01. AC Adaptor (l 18, 20, 164) To supply power to the Movie Camera and to charge the Battery. DC Input Lead (l 18) To connect the AC Adaptor to the Movie Camera. !"#$%&$'($) !"# l NU !"#$"%&'()* 2K !"# l NU OM 02. AC Mains Lead (l 18, 20) To connect the AC Adaptor to an AC mains socket.
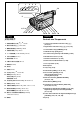
1 2 3 CAMERA VCR 4 INFOWINDOW 19 5 6, 7, 8 9 10 11 12 13 14 15 16 17 18 ENGLISH !" Controls and Components 1 !"#$%& x[z l TU US 11 Super Image Stabilizer Indication Lamp [[] (l 78, 86) 2 !"#$ x©z l TU NPU 12 Digital Effect Indication Lamp [©] (l 78, 138) 3 !"#$ x`^jbo^z l RQ 13 Camera Mode Lamp [CAMERA] (l 54) 4 !"# xs`oz l SO 14 VCR Mode Lamp [VCR] (l 62) 5 MJiìñ ! xM=iru=lccLlkz l NMQ 15 0-Lux Recording Switch [0 LUX OFF/ON] (l 104) 6 !"#$ l NTM 16 White
s SEARCH SEARCH r S6 20 5 ;W.
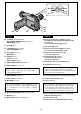
33 1 V A 41 42 43 44 34 45 35 2 46 47 36 37 38 39 40 ENGLISH 33 !" x V z l TO NSM NSO 33 Video Output Socket [V] (l 72, 160, 162) 34 !" x A z l TO NSM NSO 34 Audio Output Socket [A] (l 72, 160, 162) 35 p !"# xpJsfablz l TO NSM NSO 35 S-Video Output Socket [S-VIDEO] (l 72, 160, 162) 36 Recording Start/Stop Button (l 54) 36 ! L l RQ 37 Off/On Mode Selector Switch [CAMERA/OFF/VCR] (l 46, 54, 62, 72) 37 L !"# $ x`^jbo^ Llcc L s`oz l QS RQ SO TO 38 Grip Belt (l 46
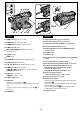
A 3 1 1 2 ENGLISH ! The 3 Types of Power Supply 1) !" 1 ! !"#$%! 2) !" # !" !"#$%&'() 3) ! l=OM 1 2 3 1) AC Adaptor 1 (supplied) to supply power from an AC mains socket 2) Car Battery Charger (optional) to supply power from the cigarette lighter socket in a vehicle 3) Battery (supplied) (l 20) !"#$%! !"#$%&'()*+,-xa`=fkz !"#$%&'()*+',"xa`=lrqz Supplying Power from an AC Mains Socket 1 2 !"#$%&' (&)* !"+,- A !"#$%& 3 ≥ !"#$%&'()*+,-.
1 2 3 3 2 1 4 4 ENGLISH 1 2 3 4 ! Supplying Power with the Battery Charge the Battery before using it. !"#$%&'(!) 1 !" ≥ !"# 1 !"#$%&'()* +, !" ≥ !"#$%&'()*+,-'./01/2 2 !"#$%&' (&)* !"+,≥ xmltboz ! 2 x`e^odbz ! 3 !"#$% ksJspRM xmltboz 2 !"x`e^odbz 3 ! !"#$ ksJspTM ≥ !"#$%&'(x`e^odbz 3 !"# !"#$%&'()*+, !" N Attach the Battery.
CGR-V14 CGR-V14S CGR-V610 NV-VS50 NV-VS70 A 2 h 40 min. 1 h 20 min. B 2 h 10 min. (1 h 30 min.) 2 h 10 min. (1 h 25 min.) C CGR-V26S CGR-V620 50 min. (35 min.) A 4 h 50 min. 2 h 25 min. B 4 h 10 min. (2 h 55 min.) 4 h 10 min. (2 h 45 min.) C CGR-V53S CGR-V816 50 min. (35 min.) A 10 h 20 min. 5 h 10 min. B 8 h 20 min. (5 h 50 min.) 8 h 20 min. (5 h 30 min.) C 50 min. (35 min.
0 1 0:00 ÿÿÿ 0 1 0:00 ÿÿÿ ÿÿÿ 1 ÿÿÿÿ ÿÿ 6 ÿÿ ÿÿ ÿ ÿÿÿÿ 6 0:03 0:03 20 0:10 10 0:05 5 0:03 10 0:05 5 3 0:01 ÿÿ ÿ 0:00 ÿÿÿ 0 A 6 ÿÿ CGR-V53S CGR-V816 ÿÿÿÿ ÿÿ ÿ ÿÿ ÿ ÿÿÿÿ 6 5 3 0:01 ÿÿ A 6 ÿÿ CGR-V26S CGR-V620 0:01 ÿÿÿÿ ÿÿ ÿ ÿÿ ÿ ÿÿÿÿ 6 ÿÿ A 3 ÿÿÿ CGR-V14 CGR-V14S CGR-V610 0:20 20 0:10 10 0:05 40 0:10 0:40 40 0:20 20 u 60 80 0:40 40 0:20 60 60 0:40 120 1:20 80 120 1:20 u 160 240 2:40 u ÿÿÿ ENGLISH ∫ !"# $ ∫ Checki
3OPEN 1 1 ENGLISH !"#$%&' Using the LCD Monitor !"#$%&'()*+,-./0123405"#$ !"#$%&'()*+,-./+0123-456 !"#$%&' 1 Improved LCD backlight transmission makes the picture extra bright. In addition, special coating of the LCD’s surface diffuses the light from outside to minimize light reflection, so the picture has vivid colours and is easy to see. x 3lmbk z !"#$%& '()* !"#$ VM 1 !"#$%&' !"#$%&'()*+,-.
1 2 CAMERA FUNCTIONS 1.CAMERA SETUP 2.DIGITAL EFFECT 3.TITLE SETUP 4.DATE/TIME SETUP 5.DISPLAY SETUP 6.LCD/EVF SETUP 7.OTHER FUNCTIONS PRESS CAMERA VCR INFOWINDOW CAMERA OFF VCR 1, 3 4, 6 2, 5, 7 1 TO EXIT 3 VCR MENU MENU FUNCTIONS 1.PLAYBACK FUNCTIONS 2.DIGITAL EFFECT 3.TITLE SETUP 4.DATE/TIME SETUP 5.DISPLAY SETUP 6.LCD/EVF SETUP MF/ TRACKING PRESS MENU TO EXIT FOCUS / SET ENGLISH !"# Using the Menus !"#$%&'()*+,-.
1 1 2 3 4 5 CAMERA SETUP M.SENSOR OFF ON 45 100 550 D.ZOOM MULTI STROBE1 STROBE2 SHUTTER EFFECT OFF ON REC TOP REC BUTTON MULTI/SNAP 6 RETURN ---YES PRESS MENU TO EXIT ENGLISH ! Menu Functions !"#$%&'()*+, -'./(01* The illustrations of the menus are for explanation purposes only and the actual menus may be somewhat different. z !"#$%&x`^jbo^=crk`qflkp 1. 2. 3. 4. 5. 6. 7.
2 3 DIGITAL EFFECT 7 8 9 EFFECT1 OFF SIS D.ZOOM SIS+D.ZOOM MOSAIC STRETCH MIRROR STROBE GAIN UP MULTI P IN P MIX WIPE EFFECT2 OFF NEGA SOLARI SEPIA B/W D.FADE1 D.FADE2 D.
4 5 DATE/TIME SETUP YEAR MONTH DATE HOUR MIN. 2001 2 28 15 30 PRESS MENU TO RETURN @ A B C D 6 DISPLAY SETUP TAPE 30 45 60 DISPLAY ALL MEMORY PARTIAL OFF C.RESET ---YES SELF SHOOT NOR. MIR.
1 2 PLAYBACK FUNCTIONS MULTI STROBE1 STROBE2 DNR OFF ON 1 2 3 3 DIGITAL EFFECT EFFECT OFF ON EFFECT1 RETURN PRESS OFF MOSAIC STRETCH MIRROR STROBE MULTI P IN P MIX WIPE EFFECT2 OFF NEGA SOLARI SEPIA B/W D.FADE1 D.FADE2 D.FADE3 RETURN ---YES PRESS MENU TO EXIT ---YES TO EXIT MENU 4 5 DATE/TIME PRESS MENU TAPE DISPLAY 2001 2 28 15 30 TO RETURN PRESS RETURN PRESS SETUP 30 45 60 ALL MEMORY OFF ---YES C.
LCD/EVF SETUP A LCD BRIGHTNESS [-]||||----[+] LCD COLOUR [-]||||----[+] EVF BRIGHTNESS [-]||||----[+] PRESS MENU TO RETURN 180u B MENU 2 1 MF/ TRACKING FOCUS / SET 90u ENGLISH !"#$%&L !"# !"#$ Adjusting the Brightness and Colour Level of the LCD Monitor/Finder !xs`o= crk`qflkpz !x`^jbo^ crk`qflkpz !"#xi`aLbsc=pbqrmz i`aL bsc !"#$%&'() If you select the [LCD/EVF SETUP] Sub-Menu of the [VCR FUNCTIONS] or the [CAMERA FUNCTIONS] Main-Menu, the following items are
1 < EJECT 2 4 3 6 5 3OPEN LOCK 2 3 1 4 ENGLISH L !"# 1 2 3 Inserting/Ejecting the Cassette 1 !" #$%&'()*)+, l NU OM ! 1 !"#$ !x 3lmbk z !"#$ VM 2 3 !"#$%& '()* ≥ !"#$%&'()*+,-./-012345 !"#$%&'()*+,-. 4 5 6 Turn the cog wheel 1 to tighten the tape. Slide the [3OPEN] Lever to the left and simultaneously open the LCD Monitor in the direction of the arrow approximately 90x.
30 3 1 R 0:30 DISPLAY SETUP TAPE DISPLAY 30 45 ALL C.RESET SELF SHOOT ---NOR. 60 4 RETURN ---PRESS MENU TO EXIT P 2 DISPLAY SETUP P 2 TAPE DISPLAY MENU 30 ALL C.RESET 45 60 ---- MF/ TRACKING 1 RETURN ---PRESS MENU TO EXIT FOCUS / SET ENGLISH !"#$%&' Selecting the Correct Tape Length !"#$%&'()*+,-.
ENGLISH sep !" About the VHS Formats With this Movie Camera, you can choose one of the following 3 different formats for recording: 1. VHS: also called “normal” or “conventional VHS” format 2. S-VHS (Super-VHS): developed based on the VHS format but featuring higher resolution and picture quality (The [ ] Indication appears.) 3.
0:00.00 3 5 6 4 7 0:00.00 2 3 1 CAMERA OFF VCR 1 2 8 ENGLISH !"#$ Adjusting the Finder !"#$%&'()*+,-./01'2 !"#$ !"#$%& Before using the Finder, adjust it to your eyesight so that the indications in the Finder are clear and easy to read. 1 1 z x`^jbo^LlccLs`oz !"x`^jbo^ z x s`o !" ≥ !" 1 ≥Turn the switch while pressing the button !"#$% 2 !"#$%&'()*+,-"./012 2 3 !"#$%&'() 3 !"#$%&'()*+,-./0123456789 !"#$%&'( 2 1.
1 _ 1 2 ENGLISH !"#$ 1 2 Inserting the Button-type Battery !"#$%&'()*+,-./01 ! z x_^`hrm=_^qqbov !"# !"#$%&'()* Before setting the date and time, insert the button-type battery (supplied). !"# 1 x_^`hrm=_^qqbov z ≥ ≥ ≥ ≥ 2 !"#$%&'()*+,-./x`^jbo^LlccLs`oz !" L L ! !"xlccz !"#$"%&'()*+,-.$x0z !"# !"#$ `oOMOR ! !"#$%&' P !"#$%&'()*+,-./012345678 !"#$%&'()*+,-.
CAMERA FUNCTIONS 1.CAMERA SETUP 2.DIGITAL EFFECT 3.TITLE SETUP 4.DATE/TIME SETUP 5.DISPLAY SETUP 6.LCD/EVF SETUP 7.OTHER FUNCTIONS PRESS MENU TO EXIT 10 1, 3, 5, 7, 9 2, 4, 6, 8 MENU DATE/TIME SETUP YEAR MONTH DATE HOUR MIN.
TITLE SETUP 3 1 2 DATE/TITLE DATE TIME TITLE HOLIDAY LANGUAGE FOR TITLE ENGLISH NORMAL SIZE COLOUR WHITE DATE/ TITLE RETURN ---PRESS MENU TO EXIT 1 MENU 4 HOLIDAY 15.10.2001 12:30 15.10.2001 MF/ TRACKING FOCUS / SET 2 5 5 HOLIDAY 15.10.2001 6 3 12:30 HOLIDAY 15.10.2001 4 12:30:15 15.10.
REC PAUSE AUTO 4 RECORD 5 3 CAMERA OFF VCR 1 2 CAMERA VCR 1 CAMERA OFF VCR INFOWINDOW PROG. AE STORE COLOUR 3, 4 OFF/ON 2 CAMERA OFF VCR 5 ENGLISH !"#$%&'( Recording in the Full Auto Mode !"# $%&'()*+,-./01234056 !"#$%&'( l NMS NNM !"#$%&'()*+,-./0'12345678 !"#$ foL !" !" !"#$% 1 2 x`^jbo^LlccLs`oz The Full Auto Mode adjusts the white balance and focus automatically. However, if you want, you can also adjust either one or both of them manually.
2 REC MULTI/ SNAP 3 1 ENGLISH 1 !"#$%&'()*+, xlqebo crk`qflkpz !"# !"xq^iiv=i^jmz !" xlccz l OU Tally Lamp 1 If you do not want the Tally Lamp to light during recording, set [TALLY LAMP] on the [OTHER FUNCTIONS] Sub-Menu to [OFF]. (l 28) ≥ !"#$%&'(")*+,-.S !"#$% !"#$%&!'()*+,-.
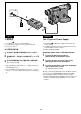
1, 2 2 CHK 1 s SEARCH 4 SEARCH r S6 5 ;W.B ∫ 1 BLC TBC " 2 3 ENGLISH !"#$%&' Checking the End of a Recorded Scene (Recording Check Function) !"#$% !"#$%&'()*+ !,-./01234 1 To play back the final few seconds of the last recorded scene in the Recording Pause Mode. !"#$%&!'(%xSz 1 ≥ x`ehz 1 !"#$%&'()"*+ !"#$%&'()* x`ehz !"#$ ≥The [CHK] Indication 1 appears.
[W] 1 1 sVOLr V.ZOOM 10 W T V.ZOOM 22 V.ZOOM 1 [T] ENGLISH L ! Zooming In/Out !"#$%&'()*+,-."/01234567 1 Recording close-ups of your subjects and recording wideangle shots add special effects to your videos. !"#$ ! xtz xtLqz ! !" ! xqz xtLqz ! 1 ≥ !"#$%&'()*+ To record a wider view (Zooming-out): Push the [W/T] Zoom Lever toward [W]. To enlarge your subject (Zooming-in): Push the [W/T] Zoom Lever toward [T].
s SEARCH 3 VOLUME 2 TBC 2 SEARCH r S6 5 ;W.B CAMERA ∫ VCR 1 BLC INFOWINDOW TBC 3 4 4 5 CAMERA OFF VCR 1 1 ENGLISH Playback !"#$%&!' Watching Playback on the Movie Camera !"#$%&'()* You can watch playback of the recorded scenes. 1 1 z x`^jbo^LlccLs`oz !"xs`o !" ≥ !" 1 !"#$% ≥ xs`oz 2 2 x6z 3 z x1 ! ≥Turn the switch while pressig the button ≥The [VCR] Lamp 2 lights. 2 1. Press the [6] Button. ≥The tape starts to rewind.
TBC DNR 1 BLC TBC PLAYBACK FUNCTIONS MULTI STROBE1 DNR OFF ON RETURN ---PRESS MENU TO EXIT ENGLISH q_` !"#$ TBC (Time Base Corrector) Function Playback of certain cassettes can cause slight horizontal shaking of the picture or other distortion. To minimise such distortion and ensure a stable playback picture, this Movie Camera is equipped with the TBC Function. This function is automatically activated within a few seconds after playback has started, and the [TBC] Indication appears.
1 2 6 3 4 5 ENGLISH !"# $ !"#$"%&'( Playing Back on a VCR (Using the Supplied Cassette Adaptor) By using the supplied Cassette Adaptor, you can play back compact cassettes in your VCR in the same way as full-size cassettes. !"#!$%&'()*+,"-./0( 1234 !"#$%&'()* + 1 2 3 4 5 6 !"#$%&'()*+ !"#$%&'()*+#$,-. !"#$%&'() !"#!$%&'()*+ !"#$%&'()* !"#$!%&' 1 2 3 4 !"#$%&'()*+,-.&/ 5 6 Push the Battery Compartment Cover upward and remove it.
1 2 TRACK. TBC s SEARCH TRACK. S6 1 MENU # " MF/ TRACKING FOCUS / SET ENGLISH ! High-Speed Rewinding 1 1 !"#$%&x6z N !" ≥ x≈z 1 ≥ !"#$%&#'$()*+,-./ ≥ !"#$%&'()*+,-./012! 34 !"#$%!"! &'()*+,%- . ! ≥ !"#$%&'(x6z P !" ≥ !"#$%&'()*+ l NSO !"#$ ≥ !"#$%"&'()*+xMWMMKMMz ≥The [≈] Indication 1 appears. ≥During High-Speed Rewinding, the tape winding sound is louder.
2 1 s SEARCH 1 SEARCH r S6 5 ;W.B ∫ 1 BLC TBC 3 ENGLISH 1 2 !"!# Cue Playback 1 !"#$%&'()*x5z !"!# Review Playback 2 !"#$%&'()*x6z !"# !"# $%&'($%)*+,-./0# $%x5z !"#x6z !"#$%&'()*+,-./ !"#$ ≥ !"#$%&'"#x1z 3 Keep the [6] Button pressed during normal playback. Search Lock Function For longer Cue or Review Playback, press the Cue Button [5] or the Review Button [6] only briefly.
% 1 ' VIDEO IN VIDEO OUT AUDIO IN S-VIDEO IN & V A AUDIO OUT S-VIDEO OUT 1 ENGLISH !"#$%&' Watching Playback on a TV !"#$%&'"()*+,&'-./012 345 !"#$%&'"()*+,-./01.2034 By connecting the Movie Camera to a TV, you can watch playback of the recorded scenes on the TV screen. Before connecting, turn off both the Movie Camera and the TV for safety’s sake.
2 CAMERA OFF VCR 2, 5 1 1, 3, 4, 6 FADE ENGLISH L Fading In/Out ∫ 1 ∫ Fading In 1 !"#$%&'()*+, !" !" Fading in lets you make the picture (and sound) appear gradually at the beginning of a recording. 1 z !"#$% &'()*+,-xc^ab ! 2 3 !"#$ !"L 2 P – Q !"#$xc^abz ∫ 2 3 !"#$%&'()*+, !" !" 4 5 6 1 !"#$xc^abz With the Movie Camera in the Recording Pause Mode, keep the [FADE] Button pressed.
REC SNAP SNAP 4 MULTI/ SNAP 3 1 2 CAMERA FUNCTIONS 1.CAMERA SETUP 2.DIGITAL EFFECT 3.TITLE SETUP 4.DATE/TIME SETUP 5.DISPLAY SETUP 6.LCD/EVF SETUP 7.OTHER FUNCTIONS MENU PRESS MENU TO EXIT MF/ TRACKING FOCUS / SET CAMERA SETUP M.SENSOR OFF D.ZOOM 45 MULTI STROBE1 SHUTTER ON EFFECT REC TOP REC BUTTON MULTI/SNAP RETURN ---PRESS MENU TO EXIT ENGLISH !"#$ !"# Recording a Still Picture (Snapshot Recording) !"#$%&'() T !"#$ %&'()* !"#$%&'()*+,-.
1 2 CAMERA CAMERA FUNCTIONS 1.CAMERA SETUP 2.DIGITAL EFFECT 3.TITLE SETUP 4.DATE/TIME SETUP 5.DISPLAY SETUP 6.LCD/EVF SETUP 7.OTHER FUNCTIONS INFOWINDOW VCR PRESS MENU TO EXIT MENU 1, 5 2, 3 2, 4 DIGITAL EFFECT EFFECT1 MF/ TRACKING EFFECT2 OFF SIS D.ZOOM SIS+D.
1 2 550 3 D.ZOOM D.ZOOM 6 5 4 550 7 MOSAIC STROBE 8 MF STROBE STRETCH STRETCH GAIN UP MIRROR STROBE ENGLISH ! N xbccb`qNz Digital Effects 1 [EFFECT1] 1 !"#$% x[z l US 1 Super Image Stabilizer Mode [[] (l 86) !"#$%&'(!)*+,-.%/012345 !"# This prevents shaky pictures when recording in the tele range or from a moving vehicle. 2 Digital Zoom Mode [D.ZOOM] (l 88) 2 !"# xaKwlljz l UU It enlarges the subject beyond the optical zooming range. !"#$%&'())*+,-.
9 : MULTI ; < MIX P IN P WIPE ENGLISH 9 !" xjriqfz l VM VO !"# V 9 Multi Image Mode [MULTI] (l 90, 92) !"#$ The screen is divided into 9 small still fields. : Picture-in-Picture Mode [P IN P] (l 94) : ! xm=fk=mz l VQ A small still picture is inserted and displayed inside the normal picture. !"#$%&'()*+,-."#/ ; ! xjfuz l VS ; Mix Mode [MIX] (l 96) !"#$%&'()*+,-./(0123)45 It gradually fades out one scene while fading in the new scene over it.
1 2 SOLARI NEGA 5 3 6 D.FADE1 BLK 4 SEPIA B/W 7 D.FADE3 BLK D.FADE2 WHT ENGLISH ! O xbccb`qOz Digital Effects 2 [EFFECT2] 1 !xkbd^z 1 Negative Mode [NEGA] !"#$%&'()*(+,- The picture has reversed colours similar to photographic negatives. 2 !"#xpli^ofz 2 Solarisation Mode [SOLARI] !"#$%&'()* The picture has an effect similar to a painting. 3 !xpbmf^z 3 Sepia Mode [SEPIA] !"#$%&'()*+, -. Scenes have a brown tint similar to the colour of old photographs.
CAMERA DIGITAL EFFECT EFFECT2 OFF SIS D.ZOOM SIS+D.ZOOM MOSAIC STRETCH MIRROR STROBE GAIN UP MULTI P IN P MIX WIPE OFF RETURN PRESS MENU EFFECT1 INFOWINDOW VCR ---TO EXIT MENU 3 1 2 MF/ TRACKING FOCUS / SET ENGLISH !"#$%&'() Using the Super Image Stabilizer Function In recording situations where shaking of the Movie Camera is likely to happen, for example when you have zoomed in on a distant subject or when you record while walking, you can use this function to stabilize the image.
22 25 sVOLr CAMERA D.ZOOM 7 DIGITAL EFFECT EFFECT1 OFF SIS D.ZOOM SIS+D.ZOOM MOSAIC STRETCH MIRROR STROBE GAIN UP MULTI P IN P MIX WIPE EFFECT2 OFF NEGA SOLARI SEPIA B/W D.FADE1 D.FADE2 D.FADE3 RETURN ---YES PRESS MENU TO EXIT CAMERA SETUP M.SENSOR OFF ON D.
CAMERA DIGITAL EFFECT OFF SIS D.ZOOM EFFECT1 SIS+D.ZOOM MOSAIC STRETCH MIRROR STROBE GAIN UP MULTI P IN P MIX WIPE EFFECT2 OFF 1 2 3 4 5 6 RETURN 7 8 9 ---- YES CAMERA SETUP M.SENSOR OFF ON 45 100X 480X D.
CAMERA DIGITAL EFFECT EFFECT1 OFF SIS D.ZOOM SIS+D.ZOOM MOSAIC STRETCH MIRROR STROBE GAIN UP MULTI P IN P MIX WIPE EFFECT2 OFF 1 2 3 4 5 6 RETURN 7 8 9 ---- YES CAMERA SETUP M.SENSOR OFF ON 45 100X 480X D.
MULTI/ SNAP P IN P CAMERA DIGITAL EFFECT OFF SIS D.ZOOM EFFECT1 SIS+D.ZOOM MOSAIC STRETCH MIRROR STROBE GAIN UP MULTI P IN P MIX WIPE EFFECT2 OFF NEGA SOLARI SEPIA B/W D.FADE1 D.FADE2 D.FADE3 RETURN ---YES PRESS MENU TO EXIT CAMERA SETUP M.SENSOR OFF ON D.
CAMERA OFF VCR MIX MIX 2, 3, 4 WIPE WIPE CAMERA INFOWINDOW VCR DIGITAL EFFECT EFFECT1 OFF SIS D.ZOOM SIS+D.ZOOM MOSAIC STRETCH MIRROR STROBE GAIN UP MULTI P IN P MIX WIPE EFFECT2 OFF NEGA SOLARI SEPIA B/W D.FADE1 D.FADE2 D.FADE3 RETURN ---YES PRESS MENU TO EXIT 1 MENU MF/ TRACKING FOCUS / SET ENGLISH !"#$ ! Mix Function and Wipe Function !" Mix Function: !"#$%&'()*+,-.
1 D.FADE1 BLK 1 CAMERA D.FADE1 BLK OFF/ON 2 D.FADE2 WHT D.FADE2 WHT 1 D.FADE3 BLK CAMERA OFF VCR MENU D.FADE2 WHT 3 INFOWINDOW PROG. AE STORE COLOUR D.FADE1 BLK 2 VCR MF/ TRACKING 4, 7 FADE FOCUS / SET D.FADE3 BLK 2, 3, 5, 6, 8 D.FADE3 BLK ENGLISH !"# Digital Fade P !"#$%&'() There are 3 Digital Fade Modes available. 1 ! N xaKc^abNz 2 ! O xaKc^abOz 3 ! P xaKc^abPz 1 Digital Fade 1 [D.FADE1] 2 Digital Fade 2 [D.FADE2] 3 Digital Fade 3 [D.
STDBY REC CAMERA MOTION SENSOR PRESS 1, 5 2, 3 2, 4 FUNCTIONS 1.CAMERA SETUP 2.DIGITAL EFFECT 3.TITLE SETUP 4.DATE/TIME SETUP 5.DISPLAY SETUP 6.LCD/EVF SETUP 7.OTHER FUNCTIONS MOTION SENSOR MENU TO EXIT CAMERA SETUP OFF M.SENSOR 45 D.ZOOM MULTI STROBE1 SHUTTER EFFECT OFF REC TOP REC BUTTON MENU MF/ TRACKING RETURN PRESS FOCUS / SET MENU ON ---TO EXIT ENGLISH !"#$%& Motion-Sensor-Controlled Recording !"#$%&'()*+,-.
ENGLISH ∫ !"#$ %&'()*+,-./0123 ≥ ≥ ≥ ≥ ≥ ≥ ≥ ≥ ≥ ≥ ∫ In the Following Recording Situations, the Motion Sensor May Not Work Correctly: !"#$%&"'()*%+,-. !"#$%&'()*+,-. !"#$%&'() !"#$%&'()*+,!"#$%&$'() !"#$%&'( !"#$%& xjlqflk=pbkploz !"# !"#$% !"#$%&'()*+ !"#$%&'()* ≥A white wall or another single-colour background behind the subject. ≥A subject with horizontal, vertical or oblique stripes. ≥Sudden changes in the surrounding brightness.
0LUX O LUX OFF 1 1 ON ENGLISH !"#$%&'()*+ Recording in Dark Places without Any Illumination (0 Lux Night View Function) M=iìñ !" This function is convenient when you want to record at night in places without any illumination, for example for observing the behaviour of nocturnal animals, etc. In this mode, the Movie Camera emits infrared rays which makes it possible to record subjects that are invisible to the naked eye. !"#$%&'()*+,-./0123#45676 !"#$%&'()*+,-.
MNL 3 sVOLr MNL 1 ;W.B W 1 T 2 PROG. AE 2 ENGLISH !"#$%&'()*+ Recording with Manual White Balance Adjustment !"#$%&'()*+,-./01 !"#$%&'() *+,-./01234567 ! 1 l NMU !"#$%&'()*+,-./ !"#$%&'()*+ ,-. /012 1 z x moldK ^b ^b x^rql z ! !" #$% 2 3 !"#$%&'(%)*+,-./0 !1 With this Movie Camera, you can also adjust the white balance manually.
10 000K 9 000K 8 000K 7 000K 6 000K 5 000K 4 000K 3 000K 2 000K 1 000K ENGLISH ! "#$% Colour Temperature and White Balance Adjustment !"#$%&'()*$+,-.)/ h !"# ! "#$ !"#$!%&' !"#$ !"#$%&'( )*!+, !"# 1 !"#$%&'()*+,-./01 !"#$%&'()*+,-.%/0123 4567 !"#$%&'()*+,-./01234!56# l NMS !"#$%&'()* 1 2 3 4 5 6 7 8 9 : ; < Every light source has its own colour temperature measured in Kelvin (K).
sVOLr 4 MNL MF 1 1 3 W T 2 PROG. AE 2 MENU 3 MF/ TRACKING 4 FOCUS / SET ENGLISH !"#$%&'() Recording with Manual Focus Adjustment !"#$%&'()*+,-./0123456789 !"#$% 1 z !x moldK ^b ^b x^rql z ! !" #$% 2 xtLqz 3 xjcz 4 !"#$xq z This makes it possible to adjust the focus manually for subjects and recording situations for which automatic focusing is not precise. !"#$% 1 !"#$ 1 ≥ !"#$%&'()*$+,-.
1 4 5 2 7 3 5 1 Ω PROG. AE º 4 ENGLISH !"#$% 1 Recording in Special Situations ^b (Programme AE) !"#$%&'()*+,-./0123456 This function lets you select Automatic Exposure settings optimized for special recording situations. z !xmoldK ^b ^b !"#$%& !" x5z x7z x4z xΩz xºz 1 Press the [PROG. AE] Button repeatedly until the indication of the desired mode ([5], [7], [4], [Ω] or [º]) appears.
ENGLISH ! ≥ ≥ ≥ ≥ ≥ Sports Mode ≥When playing back scenes recorded in the Sports Mode, you can enjoy slow motion and still playback of very sharp images with fine details. ≥Avoid recording under fluorescent, mercury-vapour or natrium lamps as the colour and the brightness of the playback picture may fluctuate. ≥When recording subjects lit by strong lights or with much light reflection, the playback picture may contain vertical streaks of light.
1 VIDEO CAMERA COUNTER RESET 2 3 FADE D.FADE COLOUR V /REW 6 PLAY 1 START/ STOP MULTI/ SNAP ZOOM 4 5 T sVOL r DATE/ TITLE 6 FF/W 5 W STORE OFF/ON PAUSE ; STOP COLOUR 7 ∫ SELECT EFFECT 1/2 P.B. ZOOM 8 STORE MENU SET OFF/ON ITEM P.B.DIGITAL ENGLISH !" Using the Remote Controller !"#$%&'()*+,-'.(/012 34'5 ∫ The Remote Controller lets you take part in the action and control the recording operation from in front of the Movie Camera.
VIDEO CAMERA COUNTER RESET FADE D.FADE COLOUR /REW V PLAY FF/W 1 5 6 ZOOM T W STORE OFF/ON PAUSE 9 START/ STOP MULTI/ SNAP sVOL r DATE/ TITLE ; STOP COLOUR ∫ SELECT EFFECT 1/2 P.B. ZOOM STORE : MENU SET OFF/ON ITEM P.B.DIGITAL ENGLISH 9 : ! 9 Controls for Playback L !" x6z !"#$%$& l TM ! l SO !"#$% l SU !"#$%#&'( l RU !"#$%&' l RU Rewind/Review Button [6] To start review playback. (l 70) To rewind the tape.
VIDEO CAMERA COUNTER RESET FADE D.FADE COLOUR V /REW PLAY 6 START/ STOP MULTI/ SNAP FF/ 1 ZOOM T ; 2 sVOL r DATE/ TITLE W 5 W STORE OFF/ON PAUSE ; STOP COLOUR ∫ SELECT EFFECT 1/2 P.B. ZOOM < STORE 1 15˚ MENU 15˚ SET OFF/ON 5m 10˚ ITEM P.B.
1 2 3 1 ENGLISH !"#$%&'( 1 2 3 Inserting the Button-type Battery into the Remote Controller 1 !"#$%&' 1 !"#$% !"#$%&'() !"#$%&'( 2 ∫ !"#$% ≥ ≥ ≥ ≥ !"#$"%&'()*+,-$ `oOMOR ! !"#$%N !"#$%&'()*%&+,-. !" !"#$%& !'()*%+,!"#$%& !"#$%&'!()*+,-.(/*012345 !"# 3 Pull out the Battery Holder while pressing the Stopper 1. Insert the button-type battery with the stamped (r) mark facing upward. Insert the Battery Holder into the Remote Controller.
CAMERA FUNCTIONS PRESS MENU TO EXIT 90u MENU 2, 5 2, 3 2, 4 MF/ TRACKING FOCUS / SET DISPLAY SETUP TAPE DISPLAY 30 ALL C.RESET SELF SHOOT ---NOR. 1 3OPEN 1.CAMERA SETUP 2.DIGITAL EFFECT 3.TITLE SETUP 4.DATE/TIME SETUP 5.DISPLAY SETUP 6.LCD/EVF SETUP 7.OTHER FUNCTIONS CAMERA OFF VCR 1 7, 8 MIR.
1 0:00.00 AUTO 2 ENGLISH ∫ ! ∫ Mirror Mode !"#$%&'()*+,-./01*234#$56 !"#$%&'()*+, !"#$%&'()*+,-./)012345678 !"#$%&'()*+,-./01()234567 ! !"#$%&'()*+, -./0123456*7 ≥ !"#$%&'()*+,-./01234(5/ L !"# When recording yourself with the LCD Monitor facing forward, the picture shown on it the way it is being recorded may be difficult to get used to. This is because we usually look at ourselves in the mirror, so we see a mirror-image and this feels more natural.
TITLE 2 1 3 DATE/TITLE DATE TITLE LANGUAGE FOR TITLE SIZE COLOUR RETURN PRESS SETUP TIME TITLE URLAUB GERMAN NORMAL YELLOW MENU ---TO EXIT MENU 2, 4 1, 3, 5 MF/ TRACKING FOCUS / SET ENGLISH !"#$%&'()*+, Recording with Pre-programmed Titles Inserted in the Picture NM !"#$%&'()*+#,-./01234 !"#$%&'()*+,- U ! You can insert one of 10 pre-programmed titles in recordings of special occasions such as weddings and birthday parties. These titles are available in 8 languages.
DATE/ TITLE TITLE 1 SETUP DATE/TITLE DATE TIME TITLE LANGUAGE FOR TITLE SIZE NORMAL COLOUR RETURN PRESS MENU TITLE HOLIDAY ENGLISH LARGE WHITE ---TO EXIT 2 HOLIDAY HOLIDAY MENU 8 6 7 MF/ TRACKING FOCUS / SET ENGLISH 6 7 x 34 z z !xpfwb 6 7 !"#1 z z xpbq ! !"#$%& xkloj^i x z i^odb ≥ O !"#$%&' ()* ≥ !"#$%xkloj^iz xi^odbz !"# 2 !"#$% 8 z xjbkr ! !"#$ !"#$%&'()*+,!"#xa^qbLqfqibz L Press the [SET] Button to select the desired size
1 RED 1 STORE COLOUR OFF/ON 3, 5 4 ENGLISH !"#$%&'()*+, Creating Your Own Titles and Inserting Them During Recording !"#$% (Digital Superimposer Function) !"#$%&'()*+,-./'(012 !" !"#$%&' !"#$%&'()*+,-. !"#$%&'()*+,-./')0 #12345 1 !"#$%&' !" 2 This function lets you store the image of a handwritten title, signboard, printed title, (or some similar object with strong contrast) in the Movie Camera’s digital image memory.
RED STORE OFF/ON 1, 5 CAMERA OFF VCR 2, 3, 4, 6 ENGLISH 1 2 3 z xlccLlk L ≥ !"#$% 1 !" L !"#$%& 2 !"#$%&'()*+,-./0xlccLlkz !" L !" L 3 !"#$%& Press the Recording Start/Stop Button to stop recording. Inserting Your Own Title During Recording 4 !"#$%&'()*+,-./0xlccLlkz !" L Press the Recording Start/Stop Button to start recording. ≥To make the title disappear while recording of the scene continues, press the [OFF/ON] Button briefly.
TBC TBC HOLIDAY DATE/ TITLE 1 ENGLISH !"#$%&' Using Various Functions during Playback !"#$%&'()*#+&),"-./01234 !"#$%&'()*+,-.'/0123456$7 !"#$%&'() With this Movie Camera you can add various effects to the recorded picture during playback. This is especially convenient for creatively enhancing certain scenes when you edit individual recorded scenes into a finished video. 1. !"# 2. !"# l NPU 1. Playback Title Indication 3. !"# l NRM !"q_` ! l SQ 2.
VIDEO CAMERA COUNTER RESET FADE D.FADE COLOUR V /REW 6 START/ STOP MULTI/ SNAP PLAY FF/W 1 5 ZOOM T CAMERA VCR sVOL r DATE/ TITLE INFOWINDOW W STORE OFF/ON PAUSE ; 1 2 STOP COLOUR ∫ SELECT EFFECT 1/2 P.B. ZOOM STORE MENU 1 SET OFF/ON ITEM P.B.DIGITAL ENGLISH !"# Playback Digital Effects There are various modes available for adding special digital picture effects to your recordings during playback.
CAMERA PLAYBACK FUNCTIONS MULTI STROBE1 STROBE2 DNR OFF RETURN ---- 1 2 3 4 5 6 7 8 9 VCR INFOWINDOW REC 5 MULTI/ SNAP PRESS MENU TO EXIT 1, 4 2, 3 2, 3 MENU MF/ TRACKING FOCUS / SET ENGLISH ∫ !"#$% V !" !"# N ∫ Capturing and Displaying a Sequence of 9 Still Pictures (Multi Image Strobe 1 Mode) !"#$%&'NKR !"#V !"#$%&' !"#$%&$'()*+,$-.
CAMERA 1 2 3 4 5 6 7 8 9 PLAYBACK FUNCTIONS MULTI STROBE1 STROBE2 DNR OFF ON RETURN ---- YES VCR INFOWINDOW REC 5, 6 MULTI/ SNAP PRESS MENU TO EXIT 1, 4 2, 3 2, 3 MENU MF/ TRACKING FOCUS / SET ENGLISH ∫ !"#$ V !" !"# O ∫ Continuously Capturing and Displaying 9 Still Pictures (Multi Image Strobe 2 Mode) !"#$%&'()* NKR !"# V !"# !"q_` !"#$%&' xq_`z !"#$% l SQ !"#$%&'()*+,-.
P IN P 1 TBC REC TBC MULTI/ SNAP CAMERA VCR INFOWINDOW DIGITAL EFFECT EFFECT OFF EFFECT1 EFFECT2 OFF STRETCH STROBE P IN P OFF RETURN PRESS MENU MOSAIC MIRROR MULTI MIX WIPE ---TO EXIT ENGLISH ∫ ! ∫ Picture-in-Picture Function !"#$%&'()*+,-./0121345678 ! !" q _ ` !" #$%&'(' )*+, xq_`z ! " l SQ This function lets you display a small still picture inside the normal playback picture.
VIDEO CAMERA COUNTER RESET FADE D.FADE COLOUR V 1 /REW 6 START/ STOP MULTI/ SNAP PLAY FF/W 1 5 ZOOM T sVOL r DATE/ TITLE W STORE OFF/ON PAUSE ; STOP COLOUR ∫ SELECT EFFECT 1/2 2 3 P.B. ZOOM STORE MENU SET OFF/ON P.B.DIGITAL ITEM ENGLISH ∫ !"#$ !% ∫ Mix Function and Wipe Function !"q_` !" #$%&'()*+ ,-./ xq_`z !"#$% l SQ The Playback Mix or Wipe Function can be used only when the TBC Function is activated. Make sure that the [TBC] Indication is displayed.
D.FADE1 BLK D.FADE1 BLK TBC D.FADE1 BLK 1 D.FADE2 WHT VCR INFOWINDOW TBC COLOUR 1 TBC D.FADE2 WHT D.FADE3 BLK CAMERA TBC D.FADE2 D.FADE2 WHT 5 ∫ TBC TBC TBC D.FADE3 BLK FADE TBC D.FADE3 BLK 1, 2, 3, 4, 6 TBC ENGLISH ∫ !"# ∫ Playback Digital Fade P !"#$%&'()*+,-.!"#$%&/01 !"# l VU !" q_` !" #$%&'()*+,-./0 xq_`z ! " l SQ 1 There are 3 Playback Digital Fade Modes available. They are the same as the Digital Fade Modes that can be used for recording.
WHT TBC TBC STORE COLOUR OFF/ON 1 2 ENGLISH !"# Playback Digital Superimposer This function gives the pictures the same visual effect as the Digital Superimposer Function (l 132). The Playback Digital Superimposer Function can be used only when the TBC Function is activated. Make sure that the [TBC] Indication is displayed. (l 64) !"#$%&'()*+, l NPO !"# !" q_` !" #$%&'()* +,-. xq_`z ! " l SQ 1 !"#$%&'()*+,-.
VIDEO CAMERA MULTI/ SNAP RESET FADE D.FADE COLOUR /REW V PLAY FF/W 1 5 6 START/ STOP PB ZOOM 2t ZOOM T sVOL r COUNTER DATE/ TITLE W 2 STORE OFF/ON PAUSE ; STOP COLOUR ∫ SELECT EFFECT 1/2 P.B. ZOOM STORE MENU SET OFF/ON 1 3 ITEM P.B.DIGITAL ENGLISH !" #$% !"# Enlarging the Playback Picture (Playback Zoom) !"#$%&'()*+,-.
2 DISPLAY TAPE DISPLAY 30 ALL C.RESET SELF SHOOT ---NOR. RETURN PRESS 3 MENU DISPLAY TAPE DISPLAY 1 SETUP 0:09.22 0:00.00 YES ---TO EXIT SETUP 30 ALL C.RESET MENU ---- RETURN PRESS MENU YES 1, 3 2, 4 ---TO EXIT MF/ TRACKING FOCUS / SET ENGLISH !"#$%&# Using the Tape Counter Indication !"#$%&'()*+,-.
A 1 B u R 0:30 SP 0:00.00 6 2 REC 14q AUTO u R 0:30 SP M 0:00.00 6 REC 14q AUTO 1 u R 0:30 SP 0:00.00 2 ◊ u R 0:30 SP M 0:00.
M 0:00.00 s SEARCH SEARCH r S6 1 DISPLAY TAPE DISPLAY C.RESET SELF SHOOT 5 5 SETUP CAMERA OFF VCR 30 ALL MEMORY PARTIAL OFF ---NOR. 4 2 DISPLAY TAPE DISPLAY C.RESET 1, 2 SETUP 30 ALL OFF ---- MENU MEMORY MF/ TRACKING FOCUS / SET ENGLISH !"#$%& Using the Memory Stop Function This function is convenient for temporarily marking a tape position during recording or playback so that you can easily find it again later for playback. !"#$%&'()*+,-(./012345678 !"#$%&'()*+,-.
7 ∫ CAMERA OFF VCR 4 2 3, 5, 6 1 BLC TBC VIDEO OUT VIDEO IN S-VIDEO IN AUDIO IN V A 1 AUDIO OUT S-VIDEO OUT 1 ENGLISH ! Dubbing (Copying) ! L ! ! !"#$%&' ()%*% !" s`o !" By connecting the AV Cable (supplied), you can copy the cassette recorded with this Movie Camera onto a VCR. 1 2 3 4 5 6 !" #$ 1 2 7 !"#$%"& !"#$%&!'()*+,#-./0 !"#$ s`o !"#$%&'() 3 !"#$%"& s`o ! 4 5 6 !"#$%&'() s`o ! Connect the AC Adaptor.
VIDEO IN S-VIDEO IN AUDIO IN V A S-VIDEO DIGITAL STILL PICTURE DIGITAL STILL PICTURE ENGLISH !"#$%&'()* Using the Movie Camera with a Computer !"#$%&'()*+,-.$%/"#01(*23 !"#$% !"#$ as=pqraflO !"#$% O !"#$% jáÅêçëçÑíR t á å Ç ç ï ë R = V R L V U m ` L ^ q !" !"#$% táåÇçïëR=jÉ !"#$ !" UMQUSauQ !"#$%&!'()*+,-.
ENGLISH ! Precautions !"#$%& Precautions for the Movie Camera In the event of abnormal operation (e.g. if the unit emits smoke or an unusual smell), immediately stop operating the unit and consult qualified service personnel. For Australia or New Zealand: Consult the Panasonic Customer Care Centre on 132600. !"#$% !"#$%&'()*+ !"#$ !"#$%&'()*+, ∫ !"#$%&'()*+,-./01234 ≥ !"#$%&'()*+, ≥ !"#$#%&' ≥ !"#$ !"#$ !"#$%&'()*+ !"#$%&'()*+,-./01!234567 !"#$%&'()**+,- .
ENGLISH !"#$ Precautions for the Battery !"#$% #&'"()*+,-./0123 4 !"#$%&'()*+,-!./01234567 The Battery’s ability to generate electric energy is based on a chemical reaction. If the Battery is incorrectly handled, it could cause leakage, excessive rise in temperature, fire or explosion. ∫ !"#$% ≥ ! "#$%&'(')*+,-./01 ! !"#$%&'()*+,-. ≥ !"#$%&'()*+, !"#$%&'()*+, x`^jbo^LlccLs`oz xlccz !"#$%&' ()*$&+,&%-. !"#$%&'()*+,-./01+2" -3. !"#$% ≥ !"#$%&'()*+,-.
ENGLISH !"#$%&'() Causes of Condensation and Remedy !"#$% !&'()*+,-./01234567 ! "#$%&'()*+,-. / 01 "#23 When condensation has formed inside the Movie Camera and on the tape, recording becomes impossible. In addition, the tape might remain in contact with the heads and this could seriously damage the Movie Camera. ∫ !"#$%& ≥ ≥ ≥ ≥ ≥ ∫ Main Causes of Condensation !"#$%&'()*+'(,!"#$%&'()*+,-./01234 !"#$%&'()* !"#$%&"'()*+,!"#$%&'()*+,-.
ENGLISH ! ! !"#$ How the White Balance (Tint) Adjustment Works !"#$%&'()*+,-./012345)*(6 !"#$%&' ( )* +,-./0123456 !"#$%&'( )*+,- ./01 !"#$%&'()*+,-./01)23+4567 !"#$%&'( !"#$%&' ! !"#$%&'()*+, !"#$%& '()*+,-./01234567# !"#$%&'()*+,-./0123 Video recording takes place under various light sources, from sunlight as the main natural light source to a wide range of artificial light sources such as fluorescent lamps.
1 2 U10 6 3 U11 4 5 o p 0:00 7 END 8 9 n REC RECORD q CHK PAUSE PAUSE s r t u INDEX ENGLISH !" Indications ∫ L ∫ Warning/Alarm Indications 1 2 3 ! l=NSU !"# l=NSU 4 ! ! 1 Condensation (l 168) 2 Video Head Clogging (l 168) 3 Remaining Battery Power When the remaining battery power is used up, the Movie Camera automatically switches off. Replace the Battery with a fully charged one. " !"#$%&'()*+,-).
v x w { y 0:00.00 } | z M 0:00.00 R 0:30 ü ~ 30 AUTO FAMILY FAMILY 12:30 15.10.
V W Z Y X SNAP TRACK. [ 550 RED ] \ D.ZOOM EFFECT1 MOSAIC a ` ^ STRETCH b _ STROBE MIRROR c d MF MULTI GAIN UP e f NEGA g SOLARI MIX P IN P h SEPIA WIPE i B/W D.
j k l o STDBY MOTION SENSOR m n r s S-VHS ET PB ZOOM 10 p q TBC 0LUX DNR V.ZOOM t ENGLISH j !"# l NRO j Playback Zoom Mode (l 152) k S-VHS Mode (l 44) l S-VHS ET Mode (l 44) m Recording Mode (l 126) n Recording Pause Mode (l 126) ≥The above indications m and n are only displayed when k pJsep l=QQ l pJsep=bq l=QQ m ! l=NOS n !"# l=NOS ≥ !"#$%&'()*+,-./ m n l=NOS ! recording in the Mirror Mode.
1. VW-AS7E/A 2. CGR-V14S CGR-V610 3. CGR-V26S CGR-V620 7. VW-LT4314WE 8. VW-LW4307WE 9. VZ-CT55E 4. CGR-V53S CGR-V816 5. VW-KBC7E 10. VW-TCA7E 11. VZ-LDR10E 6. VW-LF43WE 12.VW-SK11E 13.VW-DTA10E/A ENGLISH ! Optional Accessories NK !" 11. AC Adaptor OK !"# 12. Battery Pack (Lithium-Ion) PK !"# 13. Battery Pack (Lithium-Ion) QK !"# 14. Battery Pack (Lithium-Ion) RK !" # 15. Car Battery Charger SK !" 16. Filter Kit TK !"# 17.
ENGLISH Specifications pJsepJ` ! !"# S-VHS-C Movie Camera TKO s ! TKV s !"#$ Power Source: !"# QKR t !"#$%&' ksJspRM SKM t !"#$%&'() ksJspTM SKO t !"#$%&'() !"# L !" !"# !"# !"L !"# !"# ! !"# !" !" !" pJsepJ`LsepJ` im !O ! !" Tape Format: S-VHS-C/VHS-C Cassette Recording/Playback Time: LP; 2 hours with EC60 VIDEO Television System: CCIR; 625 lines, 50 fields PAL colour signal Ou
ENGLISH !"# !"#$%& Before Requesting Service (Problems & Solutions) mN pN !"#$%&'( !"#$%&'()*+$,-."/#$0 l=NU OM mO !"#$%& pO !"#$%&'(")*+,-.S !"# !"#$%&'"()*+,-./01234 !"#$x`^jbo^LlccLs`oz !" L L !"x l c c z !"#$%&' x`^jbo^z !"# l=RS mP !"#$%&'( pPJN !"#$%&'( )*+,-./.0 M MM x6z !"#$%&'()*+,-& !"# $ % & l=OM pPJO !"#$%&'()*+,-./012340 !"#$%&'()*+,-./ 0123% !"#$%&'()*+",-.
ENGLISH mP !"# L !"#$%&'() pP !"#$%&'()*+, -".$%&# !"#$%&'($)*+,+-./ 0 l=QM mQ L L !"#!$ pQJN !"xa^qbLqfqibz L L xjbkrz ! !"#$%&xjbkrz !"#$% L L !"#$%xa^qbLqfqibz !L L !"!# l=RO pQJO !"#$%&'()*+,-./0 ! l=QU mN pN mO pOJN pOJO pOJP pOJQ mP pP Recording (Continued) P3: Recording does not start when pressing the Recording Start/Stop Button. S3: The tab of the inserted cassette is broken out.