[] ® Digital Video Camcorder Operating Models Before attempting read these to connect, instructions (PV-GS59 Shown) operate or adjust Instructions No. this product, PV-GS59 PV-GS39 PV-GS29 please thoroughly. Spanish Quick Use Guide Guia para r_pida consulta is included. en espa_ol est_ incluida.
Thank you for choosing f Panasonic! Date You have purchased one of the most sophisticated and reliable products on the market today• Used properly, we're sure it wilt bring you and your family years of enjoyment. Please take time to fill in the information on the right. The serial number is on the tag located on the underside of your Camcorder. Be sure to retain this manual as your convenient Camcorder information source.
U.S.A. CONSUMERS Only- Declaration of Conformity Trade Name : Panasonic Model No. : PV-GS29/PV-GS39/PV-GS59 Responsibility Party : Panasenic Corporation of North America Address : One Panasonic Way Secaucus New Jersey 07094 Telephone Number : 1-800-211-PANA(7262) This device complies with Part 15 of the FCC Rules.
Important Safety instructions 1) Read these instructions. 2) Keep these instructions. 3) Heed all warnings. 4) Follow all instructions. 5) Do not use this apparatus near water. 6) Clean only with dry cloth. 7) Do not block any ventilation openings. Install in accordance with the manufacturer's 8) Do not install near any heat sources such as radiators, heat registers, stoves, or other apparatus (including amplifiers) that produce heat.
USE & LOCATION oAVOID oTO AVOID SHOCK HAZARD ... Your Camcorder and power supply should not be exposed to rain or moisture. Do not connect the power supply or operate your Camcorder if it gets wet. Your Camcorder has been designed for outdoor use, however it is not designed to sustain direct exposure to water, rain, sleet, snow, sand, dust, or a direct splashing from a pool or even a cup of coffee. This action could permanently damage the internal parts of your Camcorder.
Before opening the CD-ROM package (PV-GS59 Only), please read the following. You ("Licensee") are granted a license for the Software defined in this End User Software Agreement ("Agreement") on condition that you agree to the terms and conditions of this Agreement. If Licensee does not agree to the terms and conditions of this Agreement, promptly return the Software to Matsushita Electric Industrial Co., Ltd. ("Matsushita"), its distributors or dealers from which you made the purchase.
This operating instruction book is designed for use with models PV-GS29, PV-GS39 and PV-GS59. The PV-GS59 is the model used for illustrative purposes. Features may vary, so please read carefully. For U.S.A. Battery Pack (Supplied) CGR-DU06 (640 mAh) CD-ROM CGR-DU06 (640 mAh) - Supplied For U.S.A. USB Cable - For Canada Supplied Card Feature 2.5-inch USB Jack* Audio 2.7-inch No customers: Supplied (K1HA05CD0014) Wide Yes LCD 2.
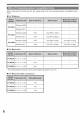
Before using the PC function (pp. 56-69), please refer to the OS (operating system) compatibility below. chart, m For Windows Windows 2000 - Windows XP - PV=GS29 Windows 2000 Yes* Yes (SP4 or later) - Windows XP Yes* Yes (SP2 or later)* - Windows 2000 Yes* Yes (SP4 or later) Yes (SP4 or later) Windows XP Yes* Yes (SP1 or later) Yes (SP2 or later) PV=GS29 X v 10.1 - v 10.4 - - - PV=GS39 X v 10.1 - v I0.4 Yes* - - PV=GS59 X v 10.1 - v 10.
Before Playback Using Things You Should Know ....................................... 2 Safety Precautions ................................................. 2 Precautions ............................................................. 5 End User License Agreement ................................. 6 Differences between models .................................. 7 With a PC (Operating System Compatibility Chart)... 8 Quick Guide ..........................................................
Attach the Battery to the AC Adaptor charge it. Attach the charged Camcorder. Place your Thumb on the [OPEN] @ Knob and pull the LCD Monitor O out in the direction of the arrow. 2 Open the Card Slot Cover O. 3 While holding the Memory Card with its cut corner facing right _) insert it into the Card Slot O. 4 Close the Card Slot Cover O securely. and . Before use, fully charge the Battery. .
Adjust by turning Knob O. the Eyepiece Corrector 1 Set the Mode Dial to Tape Playback Mode. . The [ [] TAPE PLAYBACK MODE] is displayed on the screen. . The One-Touch Navigation icon is disp(ayed on the lower right of the screen. [One-Touch N ._ 12:3 :56AM JAN 2 2006 - - PV-GS59) 1 Set the Mode Dial to Tape Recording Mode. • The [_ TAPE RECORDING MODE] is displayed on the screen. Navigation icon] w c } (Pv cs29) k_._ 2 Move the Joystick the tape.
Before Using The following accessories Camcorder. PV-DAC14D are supplied with your K2GJ2DC00011 2) K2CA2CA00025 c c o0< o [_ CGA-DU12 CGR-DU06 (PV-GS59 Canada Only) _) s) LCD Monitor Open Knob [OPEN] (p. 22) LCD Monitor (pp. 20~22, 75) Due to limitations in LCD production technology, there may be some tiny bright or dark spots on the LCD Monitor screen. However, this is not a malfunction and does not affect the recorded picture. Card Access LSFC0018 1) AC Adaptor, [pp.
[_ Audio=Video Output Jack [AV OUT] (pp. 81, 84) o Connecting an AV Cable to this jack activates the Camcorder's built-in speaker. . When connecting the pin plug of the AV Cable to this jack, plug it in as far as it goes. Mode Dial (p. 23) Recording Start/Stop Joystick Control Light Button Button (p. 30) (pp. 23, 28) [LIGHT] (pp. 33-34) W 5" c Grip Belt {p. 17) Cassette (p.
Before using the Remote Control, insert a button-type battery (not supplied)• 1 @ [_ While pressing the Lock Button O, pul! out the Battery Holder. Slow Motion/Still Advance Buttons [41, I_-] (41: reverse, I_: forward) (p. 46) Zoom/Volume Button [ZOOM/VOL]* (pp. 35~36, 45) Variable Speed Search Button [VER SEARCH] (p. 46) Menu Button Insert a button-type battery (CR2025) with the (+) marking facing upward. [MENU]* (p. 26) 3 insert the Battery Holder into the Remote Control.
Direct the Remote Control at the Remote Control Sensor of the Camcorder and press an appropriate button. • Before connecting or disconnecting the power supply, set the [OFF/ON] Switch on the Camcorder to [OFF] and make sure that [STATUS] indicator is not lit. (p. 20) W 5" C {.Q 15 ° _°_ -;_'_"_l ( // 15 ° • Distance from approximately • Angle: Within and horizontal the Camcorder: Within 15 feet (5 meters) approximately 15 ° in the vertical directions from the central axis 1 2 3 .
. Since the Battery will not be charged when the DC Cable is connected to the AC Adaptor, disconnect it from the AC Adaptor. . The [CHARGE] Lamp lights up, and charging starts. . When the [CHARGE] Lamp goes off, charging is completed. . When the battery is completely discharged, the [CHARGE] Lamp blinks at first_ but the battery is charged normally. When the temperature of the battery is too high or low, the [CHARGE] Lamp blinks and the charging time becomes longer than usual. Attach the charged Camcorder.
o "1 h 40 min." indicates 1 hour and 40 minutes. o Battery CGR-DU06 (PV-GS29/PV-GS39/PV-GS59 U.S.A.) or CGA-DU12 (PV-GS59 Canada) is supplied. o The times shown in the table are approximate times. The numbers indicate the recording time when the Viewfinder is used. The numbers in parentheses indicate the recording time when the LCD Monitor is used. In actual use_ the available recording time may be shorter.
. When not using the Lens Cap, pull the Lens Cap Cord in the direction of the arrow. O . When you are not recording_ be sure to cover the Lens with the Lens Cap for protection. O • Please use Genuine Panasonic DVC Tapes for more information please contact your local dealer or visit www.Danasonic.com. • For your reference if you travel frequently you should also purchase a Panasonic head cleaning tape AY-DVMCLA and use when HEAD CLOG message appears on the LCD/EVF of your Camcorder.
Caution : Before closing the Cassette Holder 0, be sure your fingers have not been placed underneath the Cassette Holder as shown below. This may cause your fingers to jam in the cassette holder. Do not place fingers Only after completely here. [Bottoln View] the Cassette Holder is housed, close the Cassette Compartment Cover by pressing the mark O.
3 While holding the Memory Card with its cut corner facing right O, insert/remove it into/from the Card S!ot. Turn on the power first and then select modes. m How to Turn on the Power 1 Set the [OFF/ON] Switch pressing the button O. II Removing the Card Open the Card Slot Cover and press the center of the Card and then pull it straight out. • After removing the Card, close the Card Slot Cover. • The Camcorder may be damaged if the Card is forced out when the Card is fully inserted.
• The power will not turn off if the LCD Monitor is closed and the Viewfinder is retracted. • The [STATUS] Indicator O automatically goes off and the power turns off. (If Quick Start is set to [ON] (p. 34)_ the unit goes into Quick Start standby mode and the [STATUS] Indicator lights Green,) • Even if the LCD Monitor is closed or the Viewfinder is retracted while recording on a tape, the power does not turn off. (The Viewfinder stays lit up.) Open the Viewfinder LCD Monitor again.
With the LCD Monitor open, you can also record the picture while watching it. 1 Place your Thumb on the [OPEN] Knob and pull the LGD Monitor out in the direction of the arrow. , The LCD Monitor will be activated. , it can open up to 90 °. Adjust the LCD Monitor angle according to the desired recording angle. , The LCD Monitor can rotate a maximum of 180° O from the vertical position upwards and a maximum of 90 ° O to the downward direction.
You can choose a desired mode by rotating the Mode Dial. 1 Rotate the Mode Dial. . Set your desired mode to O. Press the center of the Joystick Control, and the One-Touch Navigation icon will be displayed on the lower right of the screen. • Press the Joystick Control again to turn offthe One-Touch Navigation icon. • Pressing the center button of the Joystick Control again to redisplay the One-Touch Navigation icon will display the last page used. Each press of [_'] switches depending on the mode.
m Tape Recording Mode • When the [AUTO/MANUAL/FOCUS] set to [AUTO]. t Switch is Ill Tape Recording Mode • When the [AUTO/MANUAL/FOCUS] set to [FOCUS]. [] Fade O Help Mode* p. 25 ,t, _ Backlight p. 37 p. 37 i 1/4 'V compensation Go to next page. _ Soft Skin Mode ,t, 6/6 Go to next page. _ MagicPix Mode p. 38 4/4 !_ Go to next page. _ Recording ¢ Blank Search _' I p. 31 Mode while recording 4 MF Manual Mode Focus Adjustment p.
3 III Card Recording Mode {For PV=GS39/PV-GS59) • When the [AUTO/MANUAL/FOCUS] set to [FOCUS]. t 4/4 !_ Focus Adjustment [!_] to select eg 4 Move the Joystick select the desired Control [A _' 4 I,-1 to function. p. 44 Go to next page. m Tape Playback Mode , An explanation of the selected on the screen. . Each time the Joystick Control the indication changes. ,L I_/ll Playback l_ _I_ Fast (Cue Playback) p. 46 "_ _i p. 46 •' [] II Picture {For Control p.
3 4 Move the Joystick Control [_] or press it to set the selection. Move the Joystick Control select the Sub=Menu. [A] or [T] to The menu screen transition is the same as when the buttons on the main unit are used. V_R 5 6 Move the Joystick Control [_] to set the selection. Move the Joystick Control select the item to be set. or press it 1 2 [A] or [T] to Press the [MENU] Button. Select a menu item.
[ _ ADVANCED] Advance Setup Sub-Menu [ .t; PlOT.QUALITY] (For PV-GS39/PV-GS59) Picture Quality (p. 32) [ _ EIS] (mage Stabilizer (p. 36) [ [] FADE COLOR] Fade color (p. 37) [ J_ AUDIO REC] Audio Record)ng Mode (p. 28) [_ US8 FUNCTION] (PV-GS59 USB Functions Mode (pp. 61, 67) On(y) [ 0 D.ZOOM] D)gital Zoom (p. 36) [ ,t_ZOOM MIC] Zoom M)crophone (p. 35) [ _ SHTR EFFECT] (PV=GS29 On(y) Shutter effect (p. 31 ) [ _ SETUP] Setup Sub-Menu [ [] DISPLAY] Display Mode (p.
[ _ SETUP] Setup Sub-Menu [ [] DISPLAY] Display Mode (p. 28) [ [] DATE/TIME] Date and Time Indication (pp. 28, 70) [ d _ POWER SAVE] Power Save Mode (p. 29) [ _tt QUICK START] Quick Start Mode (p. 34) [ j_ REMOTE] (PV-GS59 Only) Remote Control Mode (p. 15) [ =>))DEEP SOUND] Beep Sound (p. 28) [ E,_ LCD SET] LCD Adjustment (p. 22) [ &'_EVF SET] Viewfinder Adjustment (p. 22) [ _ (NIT(AL SET] Initial Setting Mode (p. 29) [ 0_ LANGUAGE] Language Setup Sub-menu (p.
II POWER SAVE Set [ _i SETUP] >> [ _z POWER SAVE] >> [5 MINUTES] or [OFF]. [OFF]: When about 5 minutes passed without any operation, the standby mode automatica[] will be set. in the standby mode_ [Ii ] bunks and it takes time more than usual to start recording after you press the Recording Start/Stop Button. [5 MINUTES]: When about 5 minutes passed without any operation, the Camcorder automatically turns off to protect the tape or to prevent the battery from running down.
Recording Mode 4 . When recording pictures on a tape, set the Mode Dial to Tape Recording Mode [ _ ]. . When recording still pictures on a card, set the Mode Dial to Card Recording Mode [ li_ ] (For PV-GS39/PV-GS59). . When recording with the [AUTO/MANUAL/FOCUS] Switch set to [AUTO], the Camcorder automatically adjusts the Focus and White Balance. tn some cases, they cannot be adjusted automatically and need to be adjusted manually. (pp.
, The [ @,] indication and the One-Touch Navigation icon appears during the Blank Search. You can play back the last few seconds of the recorded scene in the Recording Pause Mode. * Set to Tape Recording Mode. 1 Press the Joystick Control to display the One-Touch Navigation icon on the lower right of the screen. 2 Move the Joystick Control [T] until the page with [ @ ] indication is displayed.
!1 Maximum recordable (optional) number of still pictures on an SD Memory card PICTURE QUALITY Still pictures can be recorded from the Camcorder. on the Memory o Open the LCD Monitor or extend before turning on the power. 1 Card the Viewfinder Set the [OFF/ON] Switch to [ON]. , The [STATUS] Indicator lights Red. OFF" "ON ® 2 Set the Mode. Mode Dial to Card Recording o The [a CARD RECORDING displayed on the screen. MODE] 32 MB _.
Notes: , Even if the [ _ SHTR EFFECT] is set to [ON], the Shutter Effect cannot be recorded on the picture. ° When the color of the screen changes or blurs, adjust the shutter speed manually to 1/60 or 1/100. , Photoshot Recording results in slightly inferior image quality. , For the number of still pictures to be recorded on a card, refer to page 32. , The sound cannot be recorded. ° While data is being recorded on a card, do not operate the Mode Dial.
Press the [LIGHT] Sutton. O , Gain Up mode is set to off. , To eliminate washed out images, mode. While use this 3 Notes: be within 4.9 feet (1.5 meters) , , , , Using the LED Video Light reduces battery time. Set the LED Video Light to off when not in use. Do not look directly into the light. If the LED Video light is used with a Conversion lens attached, a slight vignetting (darkening around edges) effect occurs on the screen.
When you set the self-timer_ the recording starts automatically after 10 seconds on the Card. * Set to Card Recording Mode. 1 2 Press the Joystick Control to display the One-Touch Navigation icon on the lower right of the screen. This feature gives special effects to the picture by recording objects close by or with wide-angle shot. You can zoom in up to 30× optically. Set to Tape/Card Recording Mode. 1 Move the Joystick Control IV] until the page with [ 10] indication is displayed.
This function is useful when you want to record close-up shots of subjects located beyond a normal zoom range of 1× to 30× magnification. With the Digital Zoom Function, you can select a magnification from 50× up to 1000×. * Bet to Tape Recording Mode. 1 Bet [ _ ADVANCED] [_0x] or [1000×]. >> [ [] D.ZOOM] If the Camcorder is shaken while recording, the camera shake in the image can be corrected. • If the Camcorder shakes too much, the images may not be stabilized.
I , Fade In : The image and audio gradually appear. . Fade Out : The image and audio gradually disappear. , Set to Tape Recording Mode. To Select the Color The color which appears selected. 1 Set [ _ ADVANCED] >> [BLACK] For Fade in fading in/out pictures >> [ [] FADE can be COLOR] or [WHITE]. Note: 1 Press the Joystick Control to display the One-Touch Navigation icon on the lower right of the screen. 2 Move the Joystick Control [T] until the page with [ I_ ] indication is displayed.
This function allows you to record color images brightly in a dark place without using the Video Light. * Set to Tape Recording Mode. 1 2 Press the Joystick Control to display the One-Touch Navigation icon on the lower right of the screen. This enables you to record skin colors in a softer tone. In order to get the best result, avoid background colors similar to the skin color of the subject. Otherwise, this may result in a softer background lacking in detait. • Set to Tape/Card Recording Mode.
This function reduces the sound of wind hitting the microphone when recording, • Set to Tape Recording 1 Mode. Set [ _ BASIC) >> [ _/_WIND CUT) >> [ON). Notes: • images played back vary depending on the TV connected. Please refer to the operating instructions for your TV. • This function does not widen the recording range. • When images are played back on a TV screen, the Date/Time Indication may be erased in some cases. • Depending on the TV, the picture quality may deteriorate.
I You can select optimal recording situations. * Set to Tape/Card 1 Set the scene mode under specific Notes: Recording Mode. [AUTO/MANUAL/FOCUS] Switch to [MANUAL]. Set [ _ BASIC] >> [ _ SCENE MODE] >> a desired mode ([ _, ], [ ,_'J], [ _ ], [ [] ] or [ Z_]). . The Indication of the selected Mode appears. l) 2) 3) 4) I .... / cancels any of the Scene Only) or this mode o During normal playback, the image movement may not look smooth.
Depending on the scene or lighting conditions_ the Automatic White Balance Adjustment Mode may not be able to bring out natural colors. In this case, the white balance can be adjusted manually. When the Camcorder is turned on with the Lens Cap on, the Automatic White Balance Adjustment may not function properly. Please turn on the Camcorder after removing the Lens Cap. ° Set to Tape/Card 1 Recording Switch to [MANUAL]. Move the Indication and the One-Touch icon appears.
subject. 1) The effective range of Automatic White Balance Adjustment on this Camcorder 2) Blue sky 3) Cloudy sky (rain) 4) TV screen 5) Sunlight 6) White fluorescent lamp 7) Halogen light bulb 8) Incandescent light bulb 9) Sunrise or sunset 10) Candlelight Move the Joystick Control [A] until the [ _ ] indication stops flashing. Notes: • When 3 Move the Joystick the [ _ ] Indication 4 Point the Camcorder 5 Control [4] or [_] until is displayed.
2 Move the Joystick Control [_] to select [_]. You can use this function [One-Touoh Navigatkm icon] when the screen is too bright or too dark. • Set to Tape/Card 1 Set the Recording Mode. [AUTO/MANUAL/FOCUS] Switch to [MANUAL]. • The Shutter Speed Indication MANUAL • AUTOi_ FOCU appears. . The [ _ ] Indication and the One-Touch Navigation icon appears. 3 I Move the Joystick adjust the shutter Control speed. [4] or [_] to 2 Move the Joystick Control [4] to select [_]. _.
* When focused with a wide angle, the subject may not be in focus when zoomed in. First, zoom in on the subjecL and then focus on it. Notes: . Depending on zoom magnification, there are iris values that are not displayed. . If the value does not become [OPEN], you cannot adjust the gain value. . If the gain value is increased, the noise on the screen increases. . If you are using MagicPix Mode (p. 38) or Scene Mode (p. 40), you cannot adjust the iris. .
Playback Mode Adjust 1 The recorded scene can be played back immediately after the recording. o Open the LCD Monitor or extend the Viewfinder before turning on the power. 1 the speaker Push the volume. volume [- _ for playback. / VOL +] Lever to adjust the . Towards [+]: increases the volume Towards [-]: decreases the volume (Nearer the bar to [+], larger the volume.) -_ Set the [OFF/ON] Switch to [ON], • The [STATUS] Indicator lights Red.
• Set to Tape Playback Mode. o The One-Touch Navigation icon is displayed lower right of the screen. on the • The following 6 playback speeds are available for the VariaNe Speed Search Function in both the fast-forwarding and rewinding directions: 1/5x (slow playback in SP Mode only), 1/3x (slow playback in LP Mode only), 1×, 2x 5x, 10x and 20x. II To Resume Normal Playback Press the [1_] Button or [VER SEARCH] Button. Notes: Move the Joystick Control during Playback, .
2 This Camcorder is capable of still picture playback and frame-advance playback. , Set to Tape Playback Mode. . The One-Touch Navigation icon is displayed lower right of the screen. Set the Mode Dial to Picture Playback Mode. , The [ a CARD PLAYBACK MODE] is displayed on the screen. , The One-Touch Navigation icon is displayed on the lower right of the screen. on the IIll} [_' [One-Touch Navigation icon] q_t ',>
2 Move the Joystick Control to select a desired file. [A, T, 4, or _] The recorded still pictures back like a Slide Show. . In the Multi-screen display, - Move the Joystick Control [A, _', 4, or !_] to select a file (The selected file will be encircled by a yellow frame) and press to determine it. The selected file is full-screen displayed. - If there are 7 files or more, then move the Joystick Control. The next, or previous Multi-Screen will be displayed.
1 * Set to Picture Playback , The One-Touch Navigation lower right of the screen. 1 Move select Mode. icon is displayed the Joystick Control the file to be deleted. [_] lOne-Touch 2 Move the Joystick Control Move the Joystick Control [T] to select [_]. Using the Camcorder, you can delete the files recorded on a Card. After the file is deleted, it cannot be restored.
I About the DPOF DPOF stands for Digital Print Order Format. This enables the printing )nformat)on to be added to the pictures on the card so that it can be used on a system supporting DPOF. DPOF Setting Printing data (DPOF Settings), such as the number of images to be printed, can be written to the Card. "DPOF" means Digital Print Order Format. * Set to Picture Playback . The One-Touch Navigation lower right of the screen. 1 Set [ _ ADVANCED] Mode.
Notes: o The Lock Setting carried out by this Camcorder is only effective for this Camcorder. o The SD Memory Card has a write protection switch on it. If the switch is moved to the [LOCK] side, you cannot write to or format the Card. If it is moved back. you can. By connecting your Camcorder with your TV_ the recorded scenes can be viewed on your TV screen. • Before connecting them_ turn off the power of both the Camcorder and TV. Insert a recorded Camcorder.
III To Display the On-screen Information on the TV The information displayed on the LCD Monitor or the Viewfinder (One-Touch Navigation icon, time code and mode indication, etc.), date and time can be displayed on the TV. 1 Press the [EXT DISPLAY] Remote Control. o Press the button information• EXT Button on the (PV-GS59 Only) again to erase the OSD PHOTO START/ $10P _ISP_AYSHOT _% DATE/ Note: o Use the AC adaptor to avoid battery depletion.
EdNng Mode Still pictures from scenes cassette. 1 can be recorded on the Memory that have already been recorded Set the Mode Dial to Tape 2 Press the [AUDIO DUB] Button Remote Control. . The [ hi]Ill]Ill] Indication appears. 3 To start Audio Dubbing, press the [ la ] Button on the Remote Control. Or, move the Joystick Control [A] to select [ o/_l1. . The [ I_gll_® ] Indication appears. . Talk into the microphone. Card on a Playback Mode.
Pictures recorded by the Camcorder can be stored on a DVD-RAM or other such media. Refer to the instructions for the recorder. • Place a recorded and an unrecorded the DVD Recorder 1 I Connect cassette in the Camcorder, DVD-RAM or cassette in or VCR. the Camcorder Connecting with the and the AV Recorder. Cable L==. [VIDEO IN] 5 Start 6 Move the Joystick 7 Stop recording. When neither 54 and set to Tape 3 Select the input channe( on the TV set and recorder.
• Date or other information to be displayed cannot be displayed if the software of the connected equipment does not support the display function. • While pictures are input from the DV terminal, the One-Touch Navigation icon blinks on instead of appearing from the side of the screen when you press the center of the Joystick Control. • While pictures are input from the DV terminal, the TV aspect will not change even if you change the setting for [ _ TV ASPECT] in the [ _ SETUP] menu.
With a PC • This function PV=GS39 and 4 is available PV=GS59. for models An image stored on the DV Cassette or Memory Card can be transferred to your personal computer. 1 Turn on the personal up Windows. computer 2 Insert the CD-ROM into the personal computer's CD-ROM drive. , The [Setup Menu] screen appears. Follow the instructions on the computer screen until the installation is complete. • Setup window will disappear when the installation is complete.
. Despite having theOperating environment PV=GS59 Only indicated_ itmay notbepossible tousetheprogramInstall the USB Driver first before connecting the withsome types ofpersona( computers. to your PC with the USB Cable. . When youconnect toanUSB 2.0interface board_ Camcorder DirectX9.0b is installed, applications useacertified board withtheUSB 2.0(HI-SPEED• When supported by previous versions of DirectX may not USB) logo. run.
Finish installation by following the on-screen instructions. • Click [Next] and proceed with installation • After completing the installation, click [Finish] After the US8 Driver is installed, restart your computer. 7 After the USB Driver is installed, please restart your computer. . Reboot the computer to finish installing USB driver. . Installation continues after the computer reboots if you selected additional software. I PV-GS39 Only I .
4 Open [My Computer] and click [Removable Disk] O (For Windows 2000 users). 5 Click [Open folder to view files using Windows Explorer] O and then [OK] (For Windows XP users). [Windows 2000] [Windows XP] ii:i!:'ii: 4 !i_ I the USB Connection Cable is connected Double click the _ , Hardware disconnect icon in task tray. dialog appears. 2 Select [USB Mass Storage Device] and 3 Verify [Matshita DVC USB Device] is selected and click [OK]. click [Stop]. i!' 10.
Ill For Macintosh Removing Macintosh the USB Cable safely for If the Camcorder is connected to your personal computer, you can send video and sound from the Camcorder to the other parties via the network. • Do not connect the USB Cable until the USB Driver is installed. (pp. 57~58) Please see chart below. [Send] O Drop the [NO_NAME] icon which appeared when you connected the Camcorder with the USB Cable into the recycle bin, then disconnect the USB Cable.
To use the Camcorder as a Web Camera, the following conditions must be met. . To upgrade Windows XP to SP1 (PV-GS59) / SP2 (PV-GS39) or later, click [Start] >> [All Programs] >> [Windows Update]. (Requires Internet connection.) ° To upgrade Windows 2000 to SP4 or later, click [Start] >> [All Programs] >> [Windows Update]. (Requires lnternet connection,) ° You have direct dial-up connection capability to the lnternet. Also, you and the other person(s) are in the same Network (LAN). .
. When you use Windows XP_ the other parties via the network have to use the Windows Messenger on Windows XP. When you use other than Windows XP_ the other parties via the network have to use MSN Messenger on an OS other than Windows XP.
8 Select [DVC] in the [Microphone] menu. 7 Click [Web Camera Settings...] [Tools] menu. 8 Confirm that the [Panasonic Camera Device] is selected. [] In the case 1 ii Type in your password. in the DVC Web of MSN Messenger E-mail address 7.5 and . For other information about Windows Messenger, please refer to Help. . When access is finished, close Windows Messenger, then turn off the Camcorder. Finally, disconnect the USB Cable. .
RAM: 256 MB or more m Quick Movie Magic You can easily transfer recordings made with your Camcorder to a PC where you can enhance them with titles and music • For advanced users who want to make more precise edits, MotionDV convenient features. STUDIO offers The edited contents set with Quick Movie Magic can be opened in the MotionDV STUDIO where the recording can be made as desired.
4 Select the Video 3 system. • The [Readme] screen is displayed. Please carefully read the displayed contents and close the [Readme] screen. After the completion [Finish]. Click [Next]. . After reading the displayed contents, please carry out the installation according to instructions. 4 Select the Video system. of setup, click on • Sample data is installed concurrently Quick Movie Magic software• . The [Readme] screen is displayed.
If a description other than [Microsoft] is displayed • Update the driver with the following procedure• If you wish to capture data from a tape_ set the Camcorder to Tape Playback Mode and insert the tape• tf you wish to capture images from the lens of the CamcordeR set the Camcorder to the Tape Recording Mode and remove the tape and the card. [] With USB (supplied) OS: Windows XP SP2 or later Windows 2000 SP4 or later . The personal computer should be compatible with USB 2.
Connect the Camcorder to the personal computer with DV Cable. 1 Set the Camcorder to Tape Recording Mode or Tape Playback Mode. ® Set [ _ BASIC] or [ _ ADVANCED] >> [ [] USB FUNCTION] >> [MOTION DV]. 3 Start Quick Movie Magic STUDIO LE for DV. or MotionDV . You can record the video edited by the PC onto the Tape )n the Camcorder.
2 Connect with the the Camcorder DV Cable. to your Macintosh * Macintosh and iMovie HD from Apple are the registered trademark of Apple Computer, Inc. * Microsoft ®Windows ®, Windows Messenger e, MSN MessengeP and DirectX ® are either trademarks or registered trademarks of the Microsoft Corporation in the United States and/or other countries. iMac® 3 Click the [ _ JMovJe HD] icon. * lntel ®, Pentium ® and Celeron ®are the registered trademarks or trademarks of the Intel Corporation.
, If you install the USB Driver after the USB Cable is connected_ or if you do not follow these Operating lnstructions_ the Camcorder will not be recognized correctly, tn this case, delete the USB Driver from [Device Manager] as described betow_ uninstall the USB Driver_ and re-install it. • With the Camcorder and personal computer connected via a USB Cable, open the [Device Manager]. Right-click [!DVC] O in [Ports] or [Other devices]_ and select [Uninstalt].
Others Various functions and the Camcorder status are shown on the screen. Basic indications: _: Remaining battery power 0h00m00s00f: Time code 12:34:56PM: Date/Time indication Recording indications: R0:45: Remaining tape time . Remaining tape time is indicated in minutes. (When it reaches less than 3 minutes, the indication starts 1lashing.) Mode (p. 30) Shutter [_1 : Slide Show Playback F2.4 : 6dB F Number (p. 43) Gain Value (p. 43) []W: Fade (White) (p. 37) [] B : Fade (Black) (p.
CLOSE If any one of the following indications lights up or flashes, please check the Camcorder. Confirmatory : [--] / _: [] : Indications A cassette with the accidental erasure prevention slider placed in the [SAVE] position is inserted. No cassette is inserted. The built-in battery is low. (p. 21 ) The Warning/Alarm Indication appears when you record yourself. Turn the LCD Monitor towards the Viewfinder and check the Warning/Alarm Indication. CASSETTE DOOR: The cassette cover cover. (pp.
CHANGE TO MANUAL MODE: You are attempting to select an item other than [OFF] in [SCNSCENE MODE] when the [AUTO/ MANUAL/FOCUS] Switch is set to [AUTO]. CAN NOT OPERATE (MOTION DV MODE) You are attempting (PV-GS59 to change Only): [li_ D.ZOOM] setting during MotionDV Mode. TURN OFF THE VIDEO LIGHT: You are attempting to select an item in [ 5CN SCENE MODE] when Light is on.
[] About AC Adaptor . If the temperature of the Battery is extremely high or extremely low, the [CHARGE] Lamp may continue flashing, and the Battery may not be charged. After the temperature of the Battery has decreased or increased sufficiently_ charging starts automatically. If the [CHARGE] Lamp continues to flash even after the Battery temperature has decreased or increased sufficiently, the Battery or AC Adaptor may be faulty. In this case_ please contact a dealer. . If the Battery is warm, than normal.
m Optimal Use of the Battery Battery Characteristics This Battery is a rechargeable lithium ion battery. Its ability to generate power is based upon the chemical reaction that takes place inside it. This reaction is susceptible to the surrounding temperature and humidity, and, if the temperature is too high or too low, the operating time of the Battery becomes shorter. If the Battery is used in an extremely cold environment, the Battery may operate only for about 5 minutes.
III LCD LCD MonitorlViewfinderlLens Hood Monitor . (n a place with drastic temperature changes, condensation may form on the LCD Monitor. Wipe it with a soft dry cloth. off your Camcorder is extremely cold when you turn its power on, the image on the LCD Monitor is slightly darker than usual at first. However, as the internal temperature increases, it goes back to the normal brightness.
The Camcorder powered up. cannot be operated though The Camcorder does not operate normally. The Camcorder cannot be operated unless you open the LCD Monitor or extend the Viewfinder. Remove the cassette and then press the [RESET] button. (p. 78) If normal conditions are not restored yet, turn off the about 1 minute later, turn on the (Conducting the above operation Lamp is on may destroy the data The cassette cannot power. Then, power again. when the Access on the card.) be removed.
Sound is not pJayed back from the built-in speaker of the Camcorder. Is the volume too low? During playback, push the [- _ / VOL +] lever to display the volume indication and adjust it. (p. 45) Different time. sounds are reproduced at the same Have you set [ ]_i SETUP] >> [ _ 12bit AUDIO] >> [MIX]? If you set [,.h AUDIO REC] >> [12bit] and dub audio to a recorded tape, you can hear the sound on recording and the sound dubbed at a later time. To hear the sounds separately, set to [ST1] or [ST2]. (p.
iiiiiiiiiiiiiiiiiiiiiiiiiiiiiiiiiiiiiiiiiiiiiiiiiiiiiiiiiiiiiiiiiiiiiiiiiiiiiiiiiiiiiiiiiiiiiiiiiiiiiiiiiiiiiiiiiiiiiiiiii_!_)_i_i_i_!i_!i_!i_!i_!i_!i_!i_!i_!i_!i_ i__ The Warning/Alarm indication [ [] ] appears The indication disappears, the screen is frozen, or no operation can be performed. Turn off the power to the Camcorder. If the power cannot be turned off, press the [RESET] button (p. 78), or detach the battery or AC adaptor and then reattach it. After that, turn on the power again.
6) [] Digital Video System In a digital video system, images and sounds are converted into digital signals and recorded on a tape. This complete digital recording is capable of recording and playback with minimal image and sound deterioration. In addition, it automatically Time Code and Date/Time, records data, such as as digital signals.
USB: Card reader/writer function, USB 2.0 compliant (Hi-Speed (PV-GS59)) (Full-Speed (PV-GS39)) No copyright protection support Digital Interface: DV input/Output Jack (tEEE1394, 4-pin) Dimensions: Digital Camcorder Information for your safety Power Source: DC 7.9/7.2 V Power Consumption: Recording Approx. Approx. Mass: 4.2 W (PV-GS29) 4.4 W (PV-GS39/PV-GS59) Recording Format: Mini DV (Consumer-use Digital Video SD Format) Tape Used: 6.35 mm digital video tape Recording/Playback Time: SP: 80 min.
PV-DAC14 AC Adaptor with AC Cable and DC Cables CGR-DU06A/1B CGA-DU 12A/1B CGA-DU21A/1 © 640 mAh/Rechargeable Pack © 1 150 mAh/Rechargeable Pack Lithium Ion Battery 2 040 mAh/Rechargeable Pack Lithium Ion Battery B Lithium Ion Battery PV-DDC9 (For USA) _ DV Interface Cable (i.
Please photocopy this form when placing an order. 1. Camcorder Model # 2. Items Ordered Accessory# Description Price Each Total Price Quantity Subtotal Your State & Local Sales Tax 6.95 Shipping & Handling Total Enclosed 3. Method of payment (check one) [] Check of Money Order enclosed (NO C.O.D.SHIPMENTS) [] VISA Credit Card # [] MasterCard Expiration Date [] Discover Customer Signature Make Check or Money Order to: PANASONIC ACCESSORIES (Please do not send cash) 4.
Please photocopy this form when making a request for service notice. In the unlikely event this product needs service. • Please include your proof of purchase. (Failure to do so will delay your repair.) • To further speed your repair, please provide an explanation of what is wrong with the unit and any symptom it is exhibiting.
PANASONIC DIVISION NORTH One OF CONSUMER ELECTRONICS PANASONIC CORPORATION COMPANY, OF AMERICA Panasonic Way Secaucus, New Jersey 07094 Panasonic PANASONIC SALES PANASONIC PUERTO COMPANY, RICO, AVE 65 de Infanteria, Km. Park, Carolina, Rico Video Puerto DIVISION OF INC., 9.
,3 Accessory Purchases Purchase Products Parts, Accessories and instruction by visiting our Web Site at: htt ://www. asc. or, send request your Books ] online for all Panasonic anasonic.com by E=mail to: _us.panasonic.com You may also contact us directly at: 1 =800=332=5368 (Phone) 1 =800=237=9080 Panasonic Services Company 20421 84th Avenue hearing Only) (Monday - Friday 9 am to 8 pro, EST.
Panasonic 5770 Ambler PANASONIC Canada Drive, Mississauga, PRODUCT Inc. Ontario - LIMITED L4W 2T3 WARRANTY Panasonic Canada Inc. warrants this product to be free from defects in material and workmanship agrees to remedy any such defect for a period as stated below from the date of original purchase.
Precauciones para su seguridad ADVERTENCIA: Para evitar incendios y descargas a la lluvia ni a la humedad. elOctricas, no exponga este equipo SL] Mini_*_ Camcorder esta dise_ada para grabar y reproducir en el mode de Reproducci6n Estandar (SP) y mode Largo (LP). Se recomienda el uso s61o de cintas de cassette que hayan side probadas e inspeccionadas para su uso en aparatos VCR con la marca _'1}_"r. PRECAUCION; DSSCARGA PARA REDUCIR EL RIESGO DE ELECTRICA, NO QUITE LA CUBISRTA (O PARTE POSTERIOR).
Coloque la bateria en el adaptador carguela. Usando su pulgar presione la perilla [OPEN] O y saque la pantalla LCD O en la direcci6n de la flecha. 2 Abrir 3 Mientras de ca y . Antes de usar, cargue completamente la bateria. . Debido a que la bateria no se cargara cuando el cable de entrada de cc este conectado al adaptador de ca desconectelo del adaptador de ca . El indicador [CHARGE] se eneienden y la carga comienza. . Cuando el indieador [CHARGE] se apaga, se ha terminado la carga.
Ajuste rotando la perilla ocular correctora e. 1 o JAN el selector 2 Ajuste el selector de modo grabaci6n de cinta. • Se visualiza la indicaci6n LA CINTA] en la pantalla. [_ en modo de [Icono de navegacidn de un toque] 2006 _ 1 de modo reproduccibn de cinta. , Se visualiza la indicaoi6n [_] REPRODUCCION DE LA CINTA] en la pantalia.
A I AC Adaptor ............................................... 15, 73 Audio Dubbing ................................................ 53 Auto Focus ..................................................... 79 Iris ................................................................... 43 J Joystick Control .............................................. 23 B Backtight ......................................................... Blank Search ..................................................
S Scene Mode ................................................... 40 SD Memory Card ............................................ Self-timer Recording ....................................... Self Recording ................................................ Sensor tag ...................................................... Shutter Speed ................................................ Slide Show ..................................................... 69 35 33 17 42 48 Stow Motion Playback ......................
Panasonic Consumer Electronics Company, Division of Panasonic Corporation of North One Panasonic Way Secaucus, New Jersey 07094 Panasonic Sales Company ( PSC ), Division of Panasonic Puerto Rico, inc. Ave 65 de Infanteria, Km 9.5 San Gabriel Industrial Puerto Rico 00985 Panasonic Canada America Park Carolina, | L inc. 5770 Ambler Drive, Mississauga, Ontario L4W 2T3 (905) 624-5010 www.panasonie.