LCD Projector POWER LIGHT INPUT VI D E O CMPNT PC COMPONENT KEYSTONE MENU ENTER NORMAL ASPECT FREEZE MODE MEMORY PICTURE USER Operating Instructions LCD PROJECTOR Model No. PT-AE500U Before operating this product, please read the instructions carefully and save this manual for future use. For assistance, please call : 1-888-View-PTV(843-9788) or send e-mail to : consumerproducts@panasonic.com or visit us at www.panasonic.com (U.S.
This instruction booklet provides all the necessary operating information that you might require. We hope it will help you to get the most out of your new product, and that you will be pleased with your Panasonic LCD projector. The serial number of your product may be found on its back. You should note it in the space provided below and retain this booklet in case service is required.
Preparation IMPORTANT SAFETY NOTICE ...2 Precautions with regard to safety .........................................5 Accessories .................................9 Before use ....................................9 Location and function of each part...........................................11 Getting started Setting-up...................................16 Projection methods, Projector position, Projection distances Connections...............................
6-ENGLISH Do not look into the lens while the projector is being used. B Strong light is emitted from the projector’s lens. If you look directly into this light, it can hurt and damage your eyes. B Be especially careful not to let young children look into the lens. In addition, turn off the power when you are away from the projector. Do not place your hands or other objects close to the air outlet port. B Heated air comes out of the air outlet port.
Accessories Check that all of the accessories shown below have been included with your projector. Remote control unit (N2QAEA000019 x1) Video cable [3.
Notes on use In order to get the best picture quality Draw curtains or blinds over any windows and turn off any fluorescent lights near the screen to prevent outside light or light from indoor lamps from shining onto the screen. Do not touch the surfaces of the lens with your bare hands. If the surface of the lens becomes dirty from fingerprints or anything else, this will be magnified and projected onto the screen.
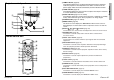
Preparation Projector $ Connector panel # # $ % & ' ' % & # Air outlet port Do not cover this port. $ Connector panel (page 13) % Power input socket (AC IN) (page 22) The accessory power cord is connected here. Do not use any power cord other than the accessory power cord. & Lamp unit holder (page 47) ' Security lock This can be used to connect a commercially-available theft-prevention cable (manufactured by Kensington).
' ( ) # $ % * & + Remote control unit . POWER & LIGHT INPUT VID E O CMPNT PC * COMPONENT ' ( KEYSTONE MENU + ENTER ) , - / NORMAL ASPECT FREEZE MODE MEMORY PICTURE USER LCD PROJECTOR 14-ENGLISH 0 1 # TEMP indicator (page 44) This indicator illuminates if an abnormally high temperature is detected inside the projector. If the temperature rises above a certain level, the power supply will be turned off automatically and the indicator will flash.
Setting-up Projector position BFront-ceiling projection Screen L: Projection distance SH: Image height SW:Image width H1: Distance from center of lens to bottom edge of projected image L H1 BFront-desk projection Top edge of screen Menu items Setting Menu items Setting FRONT/REAR FRONT FRONT/REAR FRONT DESK/CEILING DESK DESK/CEILING CEILING BRear-desk projection (Using a translucent screen) BRear-ceiling projection (Using a translucent screen) SW 65.
Connections B Read the instruction manual for each system component carefully before connecting it. B Turn off the power supply for all components before making any connections. B If the cables necessary for connecting a component to the system are not included with the component or available as an option, you may need to fashion a cable to suit the component concerned. B Refer to the list on page 54 for details on compatible signals which can be input to the projector.
Preparation for the remote control unit Connecting to computer # Open the cover. To RGB output Getting started Computer $ Insert the batteries so that the polarities are correct, and then close the cover. Equipment such as an electric screen AAA batteries (two) NOTE: B Do not drop the remote control unit. B Keep the remote control unit away from liquids. B Remove the batteries if not using the remote control unit for long periods. B Do not use rechargeable batteries.
Turning on the power Before turning on the power 1, Ensure that all components are connected properly. 2, Connect the accessory power cord. 3, Remove the lens cover.
Turning off the power ˛# POWER LIGHT INPUT VID E O CMPNT PC COMPONENT KEYSTONE ˛$ ENTER NORMAL ASPECT FREEZE MODE MEMORY PICTURE USER Power indicator the POWER button. # Press B“POWER OFF” is displayed on the ˛% POWER OFF OK CANCEL screen. $ Press the I or H button to select “OK”, and then press the ENTER button. BThe lamp unit will switch off and the picture will stop being projected. (The power indicator on the projector will illuminate orange while the cooling fan is still operating.
Correcting keystone distortion (KEYSTONE) Selecting the picture mode (PICTURE MODE) When either the projector or the screen is tilted, the keystone distortion will affect the image. You can correct the image proportions by the following procedure. You can select the appropriate picture mode for the type of projected image by the following procedure. Press the KEYSTONE button. INPUT VID E O CMPNT VID E O PC CMPNT PC Press the PICTURE MODE button.
Setting the aspect ratio (ASPECT) ASPECT This projector allows you to change the aspect ratio to match the type of input signal. 4:3 4:3 input signal 4:3 16:9 Squeezed signal (image contracted horizontally) Horizontal expansion of projected image JUST 4:3 input signal Horizontal expansion of projected image (Center of image is less distorted.
Turning on the button lights (LIGHT) LIGHT INPUT VID E O CMPNT PC COMPONENT KEYSTONE MENU Press the LIGHT button. B The buttons on the remote control unit will be illuminated. B Press the LIGHT button again to turn off the button lights. The button lights will be turned off automatically when no buttons on the remote control unit are pressed for 10 seconds. The picture settings adjusted according to the instructions on page 36 can be saved and retrieved. Press the USER MEMORY button.
On-screen menus Menu screens The various settings and adjustments for this projector can be carried out by selecting the operations from on-screen menus. The general arrangement of these menus is shown below. MENU KEYSTONE PICTURE POSITION SHUTTER LANGUAGE OPTION SELECT ENTER PICTURE menu (page 36) When an S-VIDEO/VIDEO signal is being input PICTURE PICTURE MODE NORMAL CONTRAST 0 BRIGHT 0 COLOR 0 TINT 0 SHARPNESS 0 COLOR TEMP.
Menu operation guide & Press the F or G button to select an item, and then press the I or H button to change or adjust the setting. An individual adjustment screen such as the one shown below will be displayed for bar scale items. # Press the MENU button.
Press the F or G button to select an item, and then press the I or H button to change the setting. For items with bar scales, press the ENTER button or the I or H button to display the adjustment screen, and then press the I or H button to make the adjustment. For items without any selective arrow or bar scale, press the ENTER button. The menu screen for the item will then be displayed.
TV-SYSTEM Press the ENTER button to display the “MEMORY SAVE” menu. (S-VIDEO/VIDEO only) MEMORY SAVE MEMORY 1 MEMORY 2 MEMORY 3 SELECT ENTER TV-SYSTEM AUTO [ NTSC [ NTSC4.43 [ PAL ESC [ PAL-M The settings adjusted in “PICTURE” menu can be saved. Press the F or G button to select the number in which you want to save the setting, and then press the ENTER button. The confirmation screen will then be displayed. Press the I or H button to select “OK” and then press the ENTER button.
Adjusting the position When the input signal is from a PC, first select “AUTO SETUP” and then press the ENTER button to initiate automatic positioning. If the optimum setting is not obtained when “AUTO SETUP” is carried out, adjust by the following procedure. Horizontal position (H-POSITION) Press the F or G button to select an item, and then press the I or H button to change the setting.
Option settings OPTION OSD ON NR ON PC PRIORITY NORMAL BACK COLOR BLACK EDID EDID1 FRONT/REAR FRONT DESK/CEILING DESK FAN CONTROL NORMAL LAMP POWER HIGH LAMP RUNTIME 5H SELECT ADJ ESC PC PRIORITY FRONT/REAR (PC only) FRONT/REAR LAMP POWER FRONT NORMAL REAR [ WIDE NORMAL The PC screen data is displayed in a 4:3 aspect ratio. WIDE The PC screen data is displayed in a 16:9 aspect ratio. This setting should be changed in accordance with the projector setting-up method. (Refer to page 16.
When the TEMP indicator and the LAMP indicator are illuminated There are two indicators on the control panel of the projector which give information about the operating condition of the projector. These indicators illuminate or flash to warn you about problems that have occurred inside the projector, so if you notice that one of the indicators is on, turn off the power and check the table below for the cause of the problem.
If the air filter becomes clogged with dust, the internal temperature of the projector will rise, the TEMP indicator will flash and the projector power will turn off. The air filter should be cleaned after every 100 hours of use. # Turn off the MAIN POWER switch and disconnect the power cord plug from the wall outlet. Turn off the MAIN POWER switch according to the procedure given in “Turning off the power” on page 24 before disconnecting the plug from the wall outlet.
Displayed for 30 seconds. Pressing any More than 1 800 hours button will clear the display. More than 2 000 hours Remains displayed until any button is pressed. Lamp indicator warning light Illuminates red during image projection and standby mode. Lamp unit replacement procedure NOTE: B If the lamp usage time has passed 2 000 hours (when “LAMP POWER” has been set to “HIGH”), the projector will switch to standby mode after approximately 10 minutes of operation.
Before calling for service Cleaning and maintenance Before calling for service, check the following points. 50-ENGLISH Page – – – 44 45 – – 23 36 Before carrying out cleaning and maintenance, be sure to disconnect the power cord plug from the wall outlet. Wipe the cabinet with a soft, dry cloth. If the cabinet is particularly dirty, soak the cloth in water with a small amount of neutral detergent in it, squeeze the cloth very well, and then wipe the cabinet.
Specifications Amps: LCD panel: Panel size (diagonal): Aspect ratio: Display method: Drive method: Pixels: Lens: 100 V – 240 V ~, 50 Hz/60 Hz 180 W [During standby (when fan is stopped): Approx. 1.0 W] 2.2 A - 1.0 A 0.7 type (17.78 mm) 16:9 3 transparent LCD panels (RGB) Active matrix method 921 600 (1 280 x 720) x 3 panels Manual zoom (1 - 1.2) / focus lens F 1.9 - 2.2, f 22.0 mm - 26.
Appendix List of compatible signals Mode Display resolution (dots)*1 NTSC/NTSC4.
Dimensions B The pin layout and signal names for the DVI-D input connector are shown below. (interface with TMDS connector on a personal computer) 3 Pin No. / 0 1 2 3 4 5 6 7 8 9 : Signal T.M.D.S data 3+ +5 V Earth Hot plug sense T.M.D.S data 0T.M.D.S data 0+ T.M.D.S data 0/5 shield T.M.D.S data 5T.M.D.S data 5+ T.M.D.S clock shield T.M.D.S clock+ T.M.D.S clock- 269 (10-9/16) Signal T.M.D.S data 2T.M.D.S data 2+ T.M.D.S data 2/4 shield T.M.D.S data 4T.M.D.S data 4+ DDC clock DDC data T.M.D.S data 1T.M.
Trademark acknowledgements B VGA and XGA are trademarks of International Business Machines Corporation. B S-VGA is a registered trademark of the Video Electronics Standards Association. All other trademarks are the property of the various trademark owners. These Operating Instructions are printed on recycled paper.