
Installation Instructions

11
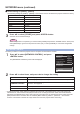
WIRED LAN
You can make detailed wired LAN settings.
Press ▲▼ to select [WIRED LAN], and press <ENTER> button.
1
The [WIRED LAN] screen will be displayed.
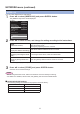
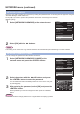
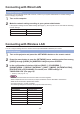
NETWORK
PROJECTOR NAME NAME1234
WIRED LAN
WIRELESS LAN
USER1
NETWORK CONTROL
NETWORK PASSWORD
OFF
NETWORK PASSWORD CHANGE
LIVE MODE CUT IN OFF
COMPUTER SEARCH
MULTI -LI VE
NETWORK STATUS
ENTER
MENU SELECT
SUB MENU
Press ▲▼ to select an item, and change the setting according to the instructions.
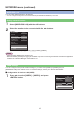
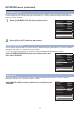
2
DHCP
_
(DHCP client function)
Set [DHCP] item to [ON] when to acquire an IP address automatically
using the DHCP server.
Set to [OFF] if [DHCP] server is not used.
IP ADDRESS
_
(Display of IP address and setting)
Enter the IP address if DHCP server is not used.
SUBNET MASK
_
(Displaying and setting the subnet
mask)
If not using a DHCP server, enter the subnet mask.
DEFAULT GATEWAY
_
(Display of gateway address and
setting)
Enter the gateway address if DHCP server is not used.
“Glossary” ( _ See page 40 – 41)
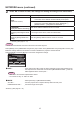
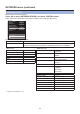
Press ▲▼ to select [STORE], and press <ENTER> button.
3
Save the current network settings.
Note
Before using the DHCP server, make sure the DHCP server is already functioning. ・
For details of IP address, subnet mask, and gateway, ask the network administrator. ・
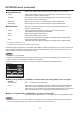
■ Default wired LAN settings
The following settings are set before the projector leaves the factory.
DHCP OFF
IP ADDRESS 19 2.16 8.10.10 0
SUBNET MASK 255.255.255.0
DEFAULT GATEWAY 19 2.16 8.10.1
NETWORK menu (continued)