
Operation Manual

72
- ENGLISH
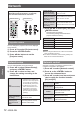
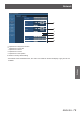
Settings
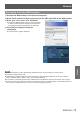
Network
Select [Network] from the Main Menu (see
“Navigating through the menu” on page 46),
then select the item from the sub-menu.
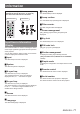
Remote Control
Side Control
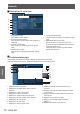
Projector name
You can change the projector name to be displayed
on the network.
Press ▲▼ to select [Projector name].1 )
Press the <ENTER> button.2 )
Press ▲▼◄► buttons to set the 3 )
[Projector name].
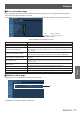
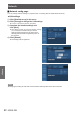
Network setup
You can make detailed wired LAN settings.
Press ▲▼ to select [Network setup], 1 )
and press <ENTER> button.
Press ▲▼ to select an item, and 2 )
change the setting according to the
instructions.
DHCP
(DHCP client function)
On: If a DHCP server exists in the
network to which the projector
is connected, the IP address
will automatically be acquired.
Off: If a DHCP server does not
exist in the network to which
the projector is connected,
additionally set [IP address,
[Subnet mask] and [ Default
gateway].
IP address
(Display of IP address
and setting)
Enter the IP address if DHCP
server is not used.
Subnet mask
(Displaying and
setting the subnet
mask)
If not using a DHCP server,
enter the subnet mask
Default gateway
(Display of gateway
address and setting)
Enter the gateway address if DHCP
server is not used.
DNS1
(Display of Preferred
DNS server address
and setting)
Enter the DNS server address if
DHCP server is not used.
DNS2
(Display of Alternate
DNS server address
and setting)
Enter the alternate DNS server
address if DHCP server is not used.
Press ▲▼◄► to select [Set], and press 3 )
<ENTER> button.
Default wired LAN settings
z
The following settings are set before the
projector leaves the factory.
DHCP
Off
IP address
192.168.10.10 0
Subnet mask
255.255.255.0
Default gateway
192.168.10.1
DNS 1/DNS 2
NONE
Note
Before using the DHCP server, make sure the DHCP
z
server is already functioning.
For details of IP address, subnet mask, gateway and
z
DNS, ask the network administrator
.
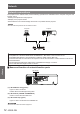
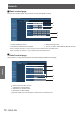
Network control
Set when you want to control the projector from a
computer connected to the network.
Press ▲▼ to select [Network control].1 )
Press ► or the <ENTER> button to 2 )
access the submenu items.
Press ▲▼ to select one item and press 3 )
◄► to switch the function between
[On] and [Off].
WEB control
Set to [On] to control with the Web
browser.
PJLink control
Set to [On] to control with the
PJLink protocol.
Command
control
Set to [On] to control with the
SERIAL IN terminal control
command format.
AMX D. D.
Set to [On] to control with the
AMX Device Discovery.
RoomView
Set to [On] to control with the
Crestron RoomView
®
.