
Owners Manual


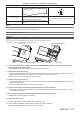


Table Of Contents
- Read this first!
- Chapter 1 Preparation
- Chapter 2 Getting Started
- Chapter 3 Basic Operations
- Switching on/off the projector
- Projecting
- Operating with the remote control
- Using the shutter/AV mute function
- Using the mute function
- Adjusting the volume
- Using the freeze function
- Using the on-screen display function
- Using the automatic setup function
- Using the SCREEN ADJ button
- Switching the aspect ratio of the image
- Using the digital zoom function
- Using the presentation timer function
- Using the FUNCTION button
- Displaying internal test patterns
- Using the status function
- Using the ECO management function
- Setting the ID number of the remote control
- Chapter 4 Settings
- Chapter 5 Operation of Function
- Chapter 6 Maintenance
- Chapter 7 Appendix

Chapter 6
Maintenance — Maintenance/replacement
ENGLISH - 143
On-screen display
REPLACE LAMP
Lamp indicator
Over 3 800 hours
The message is displayed for 30 seconds. Pressing
any button on the control panel or the remote control
within 30 seconds will clear the message.
The indicator lights in red even during the standby
mode.
Over 4 000 hours
The message remains displayed until you press any
button.
Note
f
The time which is obtained by the formula for lamp replacement time “4 000 hours” is a rough guideline, but is not a guarantee. The lamp
runtime differs depending on the setting of "LAMP POWER" menu.
How to replace the lamp unit
Attention
f
While attaching the projector to the ceiling, do not work right under the lamp unit or do not conduct work while your face is near the lamp
unit.
f
Do not remove or loosen the screws other than specied ones when replacing the lamp unit.
f
Make sure to attach the lamp unit and the lamp cover securely.
i)
ii)
Fig. 1
Fig. 2
Lamp cover
Lamp cover xing screw
Lamp unit xing screws
Lamp unit
Handles
1) Turn off the power of the projector and set the <MAIN POWER> switch to <OFF> and disconnect the
power plug from the power outlet.
f
Wait at least one hour and check if the lamp unit has cooled down.
2) Remove the lamp cover. (Fig. 1)
f
Use a Phillips screwdriver to turn the lamp cover xing screw (x1) counterclockwise until it turns freely, and
slide and pull up the lamp cover slowly in the direction of the arrow to remove it.
f
Opening the lamp cover quickly may result in falling.
3) Remove the lamp unit. (Fig. 2)
f
Use a Phillips screwdriver to turn the lamp unit xing screws (x3) counterclockwise until they turn freely, and
remove the lamp unit.
f
Hold the handles of the lamp unit and remove it straight.
4) Push in the new lamp unit while paying attention to the insertion position.
f
If the lamp unit is not installed properly, remove it and then push it in slowly. Pushing it in quickly or forcibly
may break the connector.
5) Use a Phillips screwdriver to firmly tighten the lamp unit fixing screws (x3).
f
Make sure to attach the lamp unit securely.
6) Attach the lamp cover.
i) Perform Step 2) in the reverse order to attach the lamp cover.
ii) Use a Phillips screwdriver to firmly tighten the lamp cover fixing screw (x1).
f
Make sure to attach the lamp cover slowly and securely.