
Owners Manual

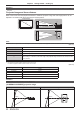


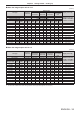


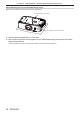
Table Of Contents
- Read this first!
- Chapter 1 Preparation
- Chapter 2 Getting Started
- Chapter 3 Basic Operations
- Switching on/off the projector
- Projecting
- Operating with the remote control
- Using the shutter/AV mute function
- Using the mute function
- Adjusting the volume
- Using the freeze function
- Using the on-screen display function
- Using the automatic setup function
- Using the SCREEN ADJ button
- Switching the aspect ratio of the image
- Using the digital zoom function
- Using the presentation timer function
- Using the FUNCTION button
- Displaying internal test patterns
- Using the status function
- Using the ECO management function
- Setting the ID number of the remote control
- Chapter 4 Settings
- Chapter 5 Operation of Function
- Chapter 6 Maintenance
- Chapter 7 Appendix

Chapter 2
Getting Started — Setting up
32 - ENGLISH
Attention
f
To ensure projector performance and security, installation of the Ceiling Mount Bracket must be carried out by your dealer or a qualied
technician.
Projected image and throw distance
Refer to the screen size and projection distances to install the projector. Image size and image position can be
adjusted in accordance with the screen size and screen position.
SD
L (LW/LT)
L1
L1
L (LW/LT)
SW SH
H
SH
SW
Projected image
Screen
Screen
Note
f
This illustration is represented on the assumption that the size and position of the projection screen are matched to ll the screen.
(Unit: m)
L (LW/LT)
*1
Projection distance
L1
Lens protrusion dimension
SH Projected image height
SW Projected image width
H
Distance from the lens center to the bottom edge of the projected image
(When setting on a desk/oor, if the bottom edge of the projected image is below the lens center, the value
of H is positive.)
SD Projected image size
*1 LW: Minimum projection distance when the Zoom Lens is used
LT: Maximum projection distance when the Zoom Lens is used
(Unit: m)
Projection lens Model No. Dimension for L1 (approximate value)
Standard zoom lens
0.040
ET-ELT30 0.081
ET-ELT31 0.092
ET-ELW30 0.071
ET-ELW31 0.070
Attention
f
Before setting up, read “Precautions for use” (
x
page 17).
[SCREEN ADJUSTMENT] projection range
[VERTICAL KEYSTONE] (viewed from the side) [HORIZONTAL KEYSTONE] (viewed from above)
Screen Screen