
Owners Manual


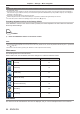


Table Of Contents
- Read this first!
- Chapter 1 Preparation
- Chapter 2 Getting Started
- Chapter 3 Basic Operations
- Switching on/off the projector
- Projecting
- Operating with the remote control
- Using the shutter/AV mute function
- Using the mute function
- Adjusting the volume
- Using the freeze function
- Using the on-screen display function
- Using the automatic setup function
- Using the SCREEN ADJ button
- Switching the aspect ratio of the image
- Using the digital zoom function
- Using the presentation timer function
- Using the FUNCTION button
- Displaying internal test patterns
- Using the status function
- Using the ECO management function
- Setting the ID number of the remote control
- Chapter 4 Settings
- Chapter 5 Operation of Function
- Chapter 6 Maintenance
- Chapter 7 Appendix

Chapter 4
Settings — [PICTURE] menu
68 - ENGLISH
Operation Adjustment Range of adjustment
Press the w button.
Increases the brightness of the dark (black) parts of the screen.
-
32 ~ +32
Press the q button.
Reduces the brightness of the dark (black) parts of the screen.
[COLOR]
(Only for movie-based signal input)
You can adjust the color saturation of the projected image.
1) Press as to select [COLOR].
2) Press qw or the <ENTER> button.
f
The
[COLOR]
individual adjustment screen is displayed.
3) Press qw to adjust the level.
Operation Adjustment Range of adjustment
Press the w button.
Deepens colors.
-
32 ~ +32
Press the q button.
Weakens colors.
[TINT]
(Only for NTSC/NTSC4.43 signal when input movie-based signal and the <VIDEO IN> terminal or the
<RGB 1 IN>
*1
terminal is selected)
You can adjust the skin tone in the projected image.
1) Press as to select [TINT].
2) Press qw or the <ENTER> button.
f
The
[TINT]
individual adjustment screen is displayed.
3) Press qw to adjust the level.
Operation Adjustment Range of adjustment
Press the w button.
Adjusts skin tone toward greenish color.
-
32 ~ +32
Press the q button.
Adjusts skin tone toward reddish purple.
*1 When [RGB1 INPUT SETTING] is set to [Y/C] (
x
page 83)
[SHARPNESS]
You can adjust the sharpness of the projected image.
1) Press as to select [SHARPNESS].
2) Press qw or the <ENTER> button.
f
The
[SHARPNESS]
individual adjustment screen is displayed.
3) Press qw to adjust the level.
Operation Adjustment Range of adjustment
Press the w button.
Contours become sharper.
0 ~ +15
Press the q button.
Contours become softer.
Note
f
[SHARPNESS] will be invalid when [DAYLIGHT VIEW] is set to [AUTO]/[1]/[2]/[3].
[COLOR TEMPERATURE]
You can switch the color temperature if the white areas of the projected image are bluish or reddish.
1) Press as to select [COLOR TEMPERATURE].
2) Press qw or the <ENTER> button.
f
The
[COLOR TEMPERATURE]
individual adjustment screen is displayed.