
Operation Manual


Replacement
ENGLISH -
69
Maintenance
z
Drying the air lter unit
Leave the lters to dry in a well-
•
ventilated location that is not exposed
to excessive dust.
Install the air lter unit to the projector.4 )
The air lter unit has no distinction between top
z
and bottom.
Perform step
z
2) in the reverse order.
Attach the air lter cover to the 5 )
projector and secure the lter cover
screw using a Phillips screwdriver.
Perform step
z
1) in the reverse order.
Attention
After cleaning the air lter unit, make sure that it is
z
sufciently dry before reinstalling it to the projector.
Installing the air lter unit while it is wet will result in
electric shock or malfunction.
Note
Be sure to install the air lter properly. If the projector
z
is operated without the air lter installed, the projector
will shut off after ten minutes to prevent damage from
incoming dirt and dust. (In such cases, the remaining
time before shutdown is displayed in one-minute
increments.)
Replace the air lter with a replacement lter unit (ET-
z
EMF100) when cleaning fails to remove dirt or dust, or
when the air lter unit breaks.
Air lter replacement is recommended after cleaning the
z
unit two times.
The dust-proof properties may reduce after each
z
cleaning.
Replacing the unit
J
Air lter unit
Replace the air lter when cleaning fails to remove dirt or dust.
Replace it with the separately sold ET-EMF100 replacement lter unit. Consult your supplier when you
purchase a replacement lter.
Replacement of the air lter unit
J
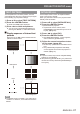
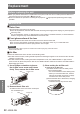
Remove the air lter cover.1 )
Use a Phillips screwdriver to turn the air lter
z
cover screw counterclockwise until the screw
turns freely to remove the air lter cover.
Remove the air lter unit.2 )
Pull the air lter unit out from the projector
z
holding the tab of the air lter unit.
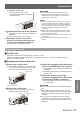
Attach the separately sold replacement 3 )
lter unit (ET-EMF100) to the projector.
The air lter unit has no distinction between top
z
and bottom.
Attach the air lter unit by performing step 2) in
z
reverse order.
Attach the air lter cover to the 4 )
projector and tighten the air lter cover
screw using a Phillips screwdriver.
Attach the air lter cover by performing step 1)
z
in reverse order.
Attention
Turn off the power before you replace the air lter
z
unit.
When attaching the air lter unit, make sure that
z
the projector is stable, and work in an environment
that is safe, even in the event of the air lter unit
dropping.
Do not turn on the projector without an air lter
z
unit attached. If the projector is used without the
air lter, dirt and dust that enters the projector may
damage it.
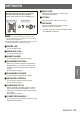
Air lter cover screw
Air lter cover
Knobs
Air lter unit