
User's Manual
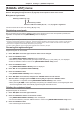
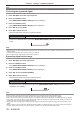
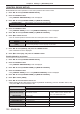
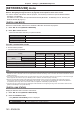
Table Of Contents
- Read this first!
- Chapter 1 Preparation
- Chapter 2 Getting Started
- Chapter 3 Basic Operations
- Switching on/off the projector
- Projecting
- Using the USB memory
- Operating with the remote control
- Using the shutter function
- Using the mute function
- Adjusting the volume
- Using the freeze function
- Using the on-screen display function
- Using the automatic setup function
- Using the screen adjustment function
- Using the digital zoom function
- Switching the image aspect ratio
- Using the presentation timer function
- Using the function button
- Displaying internal test pattern
- Using the status function
- Using the ECO management function
- Setting ID number of the remote control
- Chapter 4 Settings
- Menu navigation
- [PICTURE] menu
- [POSITION] menu
- [ADVANCED MENU] menu
- [DISPLAY LANGUAGE] menu
- [DISPLAY OPTION] menu
- [PROJECTOR SETUP] menu
- [PROJECTOR ID]
- [PROJECTION METHOD]
- [ECO MANAGEMENT]
- [LightID]
- [INITIAL STARTUP]
- [STARTUP INPUT SELECT]
- [DATE AND TIME]
- [SCHEDULE]
- [RS-232C]
- [REMOTE1 MODE]
- [FUNCTION BUTTON]
- [LENS CALIBRATION]
- [AUDIO SETTING]
- [FILTER COUNTER]
- [DC OUT]
- [STATUS]
- [DATA CLONING]
- [SAVE ALL USER DATA]
- [LOAD ALL USER DATA]
- [INITIALIZE]
- [SERVICE PASSWORD]
- [TEST PATTERN] menu
- [SIGNAL LIST] menu
- [SECURITY] menu
- [NETWORK/USB] menu
- Chapter 5 Operations
- Chapter 6 Maintenance
- Chapter 7 Appendix

Chapter 4 Settings — [NETWORK/USB] menu
140 - ENGLISH
[NETWORK/USB] menu
On the menu screen, select [NETWORK/USB] from the main menu, and select an item from the sub-menu.
Refer to “Navigating through the menu” (x page 80) for the operation of the menu screen.
f To use the wireless LAN function with the projector, it is necessary to attach the optional Wireless Module
(Model No.: ET-WM300).
For details on how to attach the optional Wireless Module (Model No.: ET-WM300), refer to “Attaching the
Wireless Module” (x page 51).
[DIGITAL LINK MODE]
Switch the communication method of the <DIGITAL LINK/LAN> terminal of the projector.
1) Press as to select [DIGITAL LINK MODE].
2) Press qw to switch the item.
f The items will switch each time you press the button.
[AUTO]
Switches the communication method automatically to DIGITAL LINK, long reach, or Ethernet.
[DIGITAL LINK]
Fixes the communication method to DIGITAL LINK.
[LONG REACH]
Fixes the communication method to long reach.
[ETHERNET]
Fixes the communication method to Ethernet.
Possible communication modes
l: Communication possible
―: Communication not possible
Setting
Communication possible
Video transfer
(100 m (328'1"))
Video transfer
(150 m (492'2"))
Ethernet RS-232C
[AUTO]
For DIGITAL LINK
l
―
l l
For long reach
―
l l l
For Ethernet
― ―
l
*1
―
[DIGITAL LINK]
l
―
l l
[LONG REACH]
―
l l l
[ETHERNET]
― ―
l
*1
―
*1 Communication via a twisted-pair-cable transmitter is not available. Connect the projector to the network directly.
Note
f The maximum transmission distance between the twisted-pair-cable transmitter and the projector is 100 m (328'1") for the signal with
resolution of 1 920 x 1 200 dots or less. For the signal with the resolution exceeding 1 920 x 1 200 dots, the maximum transmission distance
will be 50 m (164'1").
f The maximum transmission distance when connected with the long-reach communication method is 150 m (492'2"). In this case, the signal
that the projector can receive is only up to 1080/60p (1 920 x 1 080 dots, dot clock frequency 148.5 MHz).
f When the communication method of the twisted-pair-cable transmitter is set to long reach, the projector will connect with long-reach
communication method when [DIGITAL LINK MODE] is set to [AUTO]. To connect with the optional DIGITAL LINK Switcher (Model No.:
ET-YFB200G) with the long-reach communication method, set [DIGITAL LINK MODE] to [LONG REACH].
f Connection will not be made correctly if the twisted-pair-cable transmitter is not supporting the long-reach communication method even if
[DIGITAL LINK MODE] is set to [LONG REACH].
[DIGITAL LINK STATUS]
Display the DIGITAL LINK connection environment.
1) Press as to select [DIGITAL LINK STATUS].
2) Press the <ENTER> button.
f The [DIGITAL LINK STATUS] screen is displayed.
[LINK STATUS]
One of [NO LINK], [DIGITAL LINK], [LONG REACH], or [ETHERNET] is displayed.
[HDCP STATUS]
One of [NO SIGNAL], [OFF], or [ON] is displayed.