
User's Manual


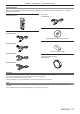


Table Of Contents
- Read this first!
- Chapter 1 Preparation
- Chapter 2 Getting Started
- Chapter 3 Basic Operations
- Switching on/off the projector
- Projecting
- Using the USB memory
- Operating with the remote control
- Using the shutter function
- Using the mute function
- Adjusting the volume
- Using the freeze function
- Using the on-screen display function
- Using the automatic setup function
- Using the screen adjustment function
- Using the digital zoom function
- Switching the image aspect ratio
- Using the presentation timer function
- Using the function button
- Displaying internal test pattern
- Using the status function
- Using the ECO management function
- Setting ID number of the remote control
- Chapter 4 Settings
- Menu navigation
- [PICTURE] menu
- [POSITION] menu
- [ADVANCED MENU] menu
- [DISPLAY LANGUAGE] menu
- [DISPLAY OPTION] menu
- [PROJECTOR SETUP] menu
- [PROJECTOR ID]
- [PROJECTION METHOD]
- [ECO MANAGEMENT]
- [LightID]
- [INITIAL STARTUP]
- [STARTUP INPUT SELECT]
- [DATE AND TIME]
- [SCHEDULE]
- [RS-232C]
- [REMOTE1 MODE]
- [FUNCTION BUTTON]
- [LENS CALIBRATION]
- [AUDIO SETTING]
- [FILTER COUNTER]
- [DC OUT]
- [STATUS]
- [DATA CLONING]
- [SAVE ALL USER DATA]
- [LOAD ALL USER DATA]
- [INITIALIZE]
- [SERVICE PASSWORD]
- [TEST PATTERN] menu
- [SIGNAL LIST] menu
- [SECURITY] menu
- [NETWORK/USB] menu
- Chapter 5 Operations
- Chapter 6 Maintenance
- Chapter 7 Appendix

Chapter 1 Preparation — Precautions for use
ENGLISH - 21
rAsk a qualied technician or your dealer for the installation work such as installing to
a ceiling, etc.
To ensure projector performance and safety, ask a qualied technician or your dealer when installing to a ceiling
or in a high place.
rAsk a qualied technician or your dealer to install the cable wiring for DIGITAL LINK
connection.
Image and sound may be disrupted if cable transmission characteristics cannot be obtained due to inadequate
installation.
rThe projector may not work properly due to strong radio wave from the broadcast
station or the radio.
If there is any facility or equipment which outputs strong radio waves near the installation location, install the
projector at a location sufciently far from the source of the radio waves. Or, wrap the LAN cable connected to the
<DIGITAL LINK/LAN> terminal using a piece of metal foil or a metal pipe which is grounded at both ends.
rFocus adjustment
The high clarity projection lens is thermally affected by the light from the light source, making the focus unstable in
the period just after switching on the power. It is recommended that images be projected continuously for at least
30 minutes before the focus is adjusted.
rDo not install the projector at an altitude of 2 700 m (8 858') or higher above sea level.
rDo not use the projector in a location that the ambient temperature exceeds 45 °C
(113 °F).
Using the projector in a location that the altitude is too high or the ambient temperature is too high may reduce the
life of the components or result in malfunctions.
rProjection in all 360° direction is possible.
360°
360°
360°
360° vertically 360° horizontally 360° tilted
(combination of vertical and horizontal)