
User's Manual
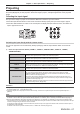
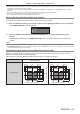
Table Of Contents
- Read this first!
- Chapter 1 Preparation
- Chapter 2 Getting Started
- Chapter 3 Basic Operations
- Switching on/off the projector
- Projecting
- Using the USB memory
- Operating with the remote control
- Using the shutter function
- Using the mute function
- Adjusting the volume
- Using the freeze function
- Using the on-screen display function
- Using the automatic setup function
- Using the screen adjustment function
- Using the digital zoom function
- Switching the image aspect ratio
- Using the presentation timer function
- Using the function button
- Displaying internal test pattern
- Using the status function
- Using the ECO management function
- Setting ID number of the remote control
- Chapter 4 Settings
- Menu navigation
- [PICTURE] menu
- [POSITION] menu
- [ADVANCED MENU] menu
- [DISPLAY LANGUAGE] menu
- [DISPLAY OPTION] menu
- [PROJECTOR SETUP] menu
- [PROJECTOR ID]
- [PROJECTION METHOD]
- [ECO MANAGEMENT]
- [LightID]
- [INITIAL STARTUP]
- [STARTUP INPUT SELECT]
- [DATE AND TIME]
- [SCHEDULE]
- [RS-232C]
- [REMOTE1 MODE]
- [FUNCTION BUTTON]
- [LENS CALIBRATION]
- [AUDIO SETTING]
- [FILTER COUNTER]
- [DC OUT]
- [STATUS]
- [DATA CLONING]
- [SAVE ALL USER DATA]
- [LOAD ALL USER DATA]
- [INITIALIZE]
- [SERVICE PASSWORD]
- [TEST PATTERN] menu
- [SIGNAL LIST] menu
- [SECURITY] menu
- [NETWORK/USB] menu
- Chapter 5 Operations
- Chapter 6 Maintenance
- Chapter 7 Appendix

Chapter 3 Basic Operations — Switching on/off the projector
ENGLISH - 65
Making adjustments and selections
It is recommended that images be projected continuously for at least 30 minutes before the focus is adjusted.
1) 8)
5)
6)
3)
3)
7) 9)
2)
1) 5) 7) 8) 9)
2)
4)
1) Press the <FOCUS> button to roughly adjust the focus of the projected image. (x page 68)
2) Change the setting of the [PROJECTOR SETUP] menu → [PROJECTION METHOD] depending on the
installation mode. (x page 36)
f Refer to “Navigating through the menu” (x page 80) for the operation of the menu screen.
3) Select the input by pressing the input selection button on the remote control or the control panel.
f The buttons that can be used on the remote control or the control panel are as follows.
Remote control:
<HDMI 1> button, <HDMI 2> button, <DIGITAL LINK> button, <RGB1/2> button, <VIDEO> button,
<NETWORK/USB> button
Control panel:
<INPUT SELECT> button
f For details of operation for input selection, refer to “Selecting the input signal” (x page 67).
4) Adjust the front, back and sideway tilt of the projector with the adjustable feet. (x page 48)
5) Press the <SHIFT> button to adjust the position of the projected image. (x page 68)
6) If the input signal is the analog RGB signal, press the <AUTO SETUP/CANCEL> button to
automatically adjust the projection position.
7) Press the <ZOOM> button to adjust the projected image size to match the screen.
8) Press the <FOCUS> button again to adjust the focus. (x page 68)
9) Press the <ZOOM> button again to adjust the zoom to match the projected image size to the screen.
Note
f When the projector is switched on for the rst time after purchase, or when the [PROJECTOR SETUP] menu → [INITIALIZE] → [ALL USER
DATA] is executed, the focus adjustment screen is displayed immediately after the projection is started, and then the [INITIAL SETTING]
screen is displayed. For details, refer to “When the initial setting screen is displayed” (x page 61).