
User's Manual


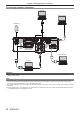


Table Of Contents
- Read this first!
- Chapter 1 Preparation
- Chapter 2 Getting Started
- Chapter 3 Basic Operations
- Switching on/off the projector
- Projecting
- Operating with the remote control
- Using the shutter function
- Using the mute function
- Adjusting the volume
- Using the freeze function
- Using the on-screen display function
- Using the auto setup function
- Using the screen adjustment function
- Using the digital zoom function
- Switching the image aspect ratio
- Using the presentation timer function
- Using the FUNCTION button
- Displaying internal test pattern
- Using the status function
- Using the ECO management function
- Setting the ID number on the remote control
- Chapter 4 Settings
- Chapter 5 Operation of Function
- Chapter 6 Maintenance
- Chapter 7 Appendix

Connecting example: Computers
Control computer
Computer
Computer
Control computer
USB Memory
Attention
f When connecting the projector to a computer or an external device, use the power cord supplied with each device and commercially
available shielded cables.
Note
f For the HDMI cable, use an HDMI High Speed cable that conforms to the HDMI standards. In addition, when 4K video signal is to be input,
please use HDMI cable that is compatible with 4K video signal. Images may be disrupted or may not be projected when a video signal
exceeding the supported transmission speed of the HDMI cable is input.
f If you operate the projector using the computer with the resume feature (last memory), you may have to reset the resume feature to operate
the projector.
f To output the signal input to the <COMPUTER 1 IN> terminal from the <COMPUTER 2 IN/1 OUT> terminal, set the [PROJECTOR SETUP]
menu
→ [COMPUTER2 SELECT] to [COMPUTER1 OUT].
38 - ENGLISH
Chapter 2 Getting Started - Connecting