
Operating Instructions


ENGLISH-15
Preparation
14-ENGLISH
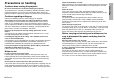
+ KEYSTONE buttons
(pages 28 and 29)
This button is used to correct
keystone distortion of the
projected image when the
projector position is tilted upward
or downward.
, NORMAL button
(page 27)
This button is used to reset the
projector adjustment values to the
factory default settings.
- ASPECT button
(page 30)
This button is used for aspect
adjustment (vertical and
horizontal proportions).
. MUTE button
(page 33)
This button momentarily stops
output of the projector’s built-in
speaker.
/ LIGHT button
This button is used to illuminate
the buttons on the remote control
unit.
0 FREEZE button
(page 36)
This button is used to
momentarily freeze projection so
that a still picture is displayed.
1 MODE PICTURE button
(page 32)
This button is to display the
PICTURE MODE menu.
2 MEMORY USER button
(page 36)
This button is to display the
MEMORY LOAD menu.
3 VOLUME +/- buttons
These buttons are used to adjust
the volume of the sound output
from the projector’s built-in
speaker.
4 SD button
(page 43)
This button is to select the SD
CARD screen.
5 SD MENU button
(page 43)
This button can be used to return
to a previous screen when SD
CARD screen is selected.
6 SD TIME button
(page 49)
This button is used to display or
clear the playing time when a
moving picture stored on the SD
card is played back.
# TEMP indicator
(page 51)
This indicator illuminates if an
abnormally high temperature is
detected inside the projector. If
the temperature rises above a
certain level, the power supply
will be turned off automatically
and the indicator will illuminate or
flash.
$ LAMP indicator
(page 52)
This indicator illuminates when it
is time to replace the lamp unit. It
flashes if a circuit abnormality is
detected.
% Power indicator
(pages 22 and 23)
This indicator illuminates red
when the main power is switched
on (Standby Mode), and it
illuminates green when projection
of an image begins.
& POWER button
(pages 22 and 23)
' MENU button
(page 24)
This button is used to display
menu screens. When a menu
screen is being displayed, it can
be used to return to a previous
screen or to clear the screen.
( Arrow (
FF
,
GG
,
II
and
HH
)
buttons
(page 26)
These buttons are used to select
and adjust items in the on-screen
menu screens.
) ENTER button
(page 26)
This button is used to accept and
to activate items selected in the
on-screen menus.
* Input select button
(INPUT/VIDEO/COMPONENT/
PC button) (page 22)
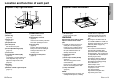
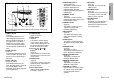
<Projector control panel and remote control unit>
*
+
'
(
&
1
2
3
456
)
0
,
-
.
/
#
$
%
&
'()
*
+
P
C
POWER
LIGHT
INPUT
ENTER
MENU
FREEZE
NORMAL
ASPECT
USER
MEMORY
VOLU ME
PICTURE
MODE
SD
MUTE
SD TIME
MENU
LCD PROJECTOR
V
I
D
E
O
C
M
P
N
T
COMPONENT
KEYSTONE
B The remote control unit and the projector itself have the same control
buttons available.