
User Manual


Maintenance/replacement
ENGLISH -
63
Maintenance
J
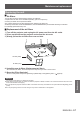
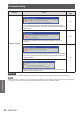
Replacing the Lamp unit
Attention
When the projector is mounted on a ceiling, do not work with your face close to the projector.
z
Attach the lamp unit and the lamp cover securely.
z
When you experience difculty in installing the lamp, remove it and try again. If you use force to install the lamp, the
z
connector may be damaged.
Turn off the Power by following the procedure in "Powering off the projector". 1 )
(
Æ
page 32). Unplug the AC power cord. Wait at least 1 hour and make sure the lamp
unit and surroundings are cool.
Use a Phillips screwdriver to loosen the two lamp cover screws and open the lamp 2 )
cover with grabbing the lamp cover screws.
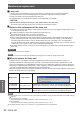
Use a Phillips screwdriver to loosen the two lamp unit screws until the screws turn 3 )
freely. Hold the used lamp unit by its base, and pull it gently from the projector.
Insert the new lamp unit in correct direction. Tighten the two lamp unit screws 4 )
securely with a Phillips screwdriver.
Close the lamp cover, and tighten the two Lamp cover screws securely with a Phillips 5 )
screwdriver.
When installing the lamp cover, make sure the lamp cover falling-prevention rubber not be clamped.
z
Reset the Lamp Hours Used
J
After replacing the lamp unit, make sure to reset the usage time in the [Clear Lamp Hours] menu. (
Æ
page 48)
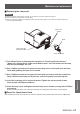
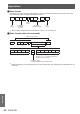
Lamp cover
screws
Lamp unit screws
Base
Lamp cover fall-
prevention rubber