
Instruction Manual


53
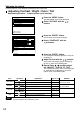
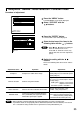
PICTURE
PICTURE MODE STANDARD
COLOR 50
TINT 30
COLOR TEMP. STANDARD
GAMMA STANDARD
CONTRAST 32
BRIGHT 32
SHARPNESS 6
NOISE REDUCTION 2
AI CONTROL OFF
:MENU SELECT
:CHANGE
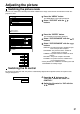
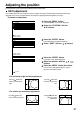
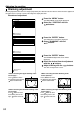
Press the “MENU” button.
The MAIN MENU screen will be displayed
Select “PICTURE” with the
buttons.
MAIN MENU
PICTURE
POSITION
LANGUAGE
OPTION
TEST PATTERN
SIGNAL LIST
Press the “ENTER” button.
The PICTURE screen will be displayed.
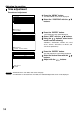
Select “COLOR TEMP.” with the
buttons.
Select the desired setting from below
with the buttons.
“LOW”, “MIDDLE”, “HIGH”, “DYNAMIC” and
“USER”, “STANDARD”, “NATURAL”, “CINEMA”,
“GRAPHIC”
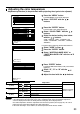
WHITE BALANCE
WHITE BALANCE HIGH
WHITE BALANCE LOW
:MENU SELECT
ENTER:SUB MENU
<To further adjust toward the desired white balance>
Select “USER” in Step .
Press the “ENTER” button.
Select “WHITE BALANCE HIGH” or
“WHITE BALANCE LOW” with the
buttons.
• All colors will not be displayed properly unless adequate adjustment is made.
If the adjustment is not successful, press “STD” (standard) button when the individual adjustment
screen is displayed to restore the factory default setting only for the displayed item.
• The color temperature cannot be adjusted for the internal test pattern (refer to page 82). Be sure to
project the input signal when adjusting the color temperature.
• If the color matching is set to “USER”, the color temperature will be fixed to “USER”.
Note
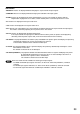
Press “ENTER” button.
The WHITE BALANCE HIGH (LOW) screen will be
displayed.
Select “R”, “G” or “B” with the
buttons.
Adjust the level with the buttons.
R (Red)
Deepens red.
Weakens red.
Deepens green.
Weakens green.
Deepens blue.
Weakens blue.
G (Green)
B (Blue)
Maximum value 255
Minimum value 0
WHITE BALANCE HIGH
R 255
G 255
B 255
:MENU SELECT
:ADJUST
Press button
Press button
Item Adjustment RemarksOperation
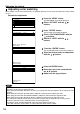
Adjusting the color temperature
Adjustment procedure (to be performed while projecting the signals to be adjusted)
Press button
Press button
Press button
Press button