Initial Setup Combination VCR Operating Instructions PV-C2022/PV-C2032W Basic Operation Model No. TV Operation As an ENERGY STAR® Partner, Matsushita Electric Corporation of America has determined that this product or product model meets the ENERGY STAR® guidelines for energy efficiency. LSQT0517A_01p09.p65 1 11/12/2001, 12:02 PM LSQT0517A Please read these instructions carefully before attempting to connect, operate, or adjust this product. Please save this manual.
Important Safeguards and Precautions READ AND RETAIN ALL SAFETY AND OPERATING INSTRUCTIONS. HEED ALL WARNINGS IN THE MANUAL AND ON UNIT INSTALLATION An outside antenna or cable system must be properly grounded to provide some protection against built up static charges and voltage.
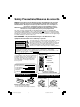
Safety Precautions/Mesures de sécurité Warning : To prevent fire or shock hazard, do not expose this equipment to rain or moisture. Caution : To prevent electric shock, match wide blade of plug to wide slot, fully insert. Avertissement : Afin de prévenir tout risque d’incendie ou de chocs électriques, ne pas exposer cet appareil à la pluie ou à une humidité excessive.
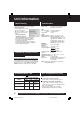
Unit Information Specifications Head Cleaning Playing older or damaged tapes may eventually cause video heads to become clogged. Head Clog Sensor During playback this screen appears if clogging is V I DEO HEADS MAY detected. To remove screen, NEED CLEAN I NG PL EASE I NSERT HEAD press PLAY on the remote CLEAN I NG CASSETTE OR REFER TO MANUAL or unit. • Use “dry” type head END : PLAY KEY cleaning cassette only. (Part No. NV-TCL30PT is recommended.) • Follow cleaning tape directions carefully.
Table of Contents Initial Setup Important Safeguards and Precautions / Safety Precautions .... 2,3 Before Using ....................................................................................... 4 Unit Information ................................................................................. 4 Table of Contents ................................................................................ 5 Location of Controls ...........................................................................
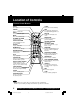
Location of Controls Remote Control Buttons EJECT SLEEP Ejects tape. Turns off the unit automatically. POWER NITE Turn on or off the unit. Color and picture intensity level are adjusted during night time use. FM/TV Receives FM radio signal. DISPLAY MUTE Displays the VCR status and clock. Mutes the sound instantly. RAPID TUNE CHANNEL UP/DOWN Displays the last channel you were watching. Selects a channel. SELECT UP/DOWN Control navigation around on-screen menu.
Front View of the Unit and Indicators Initial Setup POWER VOL CH STOP/EJECT REW/ PLAY/REPEAT FF/ REC TIMER/FM REC ON TIMER PROG TIMER VIDEO IN AUDIO IN ACTION Built-In Speaker PHONES Jack Connect an earphone or headphones. AUDIO VIDEO IN Jack For dubbing. REWIND/SEARCH See previous page. POWER ACTION Press together with STOP. PROG TIMER Indicator VOLUME UP/DOWN SET/BACK SPACE PLAY See previous page. REPEAT Lights when the unit is set for Timer Recording. See previous page.
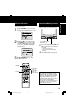
Connections/ Initial Setup (Ready to Play) Please make all cable or antenna connections before powering on. How to Connect Connecting For ANT./Cable Connect the cable from Antenna/ Cable to the VHF/UHF terminal on the unit. IN from ANT./CABLE VHF/UHF VHF/UHF For DSS/Cable Box Connect the OUT jack on your cable box to the VHF/UHF terminal on the unit with a RF cable. VHF/UHF UNIT Cable TV Converter Box VHF/UHF WARNING: Overtightening "Nut type" RF coaxial cables may damage jacks. Finger tighten only.
Reset all unit Memory Functions 1 Press ACTION on the Remote to display SET CLOCK Menu screen. Initial Setup Manual Clock Set If AUTO CLOCK SET was incomplete, manually set the clock as follows. When moving unit to a new location, or if a mistake was made in the Initial Setup section. • Make sure a tape is not inserted in the unit.
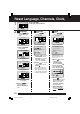
Reset Language, Channels, Clock, 1 Press ACTION M A I N MENU TV VCR LANGUAGE CH CLOCK EX I T to display MAIN MENU. SELECT : SET : ACT I ON 2 Language Clock Channels 1) Press select “CH.” 1) Press to select language icon. to 1) Press to select “CLOCK.” M A I N MENU M A I N MENU M A I N MENU TV VCR LANGUAGE CH CLOCK EX I T TV VCR LANGUAGE CH CLOCK EX I T SELECT : SET : ACT I ON SELECT : SET : ACT I ON 2) Press ACTION.
Clock, Time Zone Adjust POWER 1) Press to select “CLOCK.” NUMBER Keys Time Zone Adjust ACTION Basic Operation (Only when Auto Clock is set.) SELECT/SET :CH UP :CH DOWN :VOL UP :VOL DOWN M A I N MENU ADD/DLT TV VCR LANGUAGE CH CLOCK EX I T SELECT : SET : ACT I ON 2) Press ACTION.
Playback a Tape Ready Check List All connections are made. Your unit is plugged in. 1 Insert a cassette. • The unit power comes on automatically. Record tab To prevent tape jam, remove loose or peeling labels from tapes. 2 Record On a Tape 1 2 3 Insert a cassette with record tab. • The unit power comes on automatically. Press CH or number keys to Select Channel. • For “LINE” input, see bottom of next page. Press SPEED to select recording speed (see page 4).
Copy Your Tapes (Dubbing) Connections you’ll need to make. Recording (Editing) unit Playing (Source) VCR AUDIO VIDEO OUT IN FROM ANT. OUT TO TV Recording (Editing) unit Playback (Source) 1 2 3 Insert blank tape with record tab. Insert prerecorded tape. • Dubbing tapes protected with Copy Guard will have poor quality results. Our Vacation Select “LINE” mode. See “Selecting Input Mode” below.
TV Operation 1 2 Press POWER on the remote or unit. Ready Check List All connections are made. Your unit is plugged in. 08 ABC 3 Use CH or number keys to select a channel. Press VOL + or VOL - to adjust volume. 24 VOL + / VOL- NIGHT (NITE) Mode POWER VOL CH STOP/EJECT REW/ PLAY/REPEAT FF/ AUDIO IN ACTION Color and picture intensity levels are adjusted so the screen is easier on your eyes during night time use.
Picture Adjustment 1 2 Press ACTION to display MAIN MENU.
TV Timer Features ON-TIMER with Alarm This unit can be set to automatically power on in one of 2 modes (TV, Playback, or FM radio). You can also combine the On-Timer with a one minute alarm that gradually increases in volume. 1 2 Ready Check List The clock is set to correct time. Press PROG to display SET PROGRAM screen. SET T I MER ON T I MER SLEEP T I MER : 00 SELECT : SET : SET END : T I MER 3 ON T I MER 6:--AM CH -ALARM : ON SELE CT HOUR SELECT : SET : END : PROG 1)Press to select “ON TIMER.
Sleep Timer SLEEP This unit can be set for auto power off. DISPLAY Press SLEEP repeatedly to set SLEEP TIMER. SLEEP TIMER 30 • Pressing DISPLAY with sleep timer set displays remaining time. SLEEP TIMER 60 SELECT/SET :CH UP :CH DOWN :VOL UP :VOL DOWN SLEEP TIMER 90 Press SLEEP repeatedly until “SLEEP TIMER 00” appears to cancel. SLEEP TIMER 00 PROG ADD/DLT Instant Alarm 1 2 1:00 (one minute) 2:00 3:00 Press TIMER on the unit to display the instant alarm CANCEL/SET screen.
Closed Caption System Closed Caption is ... This multi-use system not only allows the hearing impaired to enjoy selected programs, but also makes useful information from TV stations available to everyone. Closed Caption Mode Feature 1 2 Press ACTION to display MAIN MENU.
Caption On Mute Feature Closed Caption narration, if available, is displayed when MUTE button is pressed for silence. MUTE ACTION Press ACTION to display MAIN MENU. M A I N MENU TV VCR LANGUAGE CH CLOCK EX I T SELECT : SET : ACT I ON 3 4 SET UP TV LOCK CA CAPT PT I ON N I NPUT SELECT V I DEO ADJUST FM ANTENNA SELECT : SET : END : ACT I ON : TUNER :EXT CAPT I ON CAPT I ON MODE CAPT CC ON MUTE : OFF : CAP C1 SELECT : SET : SET END : ACT I ON 5 1) Press to select “CAPTION”.
FM Radio FM Radio is ... This unit has an FM radio with built-in antenna, 9 station preset, and a band range of 87.5 ~ 108.1 MHz. You can even set the On-Timer (page 16) to wake up to your favorite radio station. FM Radio Setup 1 2 3 FM ANTENNA Setup Press FM/TV on the remote or press TIMER/FM twice on the unit to display FM radio mode. 1 2 : 0 0PM FM 1 87. 5MHz 1 2 : 0 0PM FM 1 8 7. 7MHz MEMORY : PUSH ADD / DLT KEY Press a number key (1~9) to select the FM number.
Using FM Radio 1 2 POWER VOL CH STOP/EJECT REW/ PLAY/REPEAT FF/ Press FM/TV on the remote or press TIMER/FM twice on the unit to display FM radio mode. 1 2 : 0 0PM FM 1 REC TIMER/FM TIMER REC ON TIMER PROG TIMER VIDEO IN AUDIO IN ACTION TIMER/FM 87. 5MHz To cancel, press FM/TV on the remote or TIMER/FM twice on the unit. FM/TV CH / ACTION SELECT/SET :CH UP :CH DOWN :VOL UP :VOL DOWN NUMBER Keys ADD/DLT Notes • FM radio cannot be recorded on a Video cassette.
Timer Recording You can set up to 8 programs to be recorded while you are away. 1 2 Press PROG to display SET PROGRAM screen. 1) Press SET PROGRAM T I MER PROGRAMMING ON TIMER DATE START 2) Press to display screen. • If a program is already in memory, press , and to select an unused program number. Press to select and or to set the recording DATE.
Cancel a Timer Recording: (Recording is in progress) Hold down STOP for a few seconds to cancel the Timer Recording. • Any future daily or weekly recordings will be performed as programmed. Review, Replace or Clear Program Contents : (Recording is not in progress) 1 2 Repeat steps 1 and 2 on page 22. P 1 2 3 4 DT START STOP CH SPD day 9 : 00 00p 12 : 00 00a 08 SP 8 10 : 00a 12 : 00p 125 SP 10 8 : 00p 9 : 00p 10 SP SU 9 : 00p 10 : 00p L LP Press to select the desired program.
Tape Operation Search System is ... Each time a recording is made, an invisible index mark is placed on the tape. When timer recordings are made, program index and information are also included. These index marks can be used to access or scan recordings. Program End Search Index Search Go directly to the desired recording. 1 Locates end point of recording for continuity. Press SEARCH* in Playback or Stop mode to display INDEX SEARCH screen, and then press NUMBER Keys to select the recording number.
Auto Operation Functions ■ Auto Shut Off No broadcast signal in TV (Only when Weak Signal Display is set to OFF), blank tape is Played for 5 minutes => Power turns off • This feature is canceled if any button is pressed during above mode. ■ Auto Playback Insert a tape in Power off mode => Power turns on • Playback begins if tape has no record tab.
Tape Operation (continued) Zero Search Repeat Play To quickly return to a specific tape counter location. Set to see a recording over and over. 1 2 1 2 Press DISPLAY during playback to display the Counter. 0 : 00 : 00 BEG I N 3 4 5 Press COUNTER RESET at the desired position to reset to “0:00:00.” Continue playback, rewind, or fast forward. Press STOP. 3 TV VCR LANGUAGE CH CLOCK EX I T END • Unit goes into FF or REW mode and stops at the last point the Counter was set to 0:00:00.
Special VCR Features Weak Signal Display ON/OFF When “ON” is selected, the picture is displayed even when a broadcast signal is weak or non-existent. DISPLAY SELECT/SET :CH UP :CH DOWN :VOL UP :VOL DOWN 1 2 Press ACTION to display MAIN MENU. M A I N MENU TV VCR LANGUAGE CH CLOCK EX I T SELECT : SET : ACT I ON ACTION CM/ZERO COUNTER RESET 3 SET UP CHANNEL ANTENNA : CABLE AUTO SET CHANNEL CAPT I ON WEAK EAK S I GNAL D I SPLAY : OFF SELECT : SET : : ACT I ON END 1) Press to select “CH.
Special VCR Features (continued) Channel Caption is ... Station names, e.g. ABC, TNN, etc. are set so they will appear when a channel is selected. Choose 24 preset names. Channel Caption 1 2 Press ACTION to display MAIN MENU.
V-Chip Control Feature Process of V-Chip Control Feature Enter Code Setup Blocking V-Chip Control Feature is... This unit has a built-in V-Chip Control which allows you to block unwanted TV usage based on US MOVIES and US TV PROGRAMS Ratings. Enter Secret Code A 4-digit code must be entered to view a blocked program or change rating settings. 1 2 Press ACTION to display MAIN MENU. M A I N MENU TV VCR LANGUAGE CH CLOCK EX I T SELECT : SET : ACT I ON 1) Press to select “TV.
V-Chip Control Feature (continued) If LOCK menu is not displayed, do “Enter Secret Code” steps on page 29. Setup US MOVIES Ratings 1 LOCK US MOVIES : OFF CHANGE SETT I NGS : OFF US TV PROGRAMS CHANGE SETT I NGS NEXT PAGE SELECT : SET : : ACT I ON END 1) Press to select US MOVIES. 2) Press to set “ON” or “OFF.” ■ “ON” => V-Chip Control is activated. ■ “OFF” => V-Chip Control is deactivated.
Process of V-Chip Control Feature Enter Code Setup Blocking US MOVIES RATINGS Blocking Message • If a program or CH08 movie exceeds the ratings you have PROGRAM RAT I NG EXCEEDED set, a message will RAT I NG : PG-1 3 ACCESS CODE ---appear on a black ENTER : 0-9 background and sound is muted. To View a Blocked Program / Movie [Temporarily Deactivate V-Chip Control] Enter your secret code (ACCESS CODE) in the Blocking Message screen.
On-Screen Display (OSD) VCR Status & Clock Display Press DISPLAY to display or remove the overlay. Channel Caption (See page 28.) Function Status Current Time Rec Time Remaining (OTR mode only, see page 12.) REC 0 : 25 Counter ABC 1 2 : 0 0PM -0 : 1 2 : 3 4 SP Blue Screen Display Whenever a blank section of a tape comes up in Play mode, or when the selected channel has no broadcast signal with the Weak Signal Display set to “OFF” (see page 27), the screen will turn solid blue.
Before Requesting Service Check the following points once again if you are having trouble with your unit. Power Correction No power… • Completely insert Power Plug into an AC outlet. • Set POWER button to ON. Monitor Correction No picture or sound... Poor picture with normal sound... • • • • Poor sound with normal picture... Poor TV reception... No color or poor color... Ghost (multiple) images... TV programs cannot be watched... Channel cannot be selected...
Servicenter List For Product Information, Operating Assistance, Literature Request, Dealer Locations, and all Customer Service inquires please contact: 1-800-211-PANA(7262), Monday-Friday 9am-9pm Saturday-Sunday 9am-7pm, EST. or send e-mail : consumerproducts@panasonic.com Web Site: http://www.panasonic.com You can purchase parts, accessories or locate your nearest servicenter by visiting our Web Site.
Limited Warranty Panasonic Consumer Electronics Company, Division of Matsushita Electric Corporation of America, One Panasonic Way Secaucus, New Jersey 07094 Panasonic Sales Company, Division of Matsushita Electric of Puerto Rico, Inc. AVE. 65 de Infantería, Km. 9.
Spanish Quick Use Guide/Guía para rápida consulta Connexiones/Configurcion Inicial Conecte por favor todas las conexiones del cable o de la antena antes de turing potencia. Conectando el cordon AC de la VCR en toma de pared iniciara automaticamente la busqueda de canales y colocacion de tiempo Conectando Para Ant./Cable Conecte Ant./Cable a la entrada de antena de la TV (VHF/UHF).
Operaciones básicas para la reproducción 1 2 ■ ■ ■ ■ ■ ■ ■ ■ Inserte un casete. • El videograbador combinado se enciende automáticamente. Presione PLAY. • La reproducción comienza automáticamente si el casete no tiene la lengüeta para prevención de grabación.
LSQT0520_76p80 9/21/01 11:05 AM Page 1 NOTES
LSQT0520_76p80 9/21/01 11:05 AM Page 1 NOTES
INDEX A B C D E F H I L P Q R S T U V W Z Phones .................................................. 14 Playback ............................................... 12 Picture Adjustment ................................ 15 Program End Search ............................ 24 Quality Picture ......................................... 4 Rapid Tune ............................................ 14 Rec(ord) ................................................ 12 Record/Playback Speed Settings .............