
Operating instructions


-1 2-
Check the following points once again if you are having trouble with your unit.
(BO: refers to “Basic Operations” Instruction book.)
(AO: refers to “Advanced Operations” Instruction book.)
If you cannot resolve the problem, please call the Customer
Call Center for product
assistance at 1-800-211-PANA(7262).
To locate an authorized servicenter, please call toll free 1-800-211-PANA(7262)
or, contact us via the web at:http://www.panasonic.com/contactinfo.
Power CORRECTION
No power…
Completely insert Power Plug into an AC outlet.
Set POWER button ON.
Monitor CORRECTION
No picture or sound...
Make sure your antenna system (TV or CABLE) is correctly set.
(AO p. 10)
Completely insert Power Plug into an AC outlet.
Set POWER button to ON.
Poor picture with normal
sound...
Adjust BRIGHTNESS, SHARPNESS, and PICTURE controls in
the SET UP TV menu. (AO p. 2)
Poor sound with normal
picture...
Adjust VOLUME control. (BO p. 6)
Poor TV reception...
Adjust SHARPNESS and PICTURE controls in the SET UP TV
menu. (AO p. 2)
No color or poor color...
Adjust TINT and COLOR controls in the SET UP TV menu.
(AO p. 2)
Ghost (multiple) images... Install a directional antenna.
TV programs cannot be
watched...
Make sure the selected channel is in unit’s memory. (AO p. 10)
Channel cannot be selected... Only the channel being recorded can be viewed on this unit.
VCR CORRECTION
TV program cannot be
recorded...
Make sure your antenna system (TV or CABLE) is correctly set.
(AO p. 10)
Make sure cassette record tab is intact. (BO p. 4)
Timer recording cannot be
performed…
Check that clock is set to current time and date.
Make sure DSS/CABLE box (if used) is left on and tuned to
channel to be recorded.
Set recording Start/Stop times correctly. (BO p. 7)
Timer recording may not be performed or continued if a power
interruption of more than 1 minute occurs before or during a Timer
Recording, even after power is restored.
No playback picture, or the
playback picture is noisy or
contains streaks...
Adjust TRACKING control in either direction. (BO p. 4)
Try Head Cleaning. (BO p. 4)
VCR cannot be controlled...
Make sure VCR LOCK is set to off. (AO p. 5)
Make sure unit is not in a Timer Record operation.
Remote Control CORRECTION
Unit cannot be controlled...
Aim remote at remote sensor on unit (BO p. 9) so that signal is
unobstructed.
Inspect the remote batteries. (BO p. 4)
Make sure VCR LOCK is set to off. (AO p. 5)
Exposing unit remote sensor to direct Àuorescent or outdoor light
may cause signal interference.
ACTION and PROG buttons
cannot be selected...
Check remote batteries.
Miscellaneous CORRECTION
Video cassette cannot be
inserted...
Insert the cassette window side up; record tab facing you.
Video cassette cannot be
removed...
Completely insert Power Plug into an AC outlet.
Tape cannot be ejected or
inserted...
Try ejecting or inserting the tape again after turning POWER off,
then back on.
Video cassette ejects when a
recording is started, or the
power is turned off for timer
recording...
Make sure cassette record tab is intact. (BO p. 4)
In Stop mode, the VCR motor
(CYLINDER) continues to
rotate...
To enable Quick Play mechanism, the VCR cylinder will rotate for
about 3 minutes. This reduces response time from Stop to Play
mode and from Play to Rewind Search mode.
VCR cannot be controlled... Make sure VCR LOCK is set to off. (AO p. 5)
Before Requesting Service
Warning and Instruction Displays Before Requesting Service
-1 1-
Warning and Instruction Displays
These displays will alert you to a missed operation or provide further instructions.
OSD CAUTION Page
PLEASE SET CLOCK BY
PRESSING ACTION KEY
If you attempt to set or review a Timer
Recording, or set the On-Timer and the Clock is
not set...
See page 7 of Basic
Operations and see page
2 of Advanced Operations
book.
CHECK CASSETTE
RECORD TAB
If you press REC, and a cassette is inserted
with no record tab...
See pages 4 and 7 of
Basic Operations book
TO CANCEL TIMER REC
HOLD DOWN STOP KEY
FOR APPROX 3 SEC
If you press STOP during a Timer Recording...
See page 7 of Basic
Operations book
NO CASSETTE
If you press PLAY, FF, REW, or REC without a
cassette inserted...
PLEASE PREPARE
FOR TIM ER REC
If the unit is not in Stop mode, or cassette is not
inserted, or cassette has no record tab, or tape
is at its end two minutes before a Timer
Recording is about to begin...
VIDEO HEADS MAY
NEED CLEANING
PLEASE INSERT HEAD
CLEANING CASSETTE
OR REFER TO MANUAL
END: PLAY
If head cleaning becomes necessary while
playing back a tape...
See page 4 of Basic
Operations book
VCR LOCK ACTIVATED
If you press a function button other than
STOP/EJECT or POWER while the unit is in
VCR Lock mode...
See page 5
-10-
Language Channels Clock
Time Zone Adjust
and press Ź
repeatedly to
select mode.
(“TIME ZONE ADJUST”
appears only when auto
clock is set.)
(Only when Auto Clock
is set.)
Press ACTION to display MAIN MENU.
0
+
1
-
1
Add or Delete a Channel
■ To add channel
Select channel with number keys and press
ADD/DLT.
■ To delete channel
Select channel with CH Ÿź or number keys
and press ADD/DLT.
MAIN MENU
TV LOCK LANGUAGE
CH CLOCK EXIT
SELECT:
SET :ACTION
1
Press ŸźŻ Ź
to select
“LANGUAGE.”
MAIN MENU
TV LOCK LANGUAGE
CH CLOCK EXIT
SELECT:
SET :ACTION
2
Press ACTION
repeatedly.
For Spanish
MENU PRINCIPAL
TV BLOQUEO IDIOMA
CANAL RELOJ SALIR
ELEGIR:
FIJAR :ACTION
For French
MENU
TELE BLOCAGE LANGUE
CANAL HORLOGE SORTIE
SEL. :
REGLER:ACTION
For English
MAIN MENU
TV LOCK LANGUAGE
CH CLOCK EXIT
SELECT:
SET :ACTION
3
Press ŸźŻ Ź
to select
“EXIT,” and
press ACTION
to exit.
1
Press ŸźŻ Ź
to select “CH,”
and press
ACTION.
MAIN MENU
TV LOCK LANGUAGE
CH CLOCK EXIT
SELECT:
SET :ACTION
2
Press Ÿź to
select
“ANTENNA,”
then press Ź to
set your
antenna system
(“TV” or
“CABLE”).
SET UP CHANNEL
ANTENNA : TV
AUTO SET
WEAK SIGNAL DISPLAY:ON
SELECT: SET:
END :ACTION
3
Press Ÿź to
select “AUTO
SET,” then
press Ź.
• After Channel Auto
Set is ¿nished,
Clock Auto Set will
be performed. (If
clock is set
manually, Clock
Auto Set will not be
performed.)
1
Press ŸźŻ Ź to select “CLOCK,”
and press ACTION.
MAIN MENU
TV LOCK LANGUAGE
CH CLOCK EXIT
SELECT:
SET :ACTION
2
Press Ÿź to
select
“MANUAL” or
“AUTO CLOCK
SET” and
press Ź.
SET CLOCK
AUTO CLOCK SET
MANUAL
TIME ZONE ADJUST : 0
SELECT: SET:
END :ACTION
3
Press Ÿź and
press ŻŹ to
select and set
the month,
date, year,
time, and DST
(Daylight
Saving Time).
(If select “MANUAL”)
SET CLOCK
1/ 4/2004 SUN 12:00AM
DST:ON
-----------------------
SELECT: SET:
START :ACTION
4
Press ACTION
twice to start
the clock and
exit this mode.
2
Press Ÿź to
select “TIME
ZONE
ADJUST,”
SET CLOCK
AUTO CLOCK SET
MANUAL
TIME ZONE ADJUST : 0
SELECT: SET:
END :ACTION
3
Press ACTION
twice to exit.
CHANNEL 08 ADDED
CHANNEL 08 DELETED
Reset Language, Channels, Clock, Time Zone Adjust
Copy Your Tapes (Dubbing) Reset Language, Channels, Clock, Time Zone Adjust
-9-
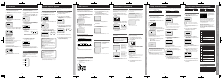
Copy Your Tapes (Dubbing)
Unauthorized exchanging and/or copying of copyrighted recordings may be copyright infringement.
Connections you’ll need to make.
Playback (Source) Recording (Editing) unit
(Perform operation of steps 4 and 5 on both units at same time.)
STOP
Recording (Editing) unit
OUT
IN
AUDIO
AUDIO INVIDEO IN
IN FROM ANT.
OUT TO TV
VID EO
Playing (Source) VCR
IMPORTANT
1
Insert pre-recorded tape.
3
Press PLAY then PAUSE at starting
point to put in Standby mode.
4
Press PLAY to start dubbing.
5
Press STOP to stop dubbing.
1
Insert blank tape with record tab.
• Dubbing tapes protected with Copy Guard will have
poor quality results.
2
Select “LINE” mode.
• See “Selecting Input Mode” (p. 6 of Basic Operations
book.)
3
Press REC, then PAUSE/SLOW
immediately to put in Standby mode.
4
Press PAUSE/SLOW to start dubbing.
5
Press STOP to stop dubbing.
-8-
Panasonic Consumer Electronics Company,
Division of Matsushita Electric Corporation of America
One Panasonic Way Secaucus,
New Jersey 07094
Panasonic Sales Company (“PSC”),
Division of Matsushita Electric of Puerto Rico, Inc.
Ave. 65 de Infanteria. Km. 9.5
San Gabriel Industrial Park, Carolina, Puerto Rico 00985
Printed in Indonesia
LSQT0768 B
S0104-1034
P
Please read these instructions carefully before attempting to connect,
operate, or adjust this product. Please save this manual.
As an
E
NERGY
S
TAR
®
Partner,
Matsushita Electric Corporation of Amer ica has de termined
that this prod uct or product mod el meets the
E
NERGY
S
TAR
®
guidelines for en ergy ef ¿ciency.
Models No. PV-C1324/PV-C1334W/
PV-C2024
Combination VCR
Operating Instructions
(Advanced Operations)
For Basic operations, see the separate
“Basic Operations” instruction book.
This operating instruction book is designed for use with models
PV-C1324, PV-C1334W and PV-C2024. Illustrations in this manual show
the PV-C2024.
LSQT0768 B
For assistance, please call : 1-800-211-PANA(7262) or, contact us via the web at: http://www.panasonic.com/contactinfo
Table of Contents
TV Features.......................................................................................................2
Closed Caption System .....................................................................................3
VCR Features ....................................................................................................4
V-Chip Control Features....................................................................................6
Copy Your Tapes (Dubbing) ..............................................................................9
Reset Language, Channels, Clock, Time Zone Adjust....................................10
Warning and Instruction Displays .................................................................... 11
Before Requesting Service..............................................................................12