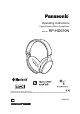
Operating Instructions Digital Wireless Stereo Headphones Model No. RP-HD610N Thank you for purchasing this product. Please read these instructions carefully before using this product, and save this manual for future use.
Safety precautions ∫ Unit WARNING: To reduce the risk of fire, electric shock or product damage, • Do not expose this unit to rain, moisture, dripping or splashing. • Do not place objects filled with liquids, such as vases, on this unit. • Use the recommended accessories. • Do not remove covers. • Do not repair this unit by yourself. Refer servicing to qualified service personnel. Avoid the use in the following conditions • High or low extreme temperatures during use, storage or transportation.
About Bluetooth® Panasonic bears no responsibility for data and/or information that is compromised during a wireless transmission. ∫ Frequency band used This unit uses the 2.4 GHz frequency band. ∫ Certification of this unit • This unit conforms to frequency restrictions and has received certification based on frequency laws. Thus, a wireless permit is not necessary. • The actions below are punishable by law in some countries: – Taking apart/modifying this unit. – Removing specification indications.
Table of contents Safety precautions ...................................................................................................................................... 2 About Bluetooth® ......................................................................................................................................... 3 Before use Accessories .................................................................................................................................................
Before use Expressions used in this document • Pages to be referred to are indicated as “l ±±”. • The product illustrations may differ from the actual product. Accessories Please check and identify the supplied accessories. 1 x USB charging cord 1 x Detachable cord 1 x Carrying case 1 x Airplane adaptor Maintenance Clean this unit with a dry and soft cloth. • Do not use solvents including benzine, thinner, alcohol, kitchen detergent, a chemical wiper, etc.
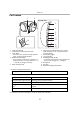
Before use Part names 1 2 Right (R) side 3 4 5 6 11 7 8 12 9 10 1 2 3 4 Audio input terminal Ambient sound enhancer sensor panel Action button 6 • This allows you to operate the Google Assistant. (l 13, “Using the Google Assistant”) 7 8 9 Multiple functions button • You can perform a wide variety of operations by pressing this button or moving it toward the “+” or “−” side.
Preparation Charging The rechargeable battery (installed in the unit) is not charged initially. Charge the battery before using the unit. Connect this unit to a computer using the USB charging cord. C A: Power/pairing LED B: USB charging cord (supplied) • Check the direction of the terminals and plug in/out straight holding onto the plug. (It may result in malfunction by the deforming of the terminal if it is plugged in obliquely or in wrong direction.
Preparation Connecting a Bluetooth® device Preparation • Place the Bluetooth® device within approx. 1 m from the unit. • Check the device operation using its operation instructions as required. Pairing (Registration) this unit with the Bluetooth® device for connection When using the Google Assistant, refer to “Using the Google Assistant” (l 13) before performing the following settings. 1 In the power-off state, press and hold [Í/I ( )] of this unit until the power/pairing LED blinks.
Preparation Connecting a paired Bluetooth® device 1 Turn on this unit. • Press and hold [Í/I ( )] of this unit for approx. 3 seconds until the power/pairing LED (blue) blinks. • A beep will sound, and the power/pairing LED (blue) will blink slowly. 2 Perform steps 2 and 3 of “Pairing (Registration) this unit with the Bluetooth® device for connection”. (l 8) • When the power/pairing LED (blue) blinks twice every approx. 2 seconds, pairing (registration) is completed.
Operation Listening to music If the Bluetooth® compatible device supports the “A2DP” and “AVRCP” Bluetooth® profiles, music can be played back with remote control operations on the unit. • A2DP (Advanced Audio Distribution Profile): Transmits audio to the unit. • AVRCP (Audio/Video Remote Control Profile): Allows remote control of the device using the unit. 1 Connect the Bluetooth® device and the unit. (l 8, “Connecting a Bluetooth® device”) 2 Select and play the music on the Bluetooth® device.
Operation Making a phone call With Bluetooth® enabled phones (cell phones or smartphones) that support the “HSP” or “HFP” Bluetooth® profile, you can use the unit for phone calls. • HSP (Headset Profile): This profile can be used to receive monaural sounds and establish two-way communication using the microphone on the unit. • HFP (Hands-Free Profile): In addition to the HSP functions, this profile has the incoming and outgoing calls function.
Operation Using noise cancelling While using the noise cancelling function, changes the volume and sound quality. The sound quality is set so that it is optimised for each level. ∫ About noise cancelling level You can select one of the following levels to suit your preference. • The default level setting is “Noise cancelling High”. – Noise cancelling High – Noise cancelling Medium – Noise cancelling Low 1 Press [NC]. • Each press of [NC] switches between three levels and Off.
Operation Using the Google Assistant You can play back music or look for information by talking to this unit to operate a smartphone or tablet (AndroidTM 5.0+/iOS 9.3 or higher) equipped with the Google Assistant. • Connect the smartphone or tablet to the Internet. This unit cannot be connected to the Internet directly. ∫ Before the first use, the following settings are required. • When using an iOS smartphone or tablet, install the Google Assistant app in advance. 1 Create a Bluetooth® connection.
Operation How to use the Google Assistant • Before use, create a Bluetooth® connection with the smartphone or tablet. • When using an iOS smartphone or tablet, start up the Google Assistant. Use Operation Operating the Google Assistant by voice Speak while pressing and holding the Action button. (Release your finger when you finish speaking.) Examples: “Play some pop music”, “Do I need an umbrella today?” Right (R) side Action button • You are not required to say, “Ok Google”.
Operation Using the app “Panasonic Audio Connect” By creating a Bluetooth® connection with a smartphone or tablet installed with the “Panasonic Audio Connect” app (free of charge), you can enjoy a wide variety of features, such as the following: • Software updates You can add new functions, etc. • Customization of various settings Connection mode setting/Noise canceling setting/Auto power off setting/Guidance language setting, etc. • Access to this document Preparation • Turn on the unit.
Operation Useful functions Activating voice functions You can use a button on this unit to activate Siri or other voice functions on your smartphone or similar device. 1 Connect the Bluetooth® device and the unit. (l 8, “Connecting a Bluetooth® device”) 2 Press and hold the Multiple functions button on this unit until the voice function is activated. Note • For details about voice function commands, refer to the operating instructions for the Bluetooth® device.
Operation Using the ambient sound enhancer This makes it easier to listen to sounds around you, such as announcements on trains, when you want to, without taking the unit off. Place your hand over the ambient sound enhancer sensor panel (R side) so that its entire surface is covered. • This makes it easier to listen to sounds around you. • Noise cancelling will turn OFF temporarily and the volume of the playback sound will be lowered.
Operation Making a multi-point connection A Bluetooth® device for music playback and calls (first device) and a Bluetooth® device for calls (second device) can be connected simultaneously. For example, even when listening to music on the first Bluetooth® device, you can answer calls received on the second Bluetooth® device by setting up the devices as follows.
Operation Battery level notification • When the unit is turned off, an English guidance message will be heard indicating the battery level. • When the battery starts running low during use of the unit, the blinking power/pairing LED will turn from blue to red. A beep will sound every 1 minute.* When the battery runs out, an English guidance message will be heard and the power will turn off.
Other Storage of the unit Fold the unit as shown below when storing it in the carrying case (supplied). • If the USB charging cord or the detachable cord (supplied) is connected, disconnect it from the unit. 1 2 3 1 Store the sliders. 2 Rotate the housing on either side by approx. 90 o (A) to fold it toward the headband side (B). 3 Rotate the other housing by approx. 90 o (C). 4 Store the unit in the carrying case.
Other Restoring to the factory settings When you want to delete all pairing device information, etc., you can restore the unit to the factory settings (original settings upon purchase). Charge the battery before restoring the unit. 1 While the unit is turned off, press and hold [Í/I ( )] for at least 5 seconds until the power/pairing LED starts blinking alternately in blue and red.
Other Troubleshooting Before requesting service, make the following checks. If you are in doubt about some of the check points, or if the remedies indicated do not solve the problem, consult your dealer for instructions. Sound and audio volume No sound. • Make sure that the unit and the Bluetooth® device are connected correctly. (l 8) • Check if music is playing on the Bluetooth® device. • Make sure that the unit is turned on and the volume is not set too low.
Other General The unit does not respond. • This unit can be reset when all operations are rejected. To reset the unit, connect the unit to a computer using the USB charging cord. (l 19) • The Multiple functions button does not work when the detachable cord (supplied) is used. Power supply and charging Cannot charge the unit. / The power/pairing LED does not light during charging. / Charging takes longer.
Other Specifications ∫ General Power supply DC 5 V, 0.5 A (Internal battery: 3.7 V (Li-polymer)) Operating time*1 Approx. 24 hours (Noise cancelling: ON, SBC) Charging time*2 (25 oC) Approx. 4 hours Charging temperature range 10 oC to 35 oC Operating temperature range 0 oC to 40 oC Operating humidity range 35 %RH to 80 %RH (no condensation) Mass Approx. 275 g (without cord) *1 It may be shorter depending on the operating conditions.
Other To remove the battery when disposing of this unit The following instructions are not intended for repairing purposes but for the disposal of this unit. This unit is not restorable once disassembled. • When disposing of this unit, take out the battery installed in this unit and recycle it. • Disassemble after the battery runs out. • Keep disassembled parts out of reach of children. Regarding the handling of used batteries • Insulate the terminals with adhesive tape or similar material.
Other Declaration of Conformity (DoC) Hereby, “Panasonic Corporation” declares that this product is in compliance with the essential requirements and other relevant provisions of Directive 2014/53/EU. Customers can download a copy of the original DoC to our RE products from our DoC server: http://www.ptc.panasonic.
Sales and Support Information Customer Communications Centre • For customers within the UK: 0344 844 3899 • For customers within Ireland: 01 289 8333 • Monday–Friday 9:00 am–5:00 pm (Excluding public holidays). • For further support on your product, please visit our website: www.panasonic.co.uk Direct Sales at Panasonic UK • Order accessory and consumable items for your product with ease and confidence by phoning our Customer Communications Centre Monday–Friday 9:00 am–5:00 pm (Excluding public holidays).