
Operating Instructions
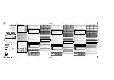

∫ How to fit the earphones (a)
1 Check the orientation (up (a), down) and L (left) and R (right) of the earphones.
2 Fit firmly by turning the earphones a small amount at a time in the directions
indicated by the arrow in the illustration.
• Confirm that the earphones will not fall from your ears after you have fitted them.
• If the earphones fall out easily, replace with earpieces (supplied) of a different size.
• The left earphone has a raised dot indicating the L side.
∫ Select the earpieces
How to remove the earpieces (b)
How to attach the earpieces (c)
• Make sure the earpieces are fitted firmly into your ears and confirm that they are not at an angle.
∫ Comment positionner les écouteurs (a)
1
Vérifiez l’orientation (haut (
a
), bas) et le côté L (gauche) et R (droit) des écouteurs.
2 Positionnez correctement en tournant légèrement à chaque fois les écouteurs
dans le sens indiqué par la flèche sur l’illustration.
• Vérifiez que les écouteurs ne tombent pas de vos oreilles une fois positionnés.
• Si les écouteurs tombent facilement, remplacez les oreillettes (fournies) par d’autres
d’une taille différente.
• L’écouteur gauche est doté d’un détrompeur (picot surélevé) qui indique le coté L.
∫ Choisir les oreillettes
Comment retirer les oreillettes (b)
Comment mettre en place les oreillettes (c)
• Assurez-vous que les oreillettes sont correctement positionnées dans vos oreilles et
vérifiez qu’elles ne sont pas inclinées.
∫ Einsetzen der Ohrhörer (a)
1 Überprüfen Sie die Ausrichtung der Ohrhörer: (oben (a), unten) bzw. L (links)
und R (rechts).
2 Um einen festen Sitz zu erzielen, drehen Sie die Ohrhörer beim Einsetzen
entsprechend dem abgebildeten Pfeil ein wenig hin und her.
• Vergewissern Sie sich nach dem Einsetzen, dass die Ohrhörer nicht aus Ihren Ohren
herausfallen können.
• Wenn die Ohrhörer leicht herausfallen, ersetzen Sie die Ohrstöpsel (mitgeliefert) durch
eine andere Größe.
• Auf dem linken Ohrhörer befindet sich als Kennzeichnung der L-Seite eine punktförmige
Erhebung.
∫ Auswahl der Ohrstöpsel
Entfernen der Ohrstöpsel (b)
Anbringen der Ohrstöpsel (c)
• Vergewissern Sie sich, dass die Ohrhörer fest in Ihren Ohren sitzen und nicht schief
eingesetzt sind.
English
How to fit the earphones
Fit the earphones correctly in order to get adequate noise cancelling effect (
[RZ-S500W]
only)
and acoustics. Select and fit the special earpieces that suit the sizes of your ears, left and right.
Français
Comment positionner les écouteurs
Positionnez correctement les écouteurs pour que les effets de réduction de bruit
(
[RZ-S500W]
uniquement) et acoustiques soient correctement obtenus. Choisissez et
positionnez les oreillettes spéciales adaptées à la taille de vos oreilles, gauche et droite.
Deutsch
Einsetzen der Ohrhörer
Setzen Sie die Ohrhörer richtig ein, um eine zufriedenstellende
Geräuschunterdrückung (nur [RZ-S500W]) und Akustik zu erzielen. Wählen und
nutzen Sie die Ohrstöpsel, die zur Größe Ihrer Ohren (links und rechts) passen.
12
L
R
L R
L R
1
6
5
7
8
10
44
3
9
2
6
5
7
8
3
9
1
3
5
77
8
10
6
2
3
5
8
6
15
11
12
13
14
16
A
B
Bluetooth
Bluetooth ON
RZ-S500W
D
C
Main unit (earphones)
(Earphones hereafter in the instructions)
a L side earphone (left) b R side earphone (right)
c Main unit (charging cradle)
(Charging cradle hereafter in the instructions)
* The product part number is shown on the certification information label.
The chargeable battery (installed in the unit) is not charged initially. Charge the battery
before using the unit.
1 Use the USB charging cord (supplied) (b) to connect the charging cradle to a
computer (a).
• Charging of the charging cradle starts. The charging cradle LEDs light or blink (white)
while the charging cradle is charging. Charging is complete when they turn off.
2 Put the earphones into the charging cradle.
• Confirm the L side and R side of the earphones, and match the positions of the
charging terminals on the earphones with the terminal sections in the charging
cradle. (Charging of the earphones will not start if the positions do not match.)
• The way the earphone LEDs light when you put the earphones into the charging
cradle depends on the usage status.
3 Confirm that the earphone LEDs (red) have illuminated (charging starts).
• The earphone LEDs light (red) while the earphones are charging. Charging is
complete when they turn off.
• Proper charging is not possible if there is dust or droplets of water on the terminal sections
of the earphones or charging cradle. Remove the dust or water droplets before charging.
• Make sure the computer is turned on and is not on standby or sleep mode.
• Do not use any other USB charging cords except the supplied one. Doing so may cause malfunction.
∫ To turn the earphones on
Take the earphones out of the charging cradle.
• The earphones turn on. A beep will sound and the earphone LEDs blink (blue)* slowly.
* The batteries are low when they are blinking in red.
∫ To turn the earphones off
Put the earphones into the charging cradle.
• If something with a magnet in it is brought close to the earphones while they are being
used, the earphones may turn off. Move the item with the magnet in it away if this occurs.
Using the “Panasonic Audio Connect” app (free of charge) makes connecting with
Bluetooth
®
simple. (l Front page)
∫ Connecting by pairing (registering) your earphones with a Bluetooth
®
device
1 Take both earphones (L and R) out of the charging cradle.
• When pairing with a device for the first time:
This unit will start to search for a Bluetooth
®
device to connect to, and the earphone
LEDs will light alternately in blue and red.
• When pairing with a device after the first time:
While the earphone LEDs light (blue) (about 3 seconds), if you touch and hold the touch
sensor (L or R) for 7 seconds, the earphone LEDs will light alternately in blue and red.
2 Turn on the Bluetooth
®
device and enable the Bluetooth
®
function.
3 From the Bluetooth
®
menu of the Bluetooth
®
device, select device name
“RZ-S500W” or “RZ-S300W” (a).
• When the earphone LEDs blink (blue)* twice at approximately 5 second intervals,
pairing has been completed and connection has been established.
* The batteries are low when they are blinking in red.
4 Confirm that the earphones and the Bluetooth
®
device are connected.
• If the connection with the device does not complete within 5 minutes, the pairing mode on the
earphones cancels and they transition to connection standby mode. Perform pairing again.
English
A Part names
1 Touch sensor (L) (left)
(
l
)
2 Touch sensor (R) (right)
(
l
)
3 Earphone LEDs
(
l
)
4
[RZ-S500W]
Microphone for noise cancelling
5 Earpieces
6 Microphones for calls
7 Charging terminals
8 L side (left)/R side (right) indications
9 [RZ-S500W] Driver rear ports
10
Raised dot indicating the L side
11
Charging cradle lid
12
Terminal section (for the L side earphone)
13
Terminal section (for the R side earphone)
14
Charging cradle LEDs
(
l
)
15
Certification information label (bottom of
the charging cradle)*
16
Charging terminal (l )
B Charging
Usage status Earphone LED lighting/blinking patterns
Charging for the first time
(after purchase)
The earphone LEDs light (red) about 5 seconds after
you put the earphones into the charging cradle.
Charging any time after
the first time (When there
is still battery charge)
When you put the earphones into the charging
cradle, the earphone LEDs light (red) about
3 seconds, then turn off. After about 5 seconds, the
earphone LEDs light (red) again.
When the batteries are
depleted (When there is
no battery charge at all)
The earphone LEDs light (red) about 5 seconds after
you put the earphones into the charging cradle.
C Turning the earphones on and off
D Connecting to a Bluetooth
®
device
E
E
B
B
B
∫ Connecting with a paired Bluetooth
®
device
1 Take the earphones out of the charging cradle. (l )
2 Do Steps 2 to 4 of “Connecting by pairing (registering) your earphones with a
Bluetooth
®
device”.
• This unit remembers the device lastly connected. Connection may be automatically
established after step 1 (
l above).
∫ Listening to music
1 Connect the Bluetooth
®
device and the earphones. (l )
2 Select the music or video on the Bluetooth
®
device and start playback.
• The earphones will output the music or the audio of the video being played back.
∫ List of operations available with the touch sensors
* Switches between noise cancelling ([RZ-S500W] only), ambient sound and off.
Noise cancelling ([RZ-S500W] only): Reduces the sounds (noise) you can hear from
outside.
Ambient sound: You can hear ambient sound through the microphones embedded in
the earphones while enjoying music.
• A beep sounds to indicate that you have touched to reach either the maximum or
minimum volume level.
• You can also use just one side of the earphones independently. In this case, it is only
possible to perform operations available on the side you are using.
• Depending on the Bluetooth
®
device or the app, even if you operate the touch sensors
on the earphones, some functions may not respond or may operate differently from the
descriptions above.
∫ Restoring to the factory settings
Charge the earphones before restoring the earphones to their factory settings.
1 Take the R side earphone out of the charging cradle.
2 While the earphone LED lights (blue), touch and hold the touch sensor (R) for
about 7 seconds.
• The earphone LED will light alternately in blue and red.
3 Touch and hold the touch sensor (R) for about 10 seconds.
• The earphone LED (blue) blinks rapidly, and when the power turns off, the earphone
returns to the factory settings.
4 Do the same Steps 1 to 3 above for the L side earphone.
• To re-pair the earphones with a Bluetooth
®
device, delete the registered information
(device name: RZ-S500W or RZ-S300W) on the device, then pair the earphones with
the Bluetooth
®
device again. (l )
E Using the earphones
Function Touch sensor (L) Touch sensor (R)
Listening to music
Playback/pause Touch once
Raise the volume Touch rapidly 3 times –
Lower the volume Touch rapidly 2 times –
Forward a track – Touch rapidly 2 times
Back a track – Touch rapidly 3 times
Making a phone call
Receive phone call Touch once while receiving the call
Reject a phone call Touch and hold for about 2 seconds while receiving the
call
End a phone call Touch and hold for about 2 seconds during the call
Change control of
external sounds*
–
Touch and hold for about
2 seconds
Start the voice assistant Touch and hold for about
2 seconds
–
Troubleshooting (l Front page)
C
D
D
Appareil principal (écouteurs)
(Ci-après écouteurs dans les instructions)
a Écouteur côté L (gauche) b Écouteur côté R (droit)
c Appareil principal (support de charge)
(Ci-après support de charge dans les instructions)
* Le numéro de pièce du produit est visible sur l’étiquette de renseignements de certification.
La batterie rechargeable (installée dans l’appareil) n’est pas chargée initialement.
Chargez la batterie avant d’utiliser l’appareil.
1 Utilisez le câble de recharge USB (fourni) (b) pour brancher le support de
charge à un ordinateur (a).
• La charge du support de charge démarre. Les voyants du support de charge
s’allument ou clignotent (blanc) durant la charge du support de charge. La charge
est terminée lorsqu’ils s’éteignent.
2 Mettez les écouteurs dans le support de charge.
• Vérifiez le côté L et le côté R des écouteurs et faites correspondre les positions des
bornes de charge des écouteurs avec les bornes du support de charge. (La charge
des écouteurs ne démarrera pas si les positions ne correspondent pas.)
• La manière dont les voyants d’écouteur s’allument lorsque vous mettez les
écouteurs dans le support de charge dépend de l’état de l’usage.
3 Vérifiez que les voyants d’écouteur (rouge) se sont allumés (la charge démarre).
• Les voyants d’écouteur restent allumés (rouge) pendant que les écouteurs se
chargent. La charge est terminée lorsqu’ils s’éteignent.
• La charge ne peut pas s’effectuer correctement s’il y a de la poussière ou des gouttes
d’eau sur les bornes des écouteurs ou du support de charge. Retirez la poussière ou les
gouttes d’eau avant de charger.
• Assurez-vous que l’ordinateur est allumé et n’est pas en mode veille ou veille prolongée.
• N’utilisez aucun autre cordon de chargement USB à l’exception de celui fourni. Cela
pourrait causer un dysfonctionnement.
∫ Pour mettre en marche les écouteurs
Retirez les écouteurs du support de charge.
• Les écouteurs se mettent en marche. Un bip se fait entendre et les voyants d’écouteur
clignotent (bleu)* lentement.
* Les batteries sont peu chargées s’ils clignotent en rouge.
∫ Pour éteindre les écouteurs
Mettez les écouteurs dans le support de charge.
• Si un objet magnétique se trouve à proximité des écouteurs pendant qu’ils sont utilisés,
ceux-ci pourraient s’éteindre. Éloignez l’objet magnétique si cela se produit.
L’utilisation de l’application “Panasonic Audio Connect” (gratuite) permet de se connecter
par simple Bluetooth
®
. (l Recto)
∫
Connexion en appairant (enregistrant) les écouteurs avec un dispositif Bluetooth
®
1 Retirez les deux écouteurs (L et R) du support de charge.
• Pour appairer à un dispositif pour la première fois :
Cet appareil lancera la recherche d’un dispositif Bluetooth
®
auquel se connecter, et
les voyants d’écouteur s’allumeront alternativement en bleu et en rouge.
• Pour appairer à un dispositif les fois suivantes :
Pendant que les voyants d’écouteur sont allumés (bleu) (environ 3 secondes), si
vous touchez le capteur tactile (L ou R) pendant 7 secondes, les voyants d’écouteur
s’allumeront alternativement en bleu et rouge.
2 Mettez en marche le dispositif Bluetooth
®
et activez la fonction Bluetooth
®
.
Français
A Noms de pièces
1 Capteur tactile (L) (gauche) (l )
2 Capteur tactile (R) (droit) (
l )
3 Voyant d’écouteur (
l )
4 [RZ-S500W] Microphone pour réduction
de bruit
5 Oreillettes
6 Microphones pour les appels
7 Bornes de charge
8 Indicateurs côté L (gauche)/côté R
(droit)
9 [RZ-S500W] Ports arrière pilote
10
Détrompeur indiquant le côté L
11
Couvercle du support de charge
12
Borne (de l’écouteur côté L)
13
Borne (de l’écouteur côté R)
14
Voyants du support de charge (l )
15
Étiquette de renseignements de
certification (sous le support de charge)*
16
Borne de charge (l )
B Charge
État de l’usage
Modes d’éclairage/de clignotement du voyant
d’écouteur
Première charge (après
l’achat)
Les voyants d’écouteur s’allument (rouge) environ
5 secondes après que vous ayez mis les écouteurs
dans le support de charge.
Toute charge suivante
(avec niveau de charge
résiduel)
Lorsque vous mettez les écouteurs dans le support
de charge, les voyants d’écouteur restent allumés
(rouge) pendant environ 3 secondes, puis
s’éteignent. Après environ 5 secondes, les voyants
d’écouteur se rallument (rouge).
Lorsque les batteries sont
déchargées (pas de
charge résiduelle du tout)
Les voyants d’écouteur s’allument (rouge) environ
5 secondes après que vous ayez mis les écouteurs
dans le support de charge.
C Pour mettre en marche et éteindre les écouteurs
D Connexion à un dispositif Bluetooth
®
E
E
B
B
B
3 Depuis le menu Bluetooth
®
du dispositif Bluetooth
®
, sélectionnez le nom de
dispositif “RZ-S500W” ou “RZ-S300W” (a).
• Lorsque les voyants d’écouteur clignotent (bleu)* deux fois par période de
5 secondes, l’appairage a été effectué et la connexion a été établie.
* Les batteries sont peu chargées s’ils clignotent en rouge.
4 Assurez-vous que les écouteurs et le dispositif Bluetooth
®
sont connectés.
• Si la connexion avec le dispositif ne s’établit pas au bout de 5 minutes, le mode
appairage des écouteurs s’annule et ils passent en mode d’attente de connexion.
Effectuez à nouveau l’appairage.
∫ Connexion avec un dispositif Bluetooth
®
appairé
1 Retirez les écouteurs du support de charge. (l )
2 Effectuez les étapes 2 à 4 de “Connexion en appairant (enregistrant) les
écouteurs avec un dispositif Bluetooth
®
”.
• Cet appareil se souvient du dernier dispositif connecté. La connexion peut être établie
automatiquement après l’étape 1 (
l ci-dessus).
∫ Écoute de la musique
1 Connectez le dispositif Bluetooth
®
et les écouteurs. (l )
2 Sélectionnez la musique ou la vidéo sur le dispositif Bluetooth
®
et lancez la
lecture.
• Les écouteurs reproduiront la musique ou le son de la vidéo en cours de lecture.
∫ Liste des commandes disponibles avec les capteurs tactiles
* Permet de permuter entre la réduction de bruit (
[RZ-S500W]
uniquement), le bruit ambiant
et la désactivation.
Réduction de bruit ([RZ-S500W] uniquement) : Permet de réduire les sons (bruits)
provenant de dehors.
Bruit ambiant : Vous pouvez entendre le bruit à travers les microphones incorporés
dans les écouteurs tout en profitant de la musique.
• Un bip se fait entendre pour signaler que le niveau de volume maximum ou minimum a
été atteint.
• Vous pouvez aussi n’utiliser qu’un seul des deux écouteurs. Dans ce cas, il n’est
possible d’effectuer que les commandes disponibles sur le côté utilisé.
• En fonction du dispositif Bluetooth
®
ou de l’application, même si vous actionnez les
capteurs tactiles des écouteurs, certaines fonctions pourraient ne pas répondre ou
pourraient fonctionner différemment des descriptions figurant ci-dessus.
∫ Retour aux réglages d’usine par défaut
Chargez les écouteurs avant de rétablir leurs paramètres d’usine.
1 Retirez l’écouteur côté R du support de charge.
2 Pendant que le voyant d’écouteur est allumé (bleu), touchez le capteur tactile (R)
pendant environ 7 secondes.
• Le voyant d’écouteur s’allume alternativement en bleu et rouge.
3 Touchez le capteur tactile (R) pendant environ 10 secondes.
• Le voyant d’écouteur (bleu) clignote rapidement, et lors de la mise hors tension,
l’écouteur récupère ses paramètres d’usine.
4 Effectuez les mêmes étapes 1 à 3 avec l’écouteur côté L.
• Pour appairer une nouvelle fois les écouteurs avec un dispositif Bluetooth
®
, supprimez
les informations d’enregistrement (nom du dispositif : RZ-S500W ou RZ-S300W) du
dispositif, puis refaites l’appairage des écouteurs avec le dispositif Bluetooth
®
. (l )
E Utilisation des écouteurs
Fonction Capteur tactile (L) Capteur tactile (R)
Écoute de la musique
Lecture/pause Touchez une fois
Hausser le volume Touchez rapidement 3 fois –
Baisser le volume Touchez rapidement 2 fois –
Avancer vers la piste
suivante
–
Touchez rapidement 2 fois
Revenir sur la piste
précédente
–
Touchez rapidement 3 fois
Passage d’un appel téléphonique
Recevoir un appel
téléphonique
Touchez une fois lors de la réception de l’appel
Rejeter un appel
téléphonique
Touchez pendant environ 2 secondes tout en
réceptionnant l’appel
Mettre fin à un appel
téléphonique
Touchez pendant environ 2 secondes durant l’appel
Changer le contrôle des
sons extérieurs*
–
Touchez pendant environ
2 secondes.
Lancer l’assistant vocal Touchez pendant environ
2 secondes.
–
Dépannage (l Recto)
C
D
D
Hauptgerät (Ohrhörer)
(In der Anleitung im Folgenden als Ohrhörer bezeichnet)
a Ohrhörer L-Seite (links) b Ohrhörer R-Seite (rechts)
c Hauptgerät (Ladehalterung)
(In der Anleitung im Folgenden als Ladehalterung bezeichnet)
* Die Produktteilenummer ist auf dem Zertifizierungsetikett angegeben.
Der (im Gerät installierte) aufladbare Akku ist bei der Auslieferung nicht geladen. Laden
Sie den Akku vor dem Gebrauch des Gerätes auf.
1 Verwenden Sie das USB-Ladekabel (mitgeliefert) (b), um die Ladehalterung an
einen Computer (a) anzuschließen.
• Das Laden der Ladehalterung beginnt. Beim Laden der Ladehalterung leuchten
oder blinken die LEDs der Ladehalterung (weiß). Wenn sie erlöschen, ist der
Ladevorgang abgeschlossen.
2 Setzen Sie die Ohrhörer in die Ladehalterung ein.
• Bestimmen Sie die L-Seite und R-Seite der Ohrhörer und richten Sie die
Ladeanschlüsse der Ohrhörer auf die Anschlussbereiche der Ladehalterung aus.
(Wenn die Positionen nicht übereinstimmen, werden die Ohrhörer nicht aufgeladen.)
• Die Art und Weise, wie die LEDs der Ohrhörer leuchten, wenn Sie die Ohrhörer in
die Ladehalterung einsetzen, hängt vom Nutzungsstatus ab.
3 Vergewissern Sie sich, dass die Ohrhörer-LEDs (rot) leuchten (Beginn des
Ladevorgangs).
• Die Ohrhörer-LEDs leuchten (rot), während die Ohrhörer geladen werden. Wenn sie
erlöschen, ist der Ladevorgang abgeschlossen.
• Ein ordnungsgemäßes Laden ist nicht möglich, wenn sich Staub oder Wassertropfen auf
dem Anschlussbereich des Ohrhörers oder der Ladehalterung befinden. Entfernen Sie
Staub oder Wassertropfen vor dem Laden.
• Vergewissern Sie sich, dass der Computer eingeschaltet ist und sich nicht im Standby-
oder Sleep-Modus befindet.
• Verwenden Sie ausschließlich das mitgelieferte USB-Ladekabel. Ansonsten kann es zu
Fehlfunktionen kommen.
∫ Einschalten der Ohrhörer
Entnehmen Sie die Ohrhörer aus der Ladehalterung.
• Die Ohrhörer werden eingeschaltet. Ein Piepton ertönt und die Ohrhörer-LEDs blinken
langsam (blau)*.
* Wenn die Leuchten rot blinken, ist der Akku fast leer.
∫ Ausschalten der Ohrhörer
Setzen Sie die Ohrhörer in die Ladehalterung ein.
• Kommt während des Gebrauchs ein Gegenstand, der einen Magneten enthält, zu nahe
an die Ohrhörer heran, werden die Ohrhörer möglicherweise ausgeschaltet. Bewegen
Sie in diesem Fall den Gegenstand mit dem Magneten weg.
Die Nutzung der “Panasonic Audio Connect”-App (kostenlos) vereinfacht das Herstellen
einer Bluetooth
®
-Verbindung. (l Vorderseite)
∫
Verbinden durch Koppeln (Registrieren) Ihrer Ohrhörer mit einem Bluetooth
®
-Gerät
1 Entnehmen Sie beide Ohrhörer (L und R) aus der Ladehalterung.
• Beim erstmaligen Koppeln mit einem Gerät:
Das Gerät sucht nach einem Bluetooth
®
-Gerät, zu dem es eine Verbindung
herstellen kann, und die Ohrhörer-LEDs blinken abwechselnd blau und rot.
• Beim Koppeln mit einem Gerät nach dem ersten Mal:
Während die Ohrhörer-LEDs (ca. 3 Sekunden lang) (blau) leuchten, berühren Sie
den Berührungssensor (L oder R) für 7 Sekunden. Die Kopfhörer-LEDs beginnen,
abwechselnd blau und rot zu leuchten.
Deutsch
A Teilebezeichnungen
1 Berührungssensor (L) (links) (l )
2 Berührungssensor (R) (rechts) (
l )
3 Ohrhörer-LEDs (
l )
4 [RZ-S500W] Mikrofon für
Geräuschunterdrückung
5 Ohrstöpsel
6 Mikrofone für Anrufe
7 Ladeanschlüsse
8 Anzeigen auf L-Seite (links)/R-Seite (rechts)
9
[RZ-S500W]
Hintere Öffnungen des Treibers
10
Punktförmige Erhebung zur
Kennzeichnung der L-Seite
11
Deckel der Ladehalterung
12
Anschlussbereich (für L-seitigen Ohrhörer)
13
Anschlussbereich (für R-seitigen Ohrhörer)
14
LEDs der Ladehalterung (l )
15
Zertifizierungsetikett (auf Unterseite der
Ladehalterung)*
16
Ladeanschluss (l )
B Wird aufgeladen
Nutzungsstatus Leucht-/Blinkmuster der Ohrhörer-LEDs
Erstmaliges Laden (nach
dem Kauf)
Nach dem Einsetzen der Ohrhörer in die
Ladehalterung leuchten die Ohrhörer-LEDs ca.
5 Sekunden lang (rot).
Aufladen nach dem
ersten Mal (wenn der
Akku noch Restladung
aufweist)
Wenn Sie die Ohrhörer in die Ladehalterung einsetzen,
leuchten die Ohrhörer-LEDs ca. 3 Sekunden lang (rot)
und erlöschen dann. Nach ca. 5 Sekunden leuchten die
Ohrhörer-LEDs erneut auf (rot).
Wenn die Akkus entladen
sind (wenn überhaupt
keine Restladung mehr
vorhanden ist)
Nach dem Einsetzen der Ohrhörer in die
Ladehalterung leuchten die Ohrhörer-LEDs ca.
5 Sekunden lang (rot).
C Ein- und Ausschalten der Ohrhörer
D Verbinden mit einem Bluetooth
®
-Gerät
E
E
B
B
B
2 Schalten Sie das Bluetooth
®
-Gerät ein und aktivieren Sie die
Bluetooth
®
-Funktion.
3 Wählen Sie im Bluetooth
®
-Menü des Bluetooth
®
-Geräts den Gerätenamen
“RZ-S500W” oder “RZ-S300W” aus (a).
• Wenn die Ohrhörer-LEDs etwa alle 5 Sekunden zweimal (blau)* blinken, ist die
Kopplung abgeschlossen und die Verbindung wurde hergestellt.
* Wenn die Leuchten rot blinken, ist der Akku fast leer.
4 Vergewissern Sie sich, dass die Ohrhörer und das Bluetooth
®
-Gerät miteinander
verbunden sind.
• Kann die Verbindung mit dem Gerät nicht innerhalb von 5 Minuten hergestellt werden,
brechen die Ohrhörer den Kopplungsmodus ab und wechseln in den
Verbindungs-Standby-Modus. Wiederholen Sie in diesem Fall den Kopplungsvorgang.
∫ Verbinden mit einem gekoppelten Bluetooth
®
-Gerät
1 Entnehmen Sie die Ohrhörer aus der Ladehalterung. (l )
2 Führen Sie die Schritte 2 bis 4 aus dem Abschnitt “Verbinden durch Koppeln
(Registrieren) Ihrer Ohrhörer mit einem Bluetooth
®
-Gerät” aus.
• Dieses Gerät speichert das zuletzt verbundene Gerät. Nach Ausführen von Schritt 1
(
l oben) wird die Verbindung möglicherweise automatisch hergestellt.
∫ Musik hören
1 Verbinden Sie das Bluetooth
®
-Gerät mit den Ohrhörern. (l )
2 Wählen Sie die gewünschten Musik- oder Videoinhalte auf dem
Bluetooth
®
-Gerät aus und starten Sie die Wiedergabe.
• Die Musik bzw. der Ton des wiedergegebenen Videos wird über die Ohrhörer
ausgegeben.
∫ Bedienvorgänge, die mit den Berührungssensoren ausgeführt werden können
* Schaltet zwischen Geräuschunterdrückung (nur
[RZ-S500W]
), Umgebungsgeräuschen
und dem Ausschalten um.
Geräuschunterdrückung (nur [RZ-S500W]): Reduziert die Töne (Geräusche), die von
außen zu Ihnen durchdringen.
Umgebungsgeräusche: Sie können während des Musikhörens auch die
Umgebungsgeräusche hören, die von den in den Ohrhörern integrierten Mikrofonen
erfasst werden.
• Ein Signalton ertönt, wenn Sie durch Berührung die maximale oder minimale Lautstärke
eingestellt haben.
• Sie können auch nur einen Ohrhörer auf einmal verwenden. In diesem Fall sind nur
Bedienvorgänge möglich, die auf der verwendeten Seite verfügbar sind.
• Je nach Bluetooth
®
-Gerät oder App kann es vorkommen, dass beim Betätigen der
Ohrhörer-Berührungssensoren einige Funktionen nicht oder anders reagieren als oben
beschrieben.
∫ Rücksetzen auf die Werkseinstellungen
Laden Sie die Ohrhörer auf, bevor Sie sie auf die Werkseinstellungen zurücksetzen.
1 Entnehmen Sie den R-seitigen Ohrhörer aus der Ladehalterung.
2 Während die Ohrhörer-LED (blau) leuchtet, berühren Sie den Berührungssensor
(R) für ca. 7 Sekunden.
• Die Ohrhörer-LED leuchtet abwechselnd blau und rot.
3 Berühren Sie den Berührungssensor (R) ca. 10 Sekunden lang.
• Die Ohrhörer-LED (blau) blinkt schnell, und beim Ausschalten wird der Ohrhörer auf
die Werkseinstellungen zurückgesetzt.
4 Führen Sie die oben beschriebenen Schritte 1 bis 3 auch für den L-seitigen
Ohrhörer aus.
• Um die Ohrhörer erneut mit einem Bluetooth
®
-Gerät zu koppeln, löschen Sie die
Registrierungsinformationen (Gerätename: RZ-S500W oder RZ-S300W) im Gerät und
koppeln Sie dann die Ohrhörer erneut mit dem Bluetooth
®
-Gerät. (l )
E Gebrauch der Ohrhörer
Funktion Berührungssensor (L) Berührungssensor (R)
Musik hören
Wiedergabe/Pause Einmal berühren
Lautstärke erhöhen 3-mal schnell berühren –
Lautstärke verringern 2-mal schnell berühren –
Nächster Titel – 2-mal schnell berühren
Vorheriger Titel – 3-mal schnell berühren
Einen Anruf tätigen
Telefonanruf annehmen Einmal berühren, während ein Anruf eingeht
Telefonanruf ablehnen Ca. 2 Sekunden lang berühren, während ein Anruf
eingeht
Telefonanruf beenden Während eines Anrufs ca. 2 Sekunden lang berühren
Steuerung externer Töne
ändern*
–
Ca. 2 Sekunden lang
berühren
Sprachassistenten
starten
Ca. 2 Sekunden lang
berühren
–
Problembehebung (l Vorderseite)
C
D
D