CD Stereo System Operating Instructions Model No. SC-AK300 SC-AK200 The illustrations show SC-AK300. Note: “EB” on the packaging indicates the United Kingdom. Before connecting, operating or adjusting this product, please read these instructions completely. Please keep this manual for future reference.
Dear customer Thank you for purchasing this product. For optimum performance and safety, please read these instructions carefully. These operating instructions are applicable to the following system. These operating instructions, however, fundamentally explain the operation of system SC-AK300.
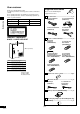
Table of contents Safety precautions Before using Placement 2 3 4 5 Battery installation ........................................................... 5 Correct method of use .................................................... 5 Placement of speakers ............................................ 5 Connections ............................................................. 6 Basic connections (for supplied accessories) .................. 6 Optional antenna connections .......................................
Caution for AC Mains Lead (For United Kingdom) (“EB” area code model only) WARNING: DO NOT CONNECT EITHER WIRE TO THE EARTH TERMINAL WHICH IS MARKED WITH THE LETTER E, BY THE EARTH SYMBOL i OR COLOURED GREEN OR GREEN/YELLOW. For your safety, please read the following text carefully. THIS PLUG IS NOT WATERPROOF—KEEP DRY. Before using This appliance is supplied with a moulded three pin mains plug for your safety and convenience. A 5-ampere fuse is fitted in this plug.
Concerning the remote control R6, AA, UM-3 A Battery installation Use of batteries • • • • For SC-AK300: Europe For SC-AK200: Continental Europe, Russia and Ukraine only • • • • Align the poles (+ and –) properly when inserting the batteries. Do not mix old and new batteries or different types of batteries. Do not recharge ordinary dry cell batteries. Do not heat or disassemble the batteries. Do not allow them to contact flame or water.
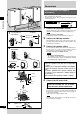
Connections Basic connections (for supplied accessories) 1 • 3 • Before using 2 4 1 For Australia and New Zealand To household mains socket Plug the AC mains lead into a household mains socket only after all other connections have been made. To prepare the antenna wires and speaker cords, twist the vinyl cover tip and pull off. 1 For Europe Note For best reception sound quality: An FM outdoor antenna is recommended. (See page 7.
Connections For Australia and New Zealand A FM outdoor antenna (not included) 75 Ω coaxial cable (not included) Optional antenna connections You may need an outdoor antenna if you use this system in a mountainous region or inside a reinforced concrete building, etc. 1 Shield braid GND 1 A 2 15 mm 2 3 For Europe Core wire FM outdoor antenna (not included) FM outdoor antenna Disconnect the FM indoor antenna if an FM outdoor antenna is installed. 1 Remove a piece of the outer vinyl insulator.
Front panel controls A A Main unit No. Name Ref. page 1 AC supply indicator (AC IN) This indicator lights when the unit is connected to the AC mains supply. Before using 2 Standby/on switch (f/I) Press to switch the unit from on to standby mode or vice versa. In standby mode, the unit is still consuming a small amount of power. 3 Display button (DISPLAY) .................................. 12, 18 4 Display 5 Preset EQ select button (PRESET EQ) ................... 22 6 Record button (a REC) ........
Front panel controls Remote control SLEEP CL CK CLOCK AUTO TO OFF TIMER 25 28 2 1 2 3 Buttons such as 2 function in exactly the same way as the buttons on the main unit. PLAY REC DISC 29 30 26 4 5 6 No. Name Ref. page ; Sleep timer/auto off button 10 7 8 9 Before using (SLEEP, –AUTO OFF) .......................................... 11, 25 < Numeric buttons (≥10, 1–9, 0) ............................ 13, 16 0 = Dimmer button (DIMMER) .........................................
A Turning the demo function off If the clock has not been set, a demonstration of the display is shown when the unit is switched to standby mode. This function is set to on at the time of purchase. A During standby mode Press and hold [L/–DEMO] until “NO DEMO” is displayed. Before using The display changes each time the button is held down. NO DEMO (off) ↔ DEMO ON (on) To show a demonstration of the display Press and hold [L/–DEMO] until “DEMO ON” is displayed.
A A Auto-off function Remote control only SLEEP –AUTO OFF When CD or tape is selected as the source To save power, the unit turns off if it is left unused for ten minutes. Note This function does not work if the source is tuner or AUX. “AUTO OFF” is shown on the display. To cancel Press and hold [–AUTO OFF] again to clear “AUTO OFF” from the display. For your reference The setting is maintained even if the unit is turned off.
Listening to radio broadcasts 1 The unit comes on automatically. Every time you press the button: FM ↔ AM DISPLAY Radio operations 4 1 2 3 1 2 3 4 Press [TUNER/BAND] to select band. 2 Press [PLAY MODE] on the remote control to select “MANUAL”. Every time you press the button: MANUAL ↔ PRESET 3 Press [g/REW/3] or [4/FF/f] to select the frequency of the required station. “TUNED” is displayed when a radio station is tuned. “ST” is displayed when a stereo FM broadcast is being received.
Presetting radio broadcasts A Remote control only There are two methods of presetting stations. Automatic presetting : All the stations the tuner can receive are preset. Manual presetting : You can select the stations to preset and the order they are preset in. Up to 15 stations each can be set in the FM and AM bands. PROGRAM TUNER Preparation: Press [TUNER] to select “FM” or “AM”. A Automatic presetting Preparation: Tune to the frequency where presetting is to begin (A page 12).
Concerning compact discs A xx x xx x x xx x x xx x xx xx x x With this system, you can only play compact discs having this mark. A However, do not use irregularly shaped CDs. CDs of the sort can damage the unit. xxxxxxx xxxxxxx x xx xx x xxx xx x xxx x xx xx XXXX XXXX XXXXX XXXX XX XXXX XXXX XXXXX XXXX XXXX XXXXX XXXX XXXX B ~ D Handling precautions • B • How to hold CDs • • • Do not touch the recorded surface.
Listening to compact discs 3 1 4 This unit can play CD-DA (digital audio) format audio CD-R and CD-RW that have been finalized (a process that enables CD-R/CD-RW players to play audio CD-R and CD-RW) upon completion of recording. It may not be able to play some CD-R or CD-RW due to the condition of the recording. 1 Press [c] button. The unit will come on automatically and the tray opens. DEMO 2 Set CD in the tray.
Listening to compact discs Program play 4 3 5 2 1•7 1 Remote control only by remote control only You can program up to 24 tracks.by remote control only 1 2 3 4 Press [CD :/ J] and then [L]. Press [PROGRAM]. Press [DISC]. (within 10 seconds or so) Press [1] – [5] to select the disc you want. Compact disc operations 1 2 5 Press the numeric button to select the desired track. 6 Repeat steps 3 through 5 until you have programmed all the tracks you want. 7 Press [CD :/ J J].
Listening to compact discs To listen to specific CDs and tracks (CD Play Mode function) 4 3 Remote control only This function makes it easier for you to select specific CDs and tracks from those loaded in the player. 2 5 1•6 1 There are 5 disc/track selection modes. All-Disc mode: Plays all loaded discs in succession from the selected disc to the final disc . 1-Song mode: Plays one selected track on the selected disc. 1-Disc Random mode: Plays one selected disc in random order.
Listening to compact discs Direct access play Remote control only 2 1 3 1 2 Press [DISC]. (within 10 seconds or so) Press [1] – [5] to select the disc you want. 3 Press the numeric button to select the desired track number. The CD will be played from the selected track to the last track of the disc. To select a two-digit track Press [≥10] and then the two numbers you want within 10 seconds or so. For example Track no. 20: [≥10] ➞ [2] ➞ [0] Track no.
Listening to tapes You can use either deck 1 or deck 2 for tape playback. Use normal position tapes. High position and metal position tapes can be played, but the unit will not be able to do full justice to the characteristics of these tapes. 4 1•3 DECK 1/2 DEMO 1 The unit will come on automatically. If the unit was off and a cassette was loaded, play will start automatically (One touch play function). 2 2 Press [TAPE :]. Press [c DECK 1 OPEN] or [c DECK 2 OPEN] and insert the tape.
Before recording (Deck 2 only) A Types of tapes which can be recorded correctly To protect tapes against further recording Use normal position tapes. High position and metal position tapes can be used, but this unit will not be able to record or erase them correctly. Side A A Tab for side B Erasure prevention The illustration shows how to remove the tabs to prevent recording. To record on the tape again, cover as shown.
A A Recording from compact discs You can use 1-DISC/ALL-DISC/1-SONG mode (A page 17) to make recordings. Preparations: • Do the preparatory steps (A page 20). • Insert the disc(s) you want to record (A page 15). 1-DISC/ALL-DISC recording 1 Do steps 1 to 4 on page 17. Ensure CD is stopped. 2 Press [a REC] to start recording. The CD starts. 1-SONG recording Do steps 1 to 5 on page 17. REC Press [a REC] to start recording. The CD starts. To stop recording Press [L/–DEMO].
A A Tape-to-tape recording The recording level will be recorded as it is on the tape being played back. Preparations: • Do the preparatory steps (A page 20). • Press [TAPE :] then [L/–DEMO] to select tape as the source. 2 1 1 Press [c DECK 1 OPEN] and insert the tape you want to record. 2 Press [a a REC] to start recording. To stop recording Press [L/–DEMO]. Both decks will stop.
Using the timers Using the play/record timer 5 4 1• 2 • 3 Remote control only The timer has two functions. It can be set to on at a certain time to wake you up, or it can be set to record the radio or from the aux source. The play timer cannot be used in combination with the record timer. Preparations: • Turn the unit on and set the clock (A page 11). • For the play timer, prepare the music source you want to listen to; tape, CD, radio or aux, and set the volume.
Using the timers Using the play/record timer PLAY/ REC CLOCK/ TIMER Remote control only To change the timer Press [rPLAY/REC] to select the desired timer. Every time the button is pressed the setting changes as follows. PLAY REC (OFF) To check settings While the unit is on and the “rPLAY” (or “rREC”) indicator is on, press [CLOCK/TIMER] so “rPLAY” (or “rREC”) appears on the display.
Using the timers A Using the sleep timer A Remote control only This timer turns your system OFF at the set time (Max. 2 hours, set at 30-minute intervals). It lets you fall asleep listening to music. SLEEP – AUTO OFF Preparations: Switch on the power. The figure shows how to set the system to standby mode after 30 minutes. While enjoying the desired source: Press [SLEEP] to select the desired time.
Troubleshooting guide Before requesting service, make the checks below. If you can’t fix the system as described below, or if something not listed here occurs, refer to the enclosed directory to locate an Authorized Service Center convenient to you or contact your dealer. Reference pages are shown as black circled numbers 6. Common Problems No sound. Sound stops. Sound is unfixed, reversed or comes from one speaker only. Humming heard during play. “ERROR” is displayed.
Specifications AMPLIFIER SECTION SC-AK300 CASSETTE DECK SECTION SPEAKER SECTION SB-AK200 (For Europe) RMS Power output 10% Total harmonic distortion 1kHz, both channels driven (Low channel) 52 W per channel (6 Ω) 10 kHz, both channels driven (High channel) 48 W per channel (6 Ω) Total Bi-Amp power 100 W per channel (For Australia and New Zealand) RMS Power output 10% Total harmonic distortion 1 kHz, both channels driven (Low channel) 42 W per channel (6 Ω) 10 kHz, both channels driven (High channel) 38 W
SUOMI VAROITUS! CAUTION! THIS PRODUCT UTILIZES A LASER. USE OF CONTROLS OR ADJUSTMENTS OR PERFORMANCE OF PROCEDURES OTHER THAN THOSE SPECIFIED HEREIN MAY RESULT IN HAZARDOUS RADIATION EXPOSURE. DO NOT OPEN COVERS AND DO NOT REPAIR YOURSELF. REFER SERVICING TO QUALIFIED PERSONNEL. LAITTEEN KÄYTTÄMINEN MUULLA KUIN TÄSSÄ KÄYTTÖOHJEESSA MAINITULLA TAVALLA SAATTAA ALTISTAA KÄYTTÄJÄN TURVALLISUUSLUOKAN 1 YLITTÄVÄLLE NÄKYMÄTTÖMÄLLE LASERSÄTEILYLLE.