Pa.asonic Operating Instructions Blu-ray Disc Home Theater Sound System Model .o. SC-BT300 SC-BT200 The illustration shows the image of SC-BT300. Dear customer Thank you for purchasing this product. For optimum performance and safety, please read these instructions carefully. Before connecting, operating or adjusting this product, please read the instructions completely. To update the firmware of this unit, refer to page 32.
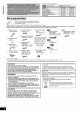
Indicates features applicable to: rcJ'i_,_ll:SC-BT300 only I _: Main unit SC-BT200 only SA-BT300 SB-HF770 SB-HC300 SB-HS470 SB-HS470 SB-HW200 Front speakers Center speaker Surround speakers Surround back speakers Subwoofer SA-BT200 SB-HF470 SB-HC200 SB-HS470 SB-HS470 SB-HW200 Accessories Use numbers indicated in parentheses when asking Please check and identify the supplied accessories. for replacement parts. (Product numbers correct as of February 2009. These may be subject to change.) Only for U.S.
THE FOLLOWING APPLIES ONLY IN THE U.S.A. FCC Note: This equipment has been tested and found to comply with the limits for a Class B digital device, pursuant to Part 15 of the FCC Rules. These limits are designed to provide reasonable protection against harmful interference in a residential installation. This equipment generates, uses, and can radiate radio frequency energy and, if not installed and used in accordance with the instructions, may cause harmful interference to radio communications.
Table of contents Getting TV started Accessories IMPORTANT ........................................................ 2 SAFETY INSTRUCTIONS ............ 3 Control reference guide (remote control) ........ Preparing the remote control ............................ Batteries ................................................................. Use ......................................................................... 5 5 5 5 Control reference guide (main unit} ................. Front panel ..............
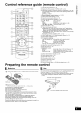
Control reference guide (remote control) (_ Turn the unit on and off(_ 19) @ Display the Home screen of VIERA CAST (_ 32) @ _) Select title numbers, etc./Enter numbers or characters (_ 20, 34) (The character buttons may be used when operating VIERA CAST contents.
Control reference guide (main unit) Front panel :.............................................................................................. "=.=2....... _'_; i_ Pullopen ® @ @ _) @ O @ POWER button (POWER aO/I (_ 19) Press to switch the unit from on to standby mode or vice-versa. In standby mode, the unit is still consuming a small amount of power.
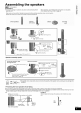
Assembling the speakers : Front speakers Preparation • To prevent damage or scratches assembly on t. lay down a soft cloth and perform • For assembiy, use a Phillips-head screwdriver • For optional wall mount, refer to page 46. tnot included ). Make sure you have all the indicated components before starting assembly, setup, and connection o Keep the screws out of reach of children to prevent swallowing. 2 Stands (',withcables) 2 Front speakers 2 Bases ! Q &Q 8 Screws Slide into the groove.
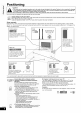
Positioning Caution • The main unit and supplied speakers are to be used only as indicated in this setup. Failure to do so may lead to damage to the amplifier and/or the speakers, and may result in the risk of fire. Consult a qualified service person if damage has occurred or if you experience a sudden change in performance. • Do not attempt to attach these speakers to walls using methods other than those described in this manual. How you set up your speakers can affect the bass and the sound field.
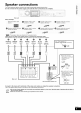
Speaker connections Turn off all equipment before connection and read the appropriate operating instructions. Do not connect the AC power supply cord until all other connections are complete.
TV connections Main unit My TV has COMPONENT VIDEO IN terminals and HDMI IN terminal. Which should I connect with? eThe different levels of picture quality input are listed below in order from highest to lowest. HDMI IN->COMPONENT VIDEO IN->VIDEO IN. However, it will take longer for the picture output to start up when this unit is connected with the HDMI IN terminal.
€) Connections Do not disconnect with a component video cable the video cable even if the below is connected. Some features Audio cable .1 (not included) The optical digital audio cable can be used when connecting to televisions with optical out terminals (_> right). TV Component Video cable (not included) COMPONENT Main unit ._-'m l'_,.'_ NOTE • • • • i_ may not be displayed. m ¸ Optical digital audio cable .
Connections to a Set Top Box, etc. Use the following connections when you want to output the original surround audio from your Set Top Box, cable TV, VCR, DVD recorder, etc. through this unit's speakers. • Do not connect through the video cassette recorder. Due to copy guard protection, the picture may not be displayed properly. • Turn off all equipment before connection. STB, VCR, DVD recorder, Refer to the operating instructions for the optimal connections. of the respective etc.
Radio antenna connections Main unit • Keep loose antenna cables away from other wires and cables. FM indoor antenna (included) Affix this end of the antenna where reception AM loop antenna (included) Stand the antenna up on its base. Place the antenna where reception is best. is best. White Red /_Black 75_ FM ANT ==1 Main unit Use a Phillips-head screwdriver, etc. (not included) Push! ® Do not screw too tightly. J 1 Use outdoor antenna if FM/AM radio reception is poor.
Broadband Network Connections The following services can be used when this unit is connected to the internet via a broadband connection. • Firmware can be updated (_ 32) • You can enjoy the BD-Live (_ 22) • You can enjoy the VIERA CAST (_ 32) Internet Main unit Straight LAN cable (not included) l_ 4 C3 -_'_--, Hub or broadband _] 1 Telecommunications (modem, etc.
SMART SETUP The SMART SETUP screen assists you to make the necessary settings. When the system is switched on for the first time, the SMART SETUP screen for the basic settings is displayed automatically. Follow the on-screen prompts to make basic settings for the system. i_ ¸ Preparation To optimize the surround sound experience we recommend that you setup the speaker output level using the Auto speaker setup function. Keep as quiet as possible during the Auto speaker setup.
Showing START menu Some functions of this unit can be operated from the START menu. O e.g., Press [(_] to turn on the unit. Press [START]. • Items displayed vary according to the chosen selector and media. _t --START iil _iI OK Press [A, ,] to select the item and press [OK]. Items Functions Playback DISC Playback Starts playing disc/SD Card. Top Menu Shows the disc top menu. Menu Shows the media menu.
Selecting the playback source Selecting the source from the START menu You can select sound modes, desired source, or access playback/menus the START menu. O i_ _t Press Press Press press by using ii_ ¸ [_] to turn on the unit. [START] to show the START menu. [A, ,] to select the item and then [OK]. oTo exit press [START]. O 5= ! Ji ;¸ ! i i iilCiiiiiiii Ciiiiiiiii iCiiiiiiiiiiiiiiiiiiiiiiiiiiiiiiiii i BDISD = = RADIO/EXT=IN iPod - Press [A, T] to make the setting.
Enjoying sound from all speakers and various sound effects eThe following sound effects/modes may not be available or have no effect with some sources, or when headphones are used (_ 19). eYou may experience a reduction in sound quality when these sound effects/modes are used with some sources. If this occurs, turn the sound effects/modes off. Changing Available i iil ii Mode iii i ill iCiiiiiiii _ ! EQ: (Equalizer) You can select sound quality settings. -FLAT (Flat): Cancel (no effect is added).
Basic operations Instructions for operations are generally described using the remote control in these operating instructions. Preparation Turn on the TV and select the appropriate video input on the TV. Inserting or removing a disc. 0 Press [_ OPEN/CLOSE] to open the disc tray. O Insert or remove the disc. ...... Inserting or removing an SD card. O Pull to flip down the front panel. O Insert the SD card into the SD card slot. Insert the card label up with the cut-off corner on the right.
Basic operations Other operations during play (These functions may not work depending on the media.) During playback, you can access specific recordings or scenes through direct entry of the numbered buttons. Play starts from the selected title or chapter. _iiiiiiiiiiiiiiii_i iiiiiiiiiiiiiiiiiii iiiiiiiiiiiiiiiiiiiiii _lD_Vj D_vj e.g., 5: 15: [0] => [0] => [5] [0] => [1] => [5] e.g.
Playing video recorded on a Video Camera or Video Recorder The status messages give you information about what is currently being played. Each time you press [STATUS], the information displayed will change. e.g.
Enjoying BD-LIVE or BONUSVIEW BD-Video |:]D]LvJ What is BONUSVIEW? BONUSVIEW allows you to enjoy 1.1/ Final Standard Profile. What is BD-Live? functions such as picture-in-picture or secondary audio etc., with BD-Video In addition to the BONUSVIEW function, BD-Video supporting BD-ROM Profile 2 that has a network extension functions such as subtitles, exclusive images and online games by connecting this unit to the Internet. In order have this unit connected to a broadband network (_ 14).
Playing still pictures Playback of a BD-RE, DVD-RAM/R/R DL, CD-R/RW, or SD card with still pictures recorded. (About structure of folders _ 44, "Structure of folders that can play back on this unit") O Insert a disc or an SD card. (_ 19) In e.g., _ BD-RE, DVD-RAM "Album View" screen is displayed. oWhen the "Title View" screen is displayed, press [G] to switch to the "Album View" screen. • If the DVD-RAM containing both JPEG and AVCHD format is inserted, the file selection menu may be displayed.
Playing still pictures Useful functions Start Slideshow during still picture play ..... Zoom out You can display still pictures one by one at a constant interval. BD-RE, DVD-RAM oWhile the "Album View' screen ,sd,splayed Press [A, T, <, I_] to select the album and press [SUB MENU]. ...................... @ Press [A, T] to select "Start Slideshow" and press [OK]. eYou can also start slideshow by pressing [1_ PLAY] after selecting the album.
Playing music r_l_l You can generally play any available music CD or MP3 file recorded onto a DVD-R/R DL and CD-R/RW. (About structure of folders _ 44, "Structure of folders that can play back on this unit") O Insert a disc. (_ 19) e.g. _ To switch from other menus to MP3 menu ! '_-J I (If the media Contains data in different fi!e PS • If a media containing data in different file formats is inserted, the file selection menu may be displayed. Press [A, T] to select "Play Music (MP3)" and press [OK].
Listening to the Radio Setting up the radio Listening/confirming channels O Numbered m buttons the preset Press [RADIO] to select "FM" or "AM". Press the numbered buttons to select the channel. = RADIO To select a 1-digit number e.g., 1: [1] => [OK]. To select a 2-digit number e.g., 12: [1] => [2] Alternatively, press [A, v] or ['_, I_]. = SEARCH SEARCH _-_ When a stereo FM broadcast is being received, "ST" lights in the display.
Enjoying TV, etc. with this unit's speakers You can enjoy TV broadcasts with this unit's speakers. Adjusting /i;¸¸ i ! the sound i C i_ You can adjust the mode depending on the source or situation. O Press [SOUND] several times to select the mode. • You can also press [SOUND] and then [A, T] to select the mode. • The selected effect will only be displayed on the main unit.
Linked operations (VIERA Link TM"HDAVI What is VIERA Control TM'') Link "HDAVI VIERA Link TM is a new name for EZ Sync TM. VIERA Link "HDAVI Control" is a convenient with the TV Control"? function • VIERA Link!!HDAVI Contror _,based on the control that offers linked operations of this unit, and a Panasonic TV (VlERA) under "H DAVl Control". You can use this function by connecting the equipment with an HDMI cable. See the operating instructions for connected equipment for operational details.
Automatic input switching When the following operations are performed, the TV will automatically switch the input channel and display the corresponding action. -When play starts on the unit -When an action that uses the display screen is performed (e.g., Direct Navigator screen) eWhen you switch the TV input to TV tuner mode, this unit will automatically switch to "AUX ''.1, "D-IN 1" (DIGITAL IN 1),1 or "D-IN 2" (DIGITAL IN 2) .2.
Using the iPod You can enjoy iPod music through this unit's speakers or view iPod videos/photos iPod on the TV. Connection Preparation • To view photos/videos from the iPod. -Ensure the video connection to the VIDEO OUT terminal on this unit (=> 10). -Operate the iPod menu to make the appropriate video/photo output settings for your TV. (Refer to the operating instructions of your iPod.) oTo display the picture, turn on the TV and select the appropriate video input mode.
iPod Playback This system features two different iPod playback modes. The first of these is EXTENDED mode, for playback of music and video contents. With this mode, you can operate the iPod from the main unit. The second mode is SIMPLE mode, which can be used for playback of three types of contents - music, photos, and videos. With this mode, simple operations such as play, stop, and search can be performed on the display of your iPod. O Press [iPod] to select "IPOD'.
Enjoying VIERA CAST TM You can access a selection of Internet services from the Home screen with VIERA CAST, for example YouTube, Picasa Photo Sharing. (Current as of February 2009) oVIERA CAST requires a broadband Internet connection. Dial-up Internet connections cannot be used. •Preparation Network connection (_ 14) • Network setting (_ 33) NOTE Press to select "BD/DVD" Press [BD/SD] [VlERA CAST]. or "SD". • Message is displayed.
Network settings These settings are used if you will connect this unit to the Internet. oThe connection to the Internet may take time or the Internet may not be connected depending It is required that you use a broadband connection. on the connection environment. (_ 40) Preparation oConnect to a broadband network. (_ 14) Setting the IP address Always test the connection when a LAN cable is connected. O l_ Press [BD/SD] to select "BD/DVD" Press [SETUP].
Network settings Setting the connection speed Setting the proxy server When the connection test results in "Fail" after the IP and DNS-IP addresses are assigned, perform the following settings. In most cases, default settings can normally be used without making any changes. Please use this setting when instructed to by your Internet service provider. After performing O O steps O to O (_ 33) Press [A, V] to select "Auto Detect Connection Speed" and press [_, I_] to select "Off".
Changing On-screen O i_ _t O Q with the on-screen settings menu operations e.g., BD-Video Press [BD/SD] to select "BD/DVD" or "SD". Press [DISPLAY]. Press [A, ,] to select the menu and press [1_]... Press [A, T] to select Menus the item and press [1_]. Press [A, T] to select the setting. i_'_ _ NOTE [ Items Signal Type eDepending on the condition Ofthe unit (playing, stopped, etc.
Changing settings with the on-screen menu To select these settings, perform steps O to Q (_ 35) "'"'"_ Play Illlf T-iIIlII'_'''''_r_ Repeat Play (Only when the elapsed time is being displayed on the unit's display.) Selects the item which you want to repeat. The items displayed differ depending on the type of disc. • All tracks All tracks • Chapter Chapter • Playlists Playlist • Title Title • One track Track •Off Select "Off" to cancel. Random _ While playing, press [A, T] to select *'On".
Changing the unit's settings Change the unit's settings if necessary. The settings remain intact even if you switch the unit to standby. Setup 0 Q 0 menu operations Press [BD/SD] to select "BD/ DVD" or "SD". @ While stopped NOTE Press [SETUP]. Press [A, V] to select the menu and press [OK]. Press [A, T] to select the item and press [OK]. TiPS oThere may be differences in operation methods.
Changing the unit's settings To select these settings, perform steps O to Q (_ 37) "Audio" Dynamic Range Compression _ _ (Dolby Digital, Dolby Digital Plus and Dolby TrueHD only) Change the dynamic range (_ 54) for late night viewing. • On • Auto: •Off Effective only when Dolby TrueHD is played. Digital Audio Output • Press [OK] to show the following settings.
"TV / Device Connection" TV Aspect Set to match the type of TV connected. When connected to a 16:9 widescreen TV: • 16:9: Video recorded for 4:3 aspect screen is displayed as a 4:3 ratio image in the center of the screen. When connected to a 4:3 aspect TV: • 4:3: Video recorded for a widescreen is played as Pan & Scan (unless prohibited by the producer of the disc). When playing BD-Video, video is output as "4:3 Letterbox'. • 4:3 Letterbox: Video recorded for a widescreen is played in the letterbox style.
Changing the unit's settings To select these settings, perform steps O to 0 (_ 37) "Network" IP Address/DNS Settings (_ 33) • Press [OK] to show the following settings. Connection Test IP Address IP Address Subnet • Oil • Off ( DHCP ) • Oil • Off Speed • Oil • Off Auto Configuration ( DHCP ) Mask Default Gateway DNS Auto Configuration Primary DNS Secondary DNS Auto Detect Connection Connection Speed Setting This is enabled only when "Auto Detect Connection turned "Off".
Speaker settings Adjusting the sound lag between speakers Delay time ([]) For optimum listening with 7.
Disc and card information Packaged discs This chart shows the different type of retail/commercial the discs and/or packaging. BD-Video High Definition (HD) movie and music discs • Discs supporting BD-Live (BD-ROM Profile 2) that allows interactive functions to be used when this unit is connected to the Internet in addition to the BONUSVlEW function.
SD cards This chart shows the different type of cards recorded with other devices that you can use. In these operating instructions, the cards shown in the table (=> below) are comprehensively Iri_ 11--4_it_ left41 _LN'=I =[_J * Including miniSD Card and microSD Card oA miniSD Card and a microSD Card must be used with the attached adaptor that comes with the card. eWhen using from 4 GB to 32 GB SD cards, only SD cards that display the SDHC logo can be used.
About MP3/JPEG files File format MP3 Playable media CD-R .1, CD-RW .1, DVD-R *_,_, DVD-R DL *_-_ Extension Files must have the extension JPEG ".mp3" or ".MP3". x x x x x x x x x x x x x between 34x34 and 8192x8192 (sub sampling is 4:2:2 or 4:2:0) rate x x x x x x x x x x x x x Files must have the extension ".jpg" or ".JPG". Picture resolution Compression x CD_R*I, CD_RW*I, DVD_RAM*2 DVD_R*I, 5, DVD-R DL .1-5, BD-RE .
Wireless connections Connecting the speakers (optional) with the optional • Wireless setup diagram e.g.,7.
Speaker installation options Front ([_T201_), surround and surround back speakers You can attach all of the speakers (except subwoofer) Center speaker to a wall. oThe wall or pillar on which the speakers are to be attached should be capable of supporting 10 kg (22 Ibs) per screw. Consult a qualified building contractor when attaching the speakers to a wall. Improper attachment may result in damage to the wall and speakers. (_ Drive a screw (not included) into the wall.
Troubleshooting guide Before requesting service, make the following checks. If you are in doubt about some of the check points, or if the solutions indicated in the chart do not solve the problem, refer to "Customer Services Directory (United States and Puerto Rico)" on page 58 if you reside in the U.S.A.and Puerto Rico, or refer to "Product information" on page 59 if you reside in Canada. The following do not indicate a problem • Regular disc rotating sounds. • Image disturbance during search.
Troubleshooting guide Displays Page TV screen and video RQT9371 The screen changes automatically. oWhen the "Screen Saver Function" in the Setup menu is set to "On", the display may return to the screen saver mode automatically if there is no operation for 10 minutes or more. Video is not output in high definition. • High definition video cannot be output through the VIDEO OUT terminal.
Sound Page Humming is heard during play. oAn AC power supply cord or fluorescent light is near the main unit. Keep other appliances and cables away from the main unit. Cannot oThere are discs for which audio cannot be changed because of how the disc was created. oWhen audio is output from the HDMI AV OUT terminal, you cannot switch the audio if "Dolby D/Dolby D +/Dolby TrueHD" or "DTS/DTS-HD" is set to "Bitstream". Set "Dolby D!Dolby D +/ Dolby TrueHD" or "DTS/DTS-HD" to "PCM'.
Troubleshooting guide Network Page Other difficulties with playback BD-Video or DVD-Video is not played. • Ensure the disc is for the correct BD-Video region code or DVD-Video region number, and is not defective. • You have set a ratings level to limit BD-Video or DVD-Video play. Change this setting. • Some BD-Video can only be output with HDMI. The BD-Live is not played with BD-Video. • • • • Confirm whether the disc supports the BD-Live.
Messages The following messages or service numbers appear on the TV or unit's display when something unusual is detected during startup and use. On the TV Page Cannot play. Cannot display oYou inserted an incompatible on this unit. disc (Discs recorded in PAL video, etc.). No disc is inserted, oThe disc may be upside down. Q This operation available. is not oSome operations are prohibited by the unit or disc.
Messages On the unit's display (continued) Page "_" is flashing. (when using the optional wireless accessory: SH-FX70) oThere is no link between this unit and the wireless system. Check that the wireless system is plugged into the household AC outlet and is turned on. • Ensure that the digital transmitter is fully inserted into the slot of this unit. • If the wireless system is not used, disconnect the digital transmitter from this unit. U59 • The unit is hot.
Language code list Enter the code with the numbered Abkhazian: Afar: Afrikaans: Albanian: Amharic: Arabic: Armenian: Assamese: Aymara: Azerbaijani: Bashkir: 6566 6565 6570 8381 6577 6582 7289 6583 6589 6590 6665 Basque: 6985 Bengali; Bangla: 6678 Bhutani: 6890 Bihari: 6672 Breton: 6682 Bulgarian: 6671 Burmese: 7789 Byelorussian: Cambodian: 6669 7577 buttons.
Glossary AVCHD AVCHD is a new format (standard) for high definition video cameras that can be used to record and play high-resolution HD images. BD-J Some BD-Video discs contain Java applications, and these applications are called BD-J. You can enjoy various interactive features in addition to playing normal video. BD-Live This is a BD-Video (BD-ROM Profile 2) that supports the new functions such as Internet connection, etc. in addition to the BONUSVIEW function.
JPEG (Joint Photographic Experts Group) This is a system used for compressing/decoding color still pictures. If you select JPEG as the storage system on digital cameras, etc., the data will be compressed to 1/10-1/100 of its original size. The benefit of JPEG is less deterioration in picture quality considering the degree of compression. LAN (Local Area Network) A group of linked devices in a company, school or home. Indicates the boundaries of a particular network.
Specifications SPEAKER • SECTION Front speakers SB-HF770 Type Speaker unit(s) Full range Input power (IEC) Output sound pressure Frequency range Dimensions (WX H X D) Mass (Weight) • Front speakers SB-HF470 Type Speaker unit(s) Full range Input power (IEC) Output sound pressure Frequency range Dimensions (WX H X D) Mass (Weight) • IBT200 1 way, 1 speaker system (Bass reflex) Impedance 3 6.5 cm (21/j ') Cone type 125 W (Max)*1 79 dB/W (1.
Listening Playable disc: BD-Video:BD-ROM Version 2 BD-RE: Version 3 (Single Layer, Dual Layer), JPEG .7 BD-R Version 2 (Single Layer, Dual Layer) DVD-RAM: DVD Video Recording format, AVCHD format .8, JPEG *_ DVD-R/DVD-R DL: DVD-Video format .2, DVD-Video Recording format .2, AVCHD format *z 8, JPEG,5, MP3 DVD-RW: DVD-Video format .2, DVD-Video Recording format .2, AVC HD format .28 +R/+RW/+R DL: Video .2, AVCHD format *z8 DVD-Video: DVD-Video format CD-Audio: CD-DA CD-R/CD-RW: CD-DA, JPEG .
Limited Warranty (Only for U.S.A. and Puerto Rico) Panasonic Consumer Electronics Company, Division of Panasonic Corporation of North America One Panasonic Way, Secaucus, New Jersey 07094 Panasonic Home Theater Limited Warranty Coverage (For U.S.A.
Limited Warranty (ONLY FOR CANADA) Panasonic Canadalnc. PANASONIC PRODUCTmLIMITED WARRANTY Panasonic Canada Inc. warrants this product to be free from defects in material and workmanship period as stated below from the date of original purchase.
Index O AC Power Connection ............ Angle .......................... Audio Attribute ...................... Changing audio ................. Channel ...................... Language .................. AVCHD ......................... 35 20 35 35, 37 54 O BD-J ........................... BD-Live ..................... BD-Video Ratings ................ BONUSVIEW ................. 54 22, 54 37 22, 54 • Chapter ........................ Cleaning Disc .......................... Lens .......................