
Operation Manual


10
RQT6817
Simple setup
The QUICK SETUP screen appears when you press [SETUP] the
first time after purchase and assists you to make necessary
settings. You can access this screen again later if you need to
(➡ page 30, Others—QUICK SETUP).
Preparation
Turn on the television and select the appropriate video input on the
television to suit the connections for the unit.
1 Press [Í] to turn on the unit.
2 Press [1 DVD/CD] to select “DVD/
CD” as the source.
Press [∫] when a disc is in the tray.
3 Press [SETUP] to show the QUICK
SETUP screen.
4 Press [3, 4, 2, 1] to select the
menu language and press [ENTER].
5 Press [3, 4] to select “Yes” to
continue and press [ENTER].
6 Press [3, 4, 2, 1] to select the item
and press [ENTER].
≥Audio Language (➡ page 30)
≥Subtitle Language (➡ page 30)
≥TV Type (➡ below)
≥TV Aspect (➡ below)
≥AV Output
§1
(➡ page 30)
≥Progressive Out
§2
(➡ page 30)
≥PCM Digital Output (➡ page 30)
§1
For the United Kingdom, Continental Europe and Russia
§2
For Australia, N.Z. and Southeast Asia
7 Press [ENTER] and then [SETUP] to
end the settings.
To return to the previous screen
Press [RETURN].
∫ TV Type
Select to suit the type of television.
≥Standard (Direct View TV) (factory preset)
≥CRT Projector
≥LCD TV/Projector
≥Projection TV
≥Plasma TV
∫ TV Aspect
Select “4:3” (regular) or “16:9” (widescreen) to suit your
television.
If you have a regular 4:3 television, you can also select how video
on some discs is shown (➡ page 30, Video—TV Aspect).
≥4:3 Pan&Scan (factory preset)
Widescreen software is expanded to fill the
screen of a 4:3 aspect television (unless
prohibited by the producer of the disc).
≥4:3 Letterbox
Widescreen software is shown in the
letterbox style on a 4:3 aspect television.
[For\Australia,\N.Z.\and\Southeast\Asia]
∫ To enjoy progressive video
1 Connect to the component video input terminals on a 480P
compatible television (➡ page 8). (Video will not be displayed
correctly if connected to an incompatible television.)
2 In QUICK SETUP, set “Progressive Out” to “Enable”.
3 Change “Video output mode” to “480P” (➡ page 25).
≥All televisions manufactured by Panasonic and that have 480P
input connectors are compatible. Consult the manufacturer if you
have another brand of television.
≥If the unit is connected to the television through VIDEO OUT or
S-VIDEO OUT, output will be interlace, irrespective of the
settings.
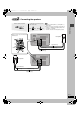
STEP6 QUICK SETUP
TVÍ
TV/AV
SETUP
PROGRAM
132
465
798
0
S
10
REPEAT
AUDIO
TU
N
E
R
/A
U
X
D
IR
EC
T
NAVIGATOR
TOP MENU
PLAY LIST
M
ENU
CANCEL
MUTING
VOLUME
SUBTITLE
PLAY MODE
CLOCK/
TIMER
SLEEP
F
PLAY
Í
P.MEMORY
TV VOL
r
TV VOL
s
PAG E
ENTER
GUI DISP
DISPLAY
QUICK REPLAY
ZOOM
SHIFT
SURROUND
CINEMA D.ENH
SUBWOOFER
SOUND
DOUBLE
RE-MASTER
SLOW/SEARCH
ANGLE
RETURN
TV
CH
X
TV
CH
W
X SKIP W
GROUP
DVD/CD
ENTER
1
2
RETURN
3, 7
4–7
SELECT
SETUP
QUICK SETUP
Select the menu language.
ENTER RETURN
English
Français
Español
Deutsch
Italiano
Português
Svenska
Nederlands
6817b-p04-25.fm 10 ページ 2003年7月4日 金曜日 午後6時15分