Operating Instructions CD Stereo System Model No. SC-EN38DB Note “EB” on the packaging indicates the United Kingdom. These instructions are applicable to the following systems. System SC-EN38DB Main unit SA-EN38DB Speakers SB-EN38 Dear customer Thank you for purchasing this product. Before connecting, operating or adjusting this product, please read the instructions completely. Please keep this manual for future reference. EB SC-EN38DB_EB (RQTV0294)_MP.
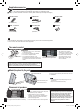
Supplied accessories Please check and identify the supplied accessories. Use numbers indicated in parentheses when asking for replacement parts. (Product numbers correct as of January 2008. These may be subject to change.) 1 Remote control 1 FM antenna (N2QAYB000245) 1 Support stand (REXV0088A-1) 1 DAB “T” antenna (RYQX0512-H) 1 AC mains lead (N1EADY000001) 2 Batteries (RFAX0025) Note • The included AC mains lead is for use with this unit only. Do not use it with other equipment.
Control guide 1 [SLEEP] Sleep timer setting (12) 2 Standby/on switch [^], [8] (5, 12) Press to switch the unit from on to standby mode or vice versa. In standby mode, the unit is still consuming a small amount of power.
➡ Page 3 for the buttons position of remote control and main unit. Connections 1 Speakers 2 DAB “T” antenna The cross bar of the T should be kept firmly stretched. Find a position with good reception. There is a function on the unit to check signal quality. (refer to page 9) Red Black 2 Be sure to fully tighten the screw. 1 Black (-) Red (+) Adhesive tape For best reception A DAB outdoor antenna is recommended.
➡ Page 3 for the buttons position of remote control and main unit. Disc operations Basic play Press [8] to turn the unit on. Press [;, OPEN/CLOSE] to open the CD lid and then set the CD in place. Press [;, OPEN/CLOSE] again to close the lid. Keep fingers away from the CD lid when it is closing to avoid possible minor injury. Label must face outward. Press until you hear it click into place. Program play The function allows you to program up to 24 tracks.
Disc operations (continued) Note on CD-R and CD-RW This unit can play CD-R and CD-RW recorded with CD-DA or MP3. Use an audio recording disc for CD-DA and finalize* it when you finish recording. The unit may not be able to play some discs due to the condition of the recording. * A process performed after recording that enables CD-R/CD-RW players to play audio CD-R and CD-RW. Caution Choose discs with this mark: Do not: • use irregularly shaped CDs. • attach extra labels and stickers.
DAB DAB stands for digital audio broadcasting. It is a new form of radio that is broadcast digitally. Unlike regular analogue broadcasting, digital radio deteriorates less, and is thus able to provide quality sound close to that of a disc. y ms. ereo). DAB structure mats). e Bands essions oa Frequencies There are two types of DAB bands, “BAND III” (Receivable in this unit) and “L BAND” (Not broadcast in the United Kingdom, and not receivable on this unit).
DAB (continued) Display DAB Auto Scan Press and hold [PLAY MODE] until “DAB AUTO SCAN” appears. When a frequency is tuned by Auto scanning on this unit, the ensemble corresponding to the frequency is displayed for approximately 2 seconds. Note • When updating memory with Auto scan, preset stations are not erased or changed. • When a frequency cannot be received, the previous memory is restored. • Total stations received is displayed for approximately 2 seconds.
DAB (continued) Checking the DAB signal quality To improve reception by adjusting the antenna while monitoring signal quality on the display. Press [DAB MENU] to enter menu mode. Note “SCAN FAILED” appears if no stations are memorized. If this occurs, adjust the antenna and try Auto scanning or change the Auto scan frequency range. Within 10 seconds, press [ or , ALBUM] to select “SIGNAL QUALITY” and then press [ENTER]. DAB Press [ or , ALBUM] to select the frequency.
➡ Page 3 for the buttons position of remote control and main unit. External unit Enjoying audio from iPod g Inserting the iPod g Charging the iPod Push to open the Built-in iPod Dock and then press down until a click sound is heard. Insert the suitable dock adapter for your iPod. Insert your iPod into the dock. • Hold the dock when connecting/disconnecting the iPod. • Recharging starts when the iPod is inserted.
rging arging l not ng USB operations MP3 The USB connectivity enables you to connect and play MP3 tracks from USB mass storage class. Typically, USB memory devices (Bulk only transfer). Preparation: Before connecting any USB mass storage device to the unit, ensure that the data stored therein has been backed up. It is not recommended to use a USB extension cable. The device connected via the cable will not be recognised by this unit. Reduce the volume and connect the USB mass storage device.
➡ Page 3 for the buttons position of remote control. Timer This is a 24-hour clock. Press [CLOCK/TIMER] to set the clock. Press [u, 2] or [i, 1] to select the time within 5 seconds. (Press and hold to change the time faster.) Press [CLOCK/TIMER] again. g To display the clock when the unit is on Press [CLOCK/TIMER] Note • The clock is accurate to within ±60 seconds a month. Readjust if necessary. • Set again after disconnecting the AC mains lead or power failure.
Troubleshooting guide Before requesting service, make the following checks. If you are in doubt about any of the check points, or if the solutions indicated in the chart do not solve the problem, consult your dealer for instructions. No play. • The disc isn’t correctly set. • The disc is scratched or dirty. (Tracks skipped.) • There is moisture on the lens. Wait for about an hour and then try again. MP3 cannot be read.
Troubleshooting guide (continued) DAB DAB reception is poor • Keep the antenna away from computers, televisions, other cables and cords. • Use an outdoor antennas. (➡ page 7) DATA • Data broadcast being received over the DAB broadcast signal. Cannot be used on this unit. SCRAMBLED • The broadcast station being received cannot be accessed. NO SERVICE • The station is currently not broadcasting. NO SIGNAL • This station cannot be received. Check your antenna.
without by the Placement Set the unit up on an even surface away from direct sunlight, high temperature, high humidity, and excessive vibration. These conditions can damage the cabinet and other components, thereby shortening the unit’s service life. Do not place heavy items on the unit. Voltage Do not use high voltage power sources. This can overload the unit and cause a fire. Do not use a DC power source. Check the source carefully when setting the unit up on a ship or other place where DC is used.
Caution for AC Mains Lead For your safety, please read the following text carefully. This appliance is supplied with a moulded three pin mains plug for your safety and convenience. A 5-ampere fuse is fitted in this plug. Should the fuse need to be replaced please ensure that the replacement fuse has a rating of 5-ampere and that it is approved by ASTA or BSI to by BS1362. ASTA or BSI to BS1362.